When I was a little girl, getting to go play at my great-grandmother’s house (whom we’ve always called “Baba”) was a huge treat for my big sister and me. Her house was always warm and inviting and she always had something fun for us to do, whether it was letting us rummage through her jewelry boxes, playing paper dolls, or making mud pies in the back yard. She also had a great talent for telling stories. One of our favorite things was sitting in the floor, listening to Baba tell funny stories from her childhood, or of she and her husband, or my personal favorite – Peter Rabbit.
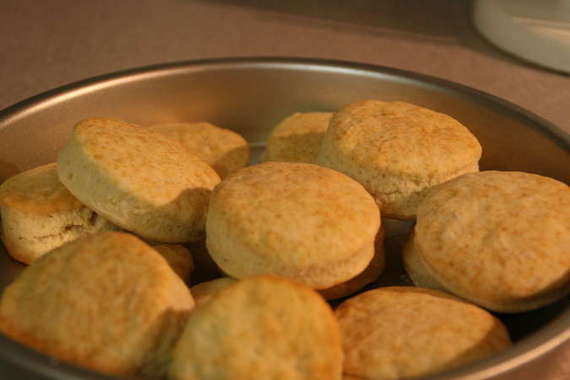
However, one of my fondest memories of afternoons at Baba’s house were spent sitting on her kitchen counter tops watching her make homemade buttermilk biscuits. Baba is one heck of a good cook – her fried chicken, coconut cake, and peach cobbler (especially her peach cobbler), and buttermilk biscuits, to name a few, cannot be matched. But, this post is just about her biscuits, so I’ll get back on track (but trust me, you’ll definitely be seeing many more of Baba’s recipes on here!). When I was a kid, I loved the taste of the raw biscuit dough, and she would let me have the little “scraps” that were leftover from cutting out the circles. Baba’s biscuits always tasted fantastic with breakfast or dinner, but my personal favorite way to eat them was with butter and sugar (sugardy butterdy biscuits, we called them as kids….I know, we were weird kids, I guess).
I’ve always been scared to re-create recipes of Baba’s; I guess because I know they’ll never be half as good as hers were (plus, there’s just something about a recipe made by your grandmother that makes it taste extra special). However, after some encouragement from my mother, I decided to try my hand at Baba’s buttermilk biscuits. Of course, as I suspected, they weren’t as good as hers, but they weren’t half bad, either……
Buttermilk Biscuits
adapted from The American Woman’s Cookbook
2 cups all purpose flour
½ teaspoon baking soda
1 teaspoon baking powder
1 teaspoon salt
2 tablespoons cold shortening (plus 2 more tablespoons for greasing pans)
1 cup cold buttermilk
Preheat oven to 450 degrees.
Sift all dry ingredients together
In a food processor, pulse shortening and flour mixture together until it resembles coarse meal. (or you can do it the old fashioned way- nix the food processor and cut the shortening in by hand)
Add the buttermilk and mix until dough forms a ball. (it will be sticky)
Dump the dough out of floured surface and form into a ball (you’ll need to add a little more flour to be able to do this – approx. 1 or 2 teaspoons)
roll dough out about ¾ of an inch thick; using a biscuit cutter, or round cookie cutter, cut out biscuits.
Place a tablespoon of shortening in a cake pan and let it melt in the oven for a minute or so (you’ll probably need two cake pans)
Place each biscuit in the warm cake pans after turning them in the melted shortening to coat.
Bake for 8-10 minutes or until golden brown.
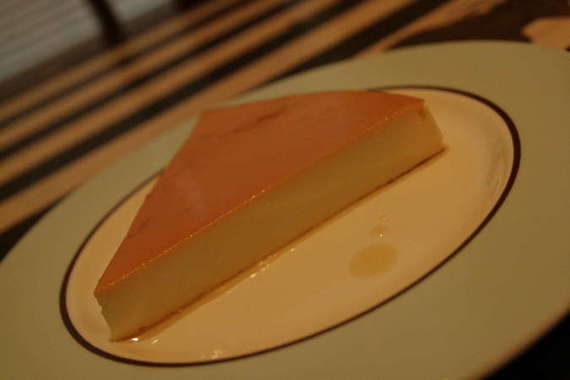
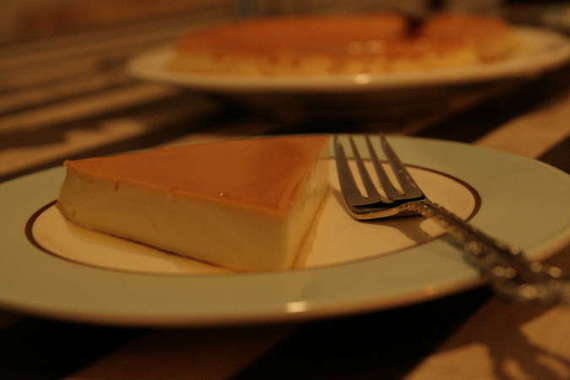
Since we were having Mexican food for dinner, I decided Flan would be a great dessert. I’ve made it before, using a recipe I found on allrecipes.com and it was delicious, but since I just got Baking: From My Home to Yours by Dorie Greenspan this week (pretty much the best cookbook I’ve ever owned), I decided to try Dorie’s recipe.
I know this was one of the recent “Tuesdays with Dorie” recipes, but unfortunately, my sweet little blog didn’t exist yet, so I couldn’t partake in this delightful challenge (but I certainly enjoyed reading everyone else’s entries!). Maybe now that I have a blog, I’ll become the latest member of the “TWD” craze!
So, what can I really say about this recipe that most of you don’t already know? It’s delicate, it’s dainty, it’s downright delicious. It was the perfect end to a tasty Mexican dinner! Enough said!
Caramel Topped Flan
from Baking: From My Home to Yours by Dorie Greenspan
For the Caramel
1/3 cup sugar
3 tbsp water
squirt of fresh lemon juice
For the Flan
1-1/2 cups heavy cream
1-1/4 cups whole milk
3 large eggs
2 large egg yolks
Getting Ready: Center a rack in the oven and preheat the oven to 350 degrees F. Line a roasting pan or a 9-x-13-inch baking pan with a double thickness of paper towels. Fill a teakettle with water and put it on to boil; when the water boils, turn off the heat.
Put a metal 8-x-2-inch round cake pan-not a nonstick one-in the oven to heat while you prepare the caramel.
To Make the Caramel: Stir the sugar, water and lemon juice together in a small heavy-bottomed saucepan. Put the pan over medium-high heat and cook until the sugar becomes an amber-colored caramel, about 5 minutes-remove the pan from the heat at the first whiff of smoke.
Remove the cake pan from the oven and, working with oven mitts, pour the caramel into the pan and immediately tilt the pan to spread the caramel evenly over the bottom; set the pan aside.
To Make the Flan: Bring the cream and milk just to a boil.
Meanwhile, in a 2-quart glass measuring cup or in a bowl, whisk together the eggs, yolks and sugar. Whisk vigorously for a minute or two, and then stir in the vanilla. Still whisking, drizzle in about one quarter of the hot liquid-this will temper, or warm, the eggs so they won’t curdle. Whisking all the while, slowly pour in the remainder of the hot cream and milk. Using a large spoon, skim off the bubbles and foam that you worked up.
Put the caramel-lined cake pan in the roasting pan. Pour the custard into the cake pan and slide the setup into the oven. Very carefully pour enough hot water from the kettle into the roasting pan to come halfway up the sides of the cake pan. (Don’t worry if this sets the cake pan afloat.) Bake the flan for about 35 minutes, or until the top puffs a bit and is golden here and there. A knife inserted into the center of the flan should come out clean.
Remove the roasting pan from the oven, transfer the cake pan to a cooking rack and run a knife between the flan and the sides of the pan to loosen it. Let the flan cool to room temperature on the rack, then loosely cover and refrigerate for at least 4 hours.
When ready to serve, once more, run a knife between the flan and the pan. Choose a rimmed serving platter, place the platter over the cake pan, quickly flip the platter and pan over and remove the cake pan-the flan will shimmy out and the caramel sauce will coat the custard.
Yield: 6 to 8 Servings
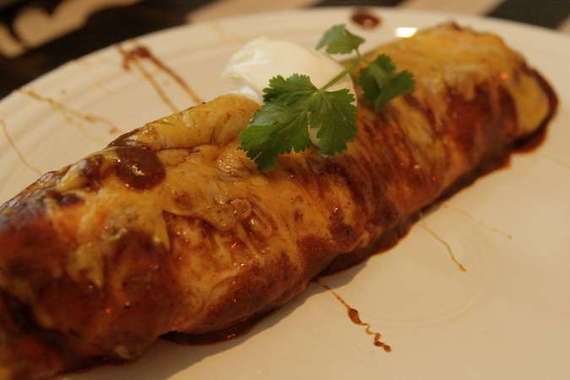
Sorry for the cheesy title….you can thank Joel for that. 🙂 Hey, I guess I should just be thankful he takes an interest in my blogging, right? Anyway, tonight’s dinner got off to a very rocky start, but finished strong. I had a hankering for chicken enchiladas and discovered a really delicious-sounding recipe from Renea of Sweet, Savory, Southern.
So, everything was going along great – Joel had just walked through the door, I was really organized, dinner was just about ready – all I had to do was make the sauce and throw the enchiladas in the oven. I had just started my sauce – I added the oil to the pan, then the flour and spices, yadda, yadda… as I was stirring, I happened to notice the mixture seemed a little thin, even after adding the flour. So I went back and checked my recipe…um, ¼ cup of oil…NOT ONE cup!!! Yeah – I used an entire cup of oil as opposed to the ¼ of a cup that the recipe called for. I have no idea where I got that….so, to try to fix things, I just added a whole bunch more flour…and spices….and used up all the rest of the chili powder I had. I ended up with a giant saucepan full of MUCK. Poor Joel had to get back out and go to the store for me (since I had used up all my chicken broth and chili powder) so I could attempt the sauce again. Luckily, the second time around was muuuuuuuuch better (and didn’t end with me dumping the pan in the sink and throwing kitchen utensils every-which-direction).
This isn’t your usual, run-of-the-mill Sour Cream Chicken Enchilada – in fact, that’s why I chose this recipe – there’s no sour cream! Now, for those of you who can’t fathom a chicken enchilada sans the sour cream, don’t worry: this dish definitely delivers (Renea knows what she’s doing!)! The chili gravy topping is full of flavor and spice – topped with gooey, melty cheese and a dollop of cool sour cream (so, I guess there’s a little sour cream in the recipe…), its a perfect enchilada, in my opinion (and Joel’s). Even though this recipe calls for chicken, I think it would be fantastic with beef or ground turkey as well – whatever tickles your enchilada-fancy!

Chicken Enchiladas
(from Renea at Sweet, Savory, Southern)
2 boneless, skinless chicken breasts, cooked and shredded
1/2 a green bell pepper, finely chopped
1/2 onion, finely chopped
2 Tbsp olive oil
1 tsp garlic powder
salt and pepper to taste
2 cups chili gravy (recipe follows)
4 flour tortillas (I had enough filling for 5-6 tortillas)
1 cup shredded cheddar cheese
Preheat oven to 350. Heat olive oil in a skillet over medium heat.
Add onion and peppers and cook for about 5 min. Add shredded chicken and stir. Add salt, pepper, and garlic powder. Remove from pan and set aside. Using the same pan, make the chili gravy as follows.
Chili Gravy
1/4 cup lard (she used vegetable oil and so did I)
1/4 cup flour
1/2 tsp black pepper
1 tsp salt
1-1/2 tsp powdered garlic
2 tsp ground cumin
1/2 tsp dried oregano (Mexican oregano is preferred if it’s available)
2 T chili powder
2 cups chicken broth (or water)
Heat the oil in a skillet over medium-high heat. Stir in the flour and continue stirring for 3 to 4 minutes, or until it makes a light brown roux.
Add all the dry ingredients and continue to cook for 1 minute, constantly stirring and blending ingredients. Add chicken broth or water, mixing and stirring until the sauce thickens. Turn heat to low and let sauce simmer for 15 minutes.
Once the chili gravy is done, add 1/2 a cup to the chicken mixture and stir. Spoon the chicken mixture into the flour tortilla shells and roll up. Spread another half cup of the sauce in the bottom of a baking dish and place the rolled tortillas in the dish. Top with the remaining cup of sauce and shredded cheese. Cover with foil and bake for 20-25 min. (I baked for 15 minutes minus the cheese, then added the cheese and cooked for 5 minutes more – just to melt the cheese)
Prep time: 12-15 minutes
Cook time: 20-25 minutes
Serves: 3 to 6 (depending on appetites)
This was a pretty uneventful Saturday, but sometimes those are nice…
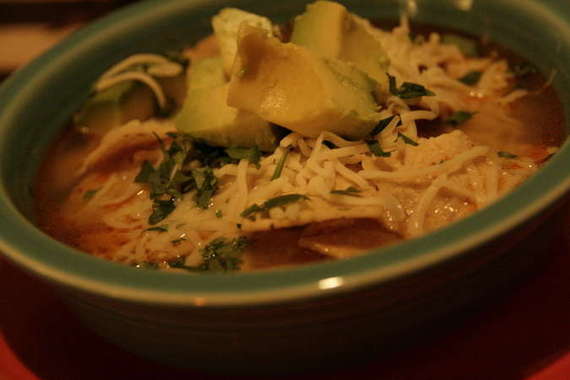
We had originally planned on going out, but the more I thought about it, the more I didn’t want to mess with getting dressed, fixing my hair and putting on makeup…all that stuff. Plus, I couldn’t think of one single restaurant that sounded good. It was a little chilly and dreary outside, so I thought it might be fun to just stay in, eat something “comforting” and watch a movie. So, I decided on Chicken Tortilla Soup. This soup is one of our all time favorites. It takes no time to make and it’s “no-fail”, not to mention delicious. The lime juice adds such great flavor, and the melty cheese with the cool avocados and fresh, bright cilantro….Y.U.M. That’s all I can say….
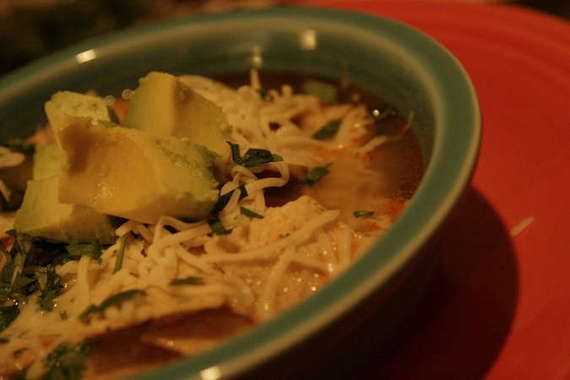
Chicken Tortilla Soup
-adapted from Williams-Sonoma: Food Made Fast: Soup
6 cups chicken stock, homemade or purchased (I use reduced sodium)
2 cups cooked, shredded chicken (I like to roast mine)
½ white onion, chopped
(I also add 2-3 zucchinis, chopped)
2 teaspoons chili powder (I also use 1 teaspoon or so of cumin)
juice from 3-4 limes
salt and pepper to taste
1 cup crumbled tortilla chips
Coat a large saucepan with olive oil over medium-high heat, add onion and zucchini and saute until tender, about 3 minutes. Add the chili powder and stir until fragrant. Pour in stock and bring to a boil. Add the shredded chicken, reduce the heat to medium and simmer until the chicken is heated through. Add the lime juice and salt and pepper to taste. Ladle into bowls and top with tortilla chips and garnishes.
Garnish ideas:
shredded Monterey Jack cheese
chopped avocado
fresh chopped cilantro


