Oh my gosh, I was so excited when I peeked in over at the TWD blog and saw that this week’s recipe was going to be Apple Cheddar Scones…I have seriously been dying to try these ever since I first got my copy of Baking From My Home to Yours! So, a big, fat THANK YOU to Karina of The Floured Apron for picking these yummy little scones!

Actually, I’ve never made scones before so I was curious about how easy/hard these might be to make, but surprisingly, they were totally easy! They didn’t take long at all. Most of the TWD bakers mentioned how sticky the dough was….definitely true! Pretty sticky stuff, but I rolled it out with plenty of flour and it was easily workable.
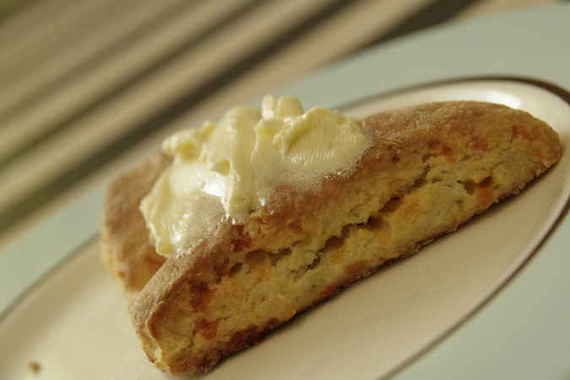
The recipe calls for dried apples, but my crummy Tom Thumb (yes I’m naming names!) doesn’t carry them, so I decided to take my chances and try fresh apples. I was a little worried they might give off too much liquid and make the scones soggy, but they came out perfectly! I think the little chunks of fresh baked apple in scones added great flavor and texture!
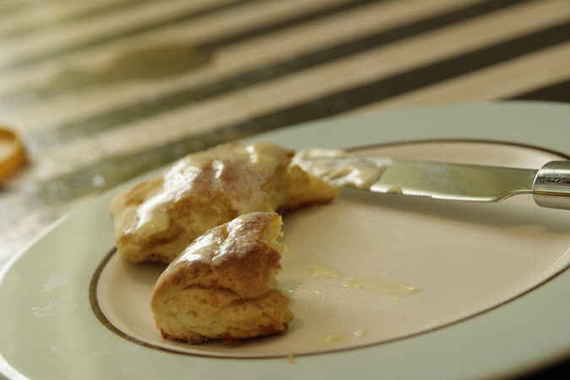
These were pretty darn tasty served warm with lots of honey butter – I’m really looking forward to having them for breakfast tomorrow with my coffee or a hot cup of tea!
I’m also really looking forward to next week’s recipe – Double Crust Blueberry Pie chosen by Amy of South In Your Mouth. Check back, cause it’s gonna be GOOD!

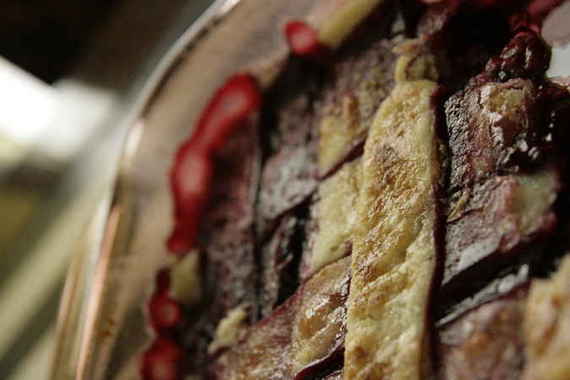
No, I didn’t use Dorie’s recipe for the biscuit topping. Shoot me. Sorry, but I don’t believe in cobblers with “biscuit topping” – that’s just not how its done in my family. I’m sure Dorie’s recipe is perfectly delicious – but if I’m going to make a cobbler, I’m going to use my great grandmother’s crust recipe. Everything else is just like Dorie calls for – just not the topping. And guess what – it was delicious! Every week, I follow the recipe exactly how its written – I’m a good little TWD member….just not this week. Don’t worry, next week I will definitely be making the Apple Cheddar Scones exactly as Dorie calls for; I promise I’ll go back to being a good girl. 🙂
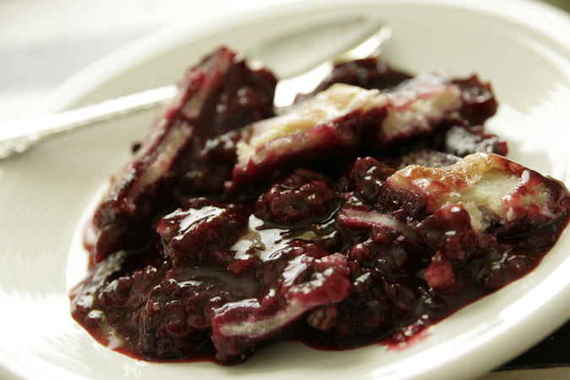
This weeks’ recipe was the Mixed Berry Cobbler chosen by Beth of Our Sweet Life.
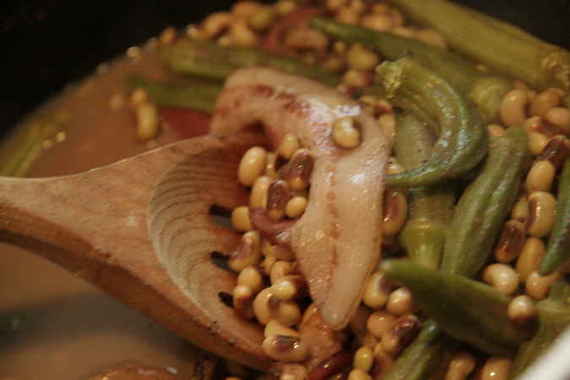
Yes, I know – I’ve been MIA for about a week now….its been a little crazy lately, with us buying a house and all, but no worries – I’M BACK! I know all of my loyal readers have really missed me, (all three of you) and I’ve definitely missed the food blogging community too! I haven’t been doing a lot of cooking lately, but my mom and I went to the Dallas Farmer’s Market yesterday and stocked up on all kinds of fresh, delicious fruits and veggies – including a big bag of purple hull blackeyed peas, which I decided would be a good way to get back into the blogging groove!
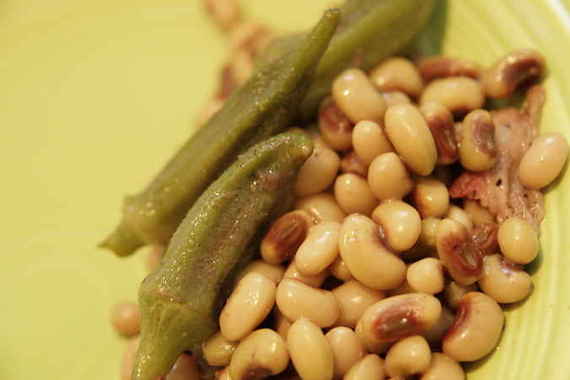
Every summer, my mom always makes a big pot of blackeyed peas with okra- usually served with cornbread and fresh sliced tomatoes (a pretty typical southern meal) – its one of those summer meals I just couldn’t live without! However, I’ve never actually made them myself! So when I saw that they had fresh peas and okra at the market – I decided now would be the perfect time to try my hand at them!
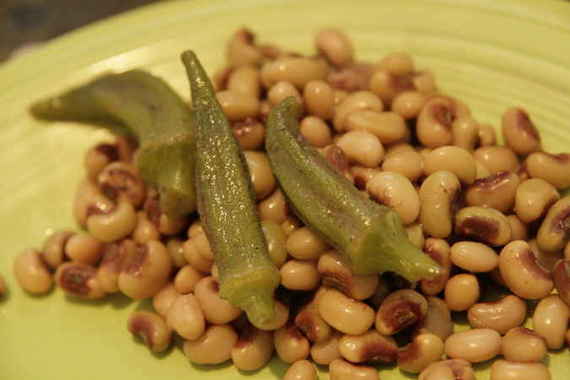
These peas are so easy to fix (after two or three phone calls to my mom making exactly sure how to do it) – just give them a good rinse, season with plenty of salt and pepper, throw them in a large pot with 3 – 4 thick slices of bacon and enough chicken broth to cover the peas, bring to a boil then lower the heat and simmer for about 2 hours or until tender. When they’re pretty much done cooking, throw in some fresh okra and let them cook for about 10- 15 more minutes and you’re done! I must say, this was one of the best batches of blackeyed peas I’ve had! And so easy!
Now, if you want to be REAL “southern” about it (the way my Daddy eats it), take a piece of cornbread, slice it in half and lay both sides on the plate; then cover the cornbread with a big spoonful of peas and PLENTY of the yummy “juice” (or “pot-lick” as we call it in my family – don’t ask.) and you’ve got yourself a mighty tasty dish! However you decide to serve and eat your blackeyed peas – they’re DELISH!

Obviously, I didn’t do this week’s recipe exactly as called for. Marie of A Year From Oak Cottage chose La Palette’s Strawberry Tart. I love strawberries – especially in the summer – but for some reason I just wasn’t in the mood for strawberries that day. And as I was trying to think of a substitute fruit, its like there was a little voice in my head chanting, “apricots! apricots! apricots!” Ok then, fine. I’ll do apricots. Good thing I did, too, because this turned out beautifully!!

I tossed my apricots with a little sugar, some fresh lime juice and a splash of coconut rum and let them macerate for about an hour. I spread my (amazingly delicious!) tart shell with a thick layer of good apricot jam, dumped on my apricots and dug in! WOW was this good!!! Honestly, my favorite part was the tart shell….it was like a shortbread cookie!! However, the apricot part was pretty darned tasty, if I do say so myself!

Sorry, but I won’t be posting Dorie’s recipes on my blog anymore – there are just too many of us (Tuesdays with Dorie members) now, and we wouldn’t want Dorie’s book sales to go downhill!! (Sorry Dorie!!) So, if you would like the recipes….buy the book!! Trust me, its the best cookbook you’ll ever own and you’ll be GLAD you bought it!!!
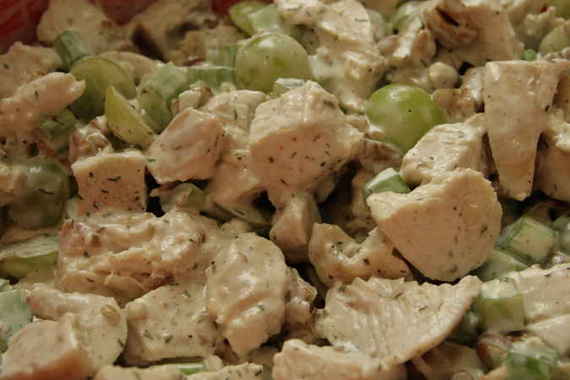
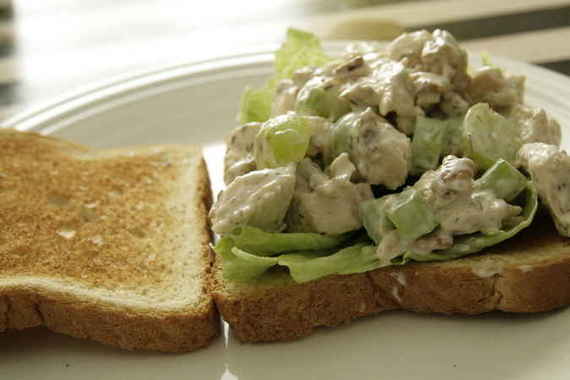
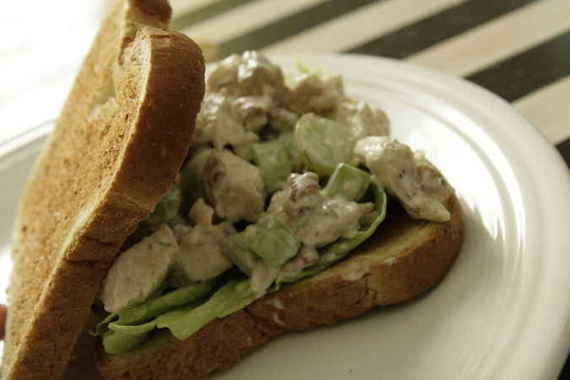
For those of you who don’t know – Pioneer Woman is a cooking blog I really enjoy reading. Her recipes are really reasonable, simple, and of course, very tasty! She reminds me a lot of my big sister, Lindsay – they have the same sharp, witty personality. Maybe that’s why I love her blog so much… Anyway, I saw her recipe for chicken salad recently and decided I just had to try it (chicken salad is big in my family!). As usual, it was very simple to make and tasted pretty good too – not as good as my mom’s (hi, mom!), but you know how that goes…nothing is ever as good as mom’s.
Pioneer Woman’s Chicken Salad
1 whole fryer, cut up and poached
2-3 stalks celery, chopped
green (or red) grapes, cut in half (as much as you’d like, really)
fresh chopped dill
1/2 cup mayonnaise
1/2 cup plain yogurt or sour cream (I used sour cream)
tablespoon or 2 fresh lemon juice
tablespoon brown sugar
salt and pepper to taste
pinch cayenne pepper
After chicken has been poached and cooled – cut into small chunks. Toss in a large bowl with chopped celery and grapes (I also added some chopped pecans.) In another bowl, mix mayo, yogurt, dill, lemon juice, brown sugar, salt and pepper, and cayenne together. Pour over chicken/grape/celery mixture and toss to coat. Let sit in the refrigerator for at least 2 or 3 hours (overnight is best) so all the flavors can “marry”. Pioneer Woman adds that you can also add some chopped bacon if you want! Yum!
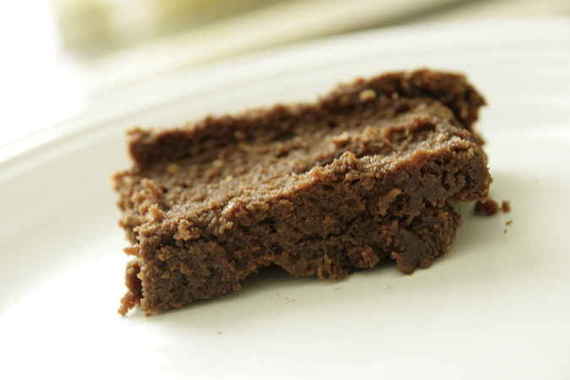
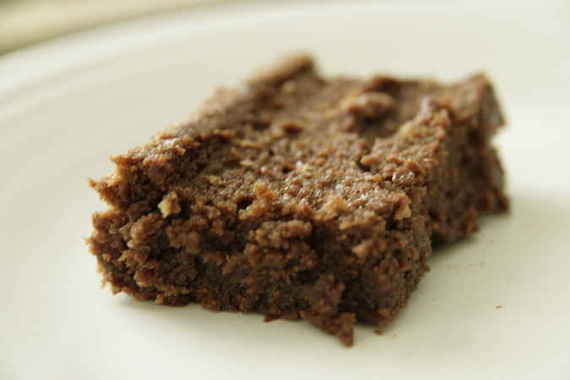
This week’s TWD recipe was French Chocolate Brownies chosen by Di of Di’s Kitchen Notebook. I have to say – these are some pretty unusual brownies. Granted, Dorie originally intended for them to be more of a cake than brownies, so the texture is a bit different from what I’m used to. However, these were pretty darn tasty and we really enjoyed them! I left out the raisins (Of course -blech!) and pulled them out of the oven a little early – because that’s how I like my brownies – GOOEY! I also added a shot (or less) of Godiva Liquor to the batter, just because I felt like it. After baking and slightly cooling, these were still very ooey gooey on the inside (which only added to their appeal as far as I’m concerned!), but at the same time, they were very light and surprisingly fluffy – almost like a “moussey” texture! And that pinch of cinnamon really added something special, in my opinion! Like everyone else, my brownies had a crust on top after baking (as they should), but I personally don’t like the “crust” so I just picked it off and took my pictures “sans brownie crust”.
Speaking of pictures……these aren’t very pretty. In fact, I’d go so far as to say they look like POO. But, I’m very new at this whole photography thing (I’m just a yuppee with a nice camera!), and I haven’t quite mastered the art of making food look pretty yet. I really admire those food bloggers who do such clever things with their food and take such beautiful, unique pictures – but for now, I’m just not that girl. But don’t worry – I’ll get there!!
French Chocolate Brownies
1/2 cup all-purpose flour
1/8 teaspoon salt
1/8 teaspoon cinnamon (optional)
1/3 cup raisins, dark or golden
1 1/2 tablespoons water
1 1/2 tablespoons dark rum
6 ounces bittersweet chocolate, finely chopped
1 1/2 sticks (12 tablespoons; 6 ounces) unsalted butter, at room temperature and cut into 12 pieces
3 large eggs, at room temperature
1 cup sugar
Getting ready: Center a rack in the oven and preheat the oven to 300°F. Line an 8-inch square baking pan with foil, butter the foil, place the pan on a baking sheet, and set aside.
Whisk together the flour, salt and cinnamon, if you’re using it.
Put the raisins in a small saucepan with the water, bring to a boil over medium heat and cook until the water almost evaporates. Add the rum, let it warm for about 30 seconds, turn off the heat, stand back and ignite the rum. Allow the flames to die down, and set the raisins aside until needed.
Put the chocolate in a heatproof bowl and set the bowl over a saucepan of simmering water. Slowly and gently melt the chocolate, stirring occasionally. Remove the bowl from the saucepan and add the butter, stirring so that it melts. It’s important that the chocolate and butter not get very hot. However, if the butter is not melting, you can put the bowl back over the still-hot water for a minute. If you’ve got a couple of little bits of unmelted butter, leave them—it’s better to have a few bits than to overheat the whole. Set the chocolate aside for the moment.
Working with a stand mixer with the whisk attachment, or with a hand mixer in a large bowl, beat the eggs and sugar until they are thick and pale, about 2 minutes. Lower the mixer speed and pour in the chocolate-butter, mixing only until it is incorporated—you’ll have a thick, creamy batter. Add the dry ingredients and mix at low speed for about 30 seconds—the dry ingredients won’t be completely incorporated and that’s fine. Finish folding in the dry ingredients by hand with a rubber spatula, then fold in the raisins along with any liquid remaining in the pan.
Scrape the batter into the pan and bake 50 to 60 minutes, or until the top is dry and crackled and a knife inserted into the center of the cake comes out clean. Transfer the pan to a rack and allow the brownies to cool to warm or room temperature.
Carefully lift the brownies out of the pan, using the foil edges as handles, and transfer to a cutting board. With a long-bladed knife, cut the brownies into 16 squares, each roughly 2 inches on a side, taking care not to cut through the foil.
Serving: The brownies are good just warm or at room temperature; they’re even fine cold. I like these with a little something on top or alongside—good go-alongs are whipped crème fraiche or whipped cream, ice cream or chocolate sauce or even all three!
Storing: Wrapped well, these can be kept at room temperature for up to 3 days or frozen for up to 2 months.

The weather has been perfect – no clouds, no rain, a slight breeze and sun, sun, sun! Just like a typical day in the Caribbean (where we spent our honeymoon!)! The perfect kind of weather for a fruity, cold, BEACHY drink!! After asking my lovely What’s Cooking Nestie friends (naturally) for their “beachy” drink ideas – this is what I ended up with:
Parrot Bay Cruiser
3 oz. Orange Juice
2 oz. Pineapple Juice
1 1/4 oz. Coconut Rum
Mix together and pour over lots of ice! And don’t even think about serving this without a cute little umbrella!! Cheers!!

Our new favorite summer drink!! I can’t believe neither of us had never tried this – or better yet, thought of it ourselves! So simple, yet so DEEEELICIOUS!! This was the perfect “beachy” drink – it reminded us of some of the yummy coctails we had on our honeymoon in St. Lucia! It was a perfect start to our “Caribbean honeymoon-themed” meal! (Fish sandwiches just like we ate every day at the beach bar – see below post!) Enjoy!!
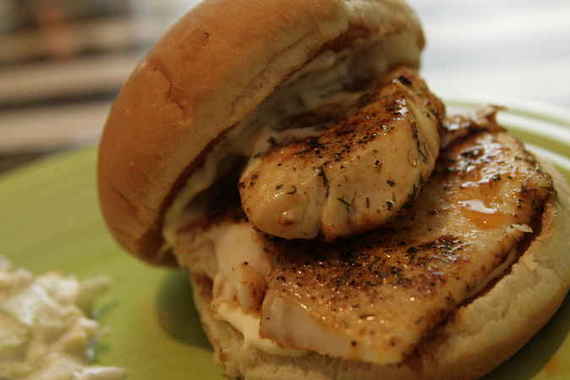
I hope you’re not picturing one of those soggy, deep-fried-mystery-meat-of-the-sea-type sandwiches you get at a fast food joint, right now – ’cause its not that kind of fish sandwich!
While on our fabulous honeymoon in St. Lucia (almost 2 years ago…YIKES!), Joel and I spent each day exactly the same: wake up, go to breakfast, go to the beach for a few hours, have lunch at the beach bar, go back to the beach, go back to our room and relax in the hammock on our front porch, get dressed and go to dinner. We followed the same exact schedule every day – not on purpose, really – it just always happened like that. (Not a bad day’s work, if you ask me!) And almost every day for lunch, we would order the “flying fish sandwich” from the beach bar – really delicious! It was served with a basket of plantain and sweet potato chips and a cold Piton Beer – it doesn’t get much better than that, folks! (Not surprisingly, lunch was always my favorite meal on this trip!) Somehow, every time I come home from a trip, the things I always remember most are the meals! And in my opinion, that’s the best way to go back and remember the good memories from past trips – just re-create the dishes and you’re there! And so, the “honeymoon fish sandwich” was created (or in this case, re-created!)! I wasn’t really in the mood for plantain and sweet potato chips, so I decided to go with a homemade buttermilk coleslaw (from allrecipes.com – go here if you’d like the recipe.) and oven fries. I also whipped up a quick homemade tartar sauce to spread on the buns. I’m telling you – this was one excellent fish sandwich!!
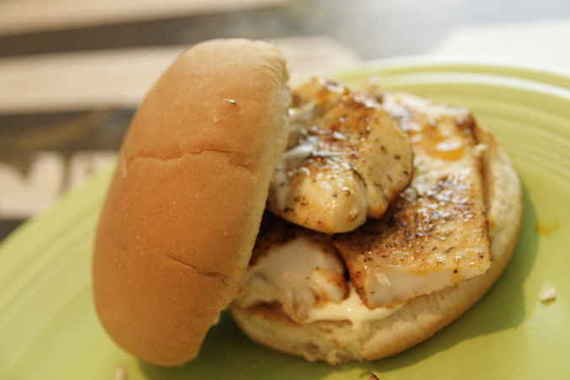
Honeymoon Fish Sandwich
2 tilapia filets (or any white fish you like)
2 teaspoons salt
1 teaspoon pepper
Dash or two of cayenne pepper
2 teaspoons fresh dill, chopped (you could also use dried)
2 teaspoons paprika
fresh lemon juice
Season both sides of the fish with salt, pepper, cayenne, dill and paprika. Sautee in a skillet over medium heat for 2-3 minutes on each side; sqeeze lemon juice over the fish while its cooking. Serve on a toasted bun with homemade tartar sauce (recipe follows) and lettuce. Serves two.
Homemade Tartar Sauce
1/2 Cup mayonnaise
1 Tablespoon chopped dill pickles (with just a splash of the pickle juice)
1 Tablespoon minced onion (I used onion powder)
1 Tablespoon fresh lemon juice
salt and pepper to taste
Combine all ingredients and chill for at least an hour before serving.
Yay!! I’ve been “Meme tagged”!! Jess from Cookbook Habit wants to know 5 things about me!! Yee haw!
The rules:
Each player answers the questions about themselves. At the end of the post, the player then tags 5 people and posts their names, then goes to their blogs and leaves them a comment, letting them know they’ve been tagged and asking them to read your blog. Let the person who tagged you know when you’ve posted your answer.
What was I doing ten years ago?
Ten years ago I was getting ready to start my freshman year of High School. I had just started working with my first ever voice teacher and was preparing for my very first voice recital!
What are five (non-work) things on my to-do list for today?
1. Do a load of colors
2. Go to the grocery store to get stuff for dinner tonight
3. Decide what’s for dinner tonight
4. Figure out what I want to use my new bottle of Parrot Bay for….yum!
5. Sit on the balcony with Joel tonight and enjoy whatever Parrot Bay concoction I decided on!
Five snacks I enjoy:
1. Nutella + finger 🙂
2. Wheat Thins
3. Honey Roasted Peanuts
4. Apples and PB
5. Cereal (preferably Honey Bunches of Oats or Honey Nut Cheerios)
Things I would do if I were a billionaire:
1. Buy a house in a nearby area (that we absolutely CANNOT afford!)
2. Donate to lots of different research funds – Alzheimer’s, Parkensen’s, etc
3. Buy a vacation home in St. Lucia
4. Share with my family, of course!
5. Have a MONSTROUS kitchen with multiple dishwashers 🙂
Places I’ve lived:
1. Cleburne, Tx
2. Sulpher Springs, Tx
3. Belton, TX (college)
4. Dallas, Tx
Jobs I’ve had:
1. I was the student worker for my undergrad’s music dept. all through college
2. I taught voice lessons to Junior High and High School students this past year
3. I sing opera
TAG! You’re it…..
Kelsey – Apple A Day
Stephanie – Confessions of a City Eater
Ashley – The Spicy Skillet
Kelly – My Sweet Life…
Elizabeth – Ugg Smell Food
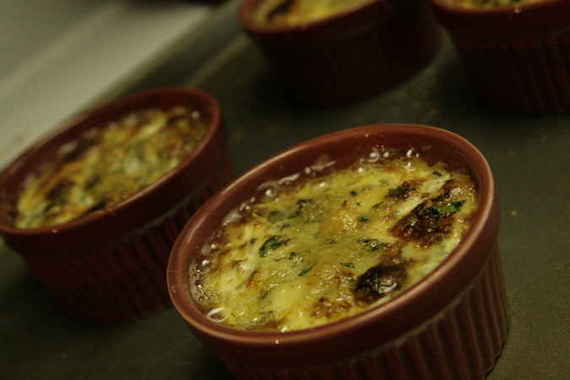
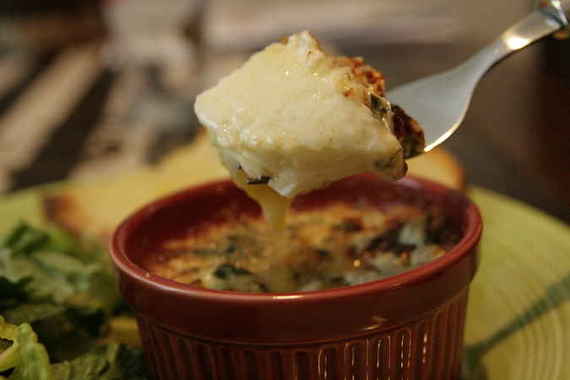
I’m happy to announce I’ve joined a new blogging group! Fellow food blogger and absolute genius, Tara started a group last week dedicated to cooking Ina Garten’s (aka: the Barefoot Contessa) recipes twice a month. She decided to call this wonderful group “Barefoot Bloggers” – genius! Being a HUGE fan of Ina, I of course, signed up without hesitation when I heard about this group! The recipe this time around was herb baked eggs – super yummy! We had these for dinner tonight and they were delicious! Joel even loved them and he’s not the biggest fan of eggs for dinner!
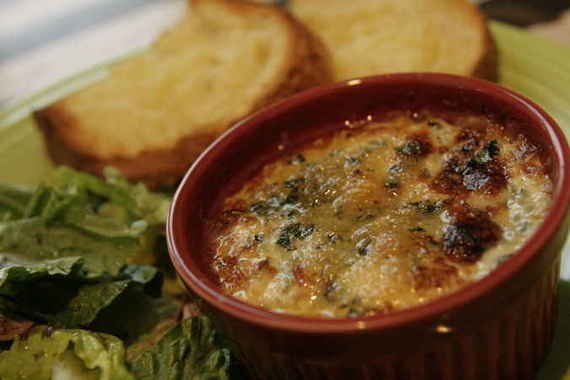
These cook very quickly and have a lovely, crunchy crust on top. I didn’t have a gratin dish, so I used four individual ramekins, which worked out perfectly! These went perfectly with a salad and toasted crusty sourdough bread.
Herb Baked Eggs
1/4 teaspoon minced fresh garlic
1/4 teaspoon minced fresh thyme leaves
1/4 teaspoon minced fresh rosemary leaves
1 tablespoon minced fresh parsley
1 tablespoon freshly grated Parmesan
6 extra-large eggs
2 tablespoons heavy cream
1 tablespoon unsalted butter
Kosher salt and freshly ground black pepper
Toasted French bread or brioche, for serving
Preheat the broiler for 5 minutes and place the oven rack 6 inches below the heat.
Combine the garlic, thyme, rosemary, parsley, and Parmesan and set aside. Carefully crack 3 eggs into each of 2 small bowls or teacups (you won’t be baking them in these) without breaking the yolks. (It’s very important to have all the eggs ready to go before you start cooking.)
Place 2 individual gratin dishes on a baking sheet. Place 1 tablespoon of cream and 1/2 tablespoon of butter in each dish and place under the broiler for about 3 minutes, until hot and bubbly. Quickly, but carefully, pour 3 eggs into each gratin dish and sprinkle evenly with the herb mixture, then sprinkle liberally with salt and pepper. Place back under the broiler for 5 to 6 minutes, until the whites of the eggs are almost cooked. (Rotate the baking sheet once if they aren’t cooking evenly.) The eggs will continue to cook after you take them out of the oven. Allow to set for 60 seconds and serve hot with toasted bread.