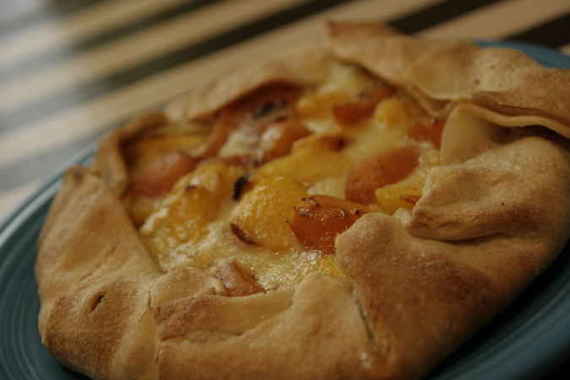
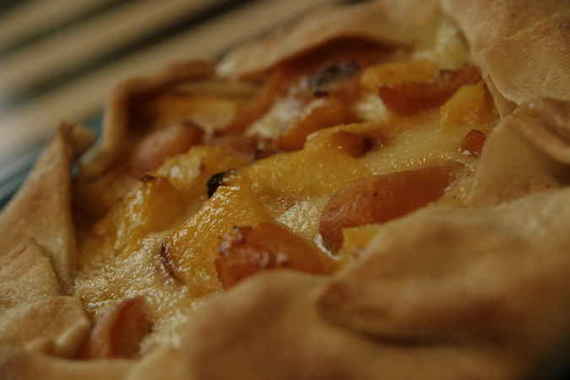
This week’s recipe was Dorie’s Summer Fruit Galette (delicious!) chosen by Michelle of Michelle In Colorado Springs. Lately, over at TWD, we’ve started doing things a wee bit differently; for instance, now we’ve started being informed of the chosen recipes for the entire month, instead of one week at a time. I think I’m the only person out of the entire group who doesn’t really cozy up to this idea. Call me crazy, but I enjoy finding out one recipe at a time – its like a little weekly surprise! It sure makes Mondays a little more enjoyable, I’ll say that! But, I understand most of the members’ reasonings for wanting this new method- going to the grocery store sucks. Let’s just come right out and say it. Nobody likes to go more than they absolutely have to, so by finding out the whole month’s TWD recipes, it allows us to go the the store one time and get everything we need for the whole month of baking. I get it. No judgement here, ladies. That’s why I didn’t make a peep when the idea was proposed…I’m just one of those weird people who like the spontaneity, I guess. I don’t have to have it, though….therefore, no gripes from SingForYourSupper!
Anyway, this galette rocked, in my fruit-and-pie-crust-lovin’ opinion! It starts with Dorie’s perfect Pie Crust, followed by apricot jam, graham cracker crumbs, plenty of fresh sliced summer fruit, such as nectarines, plums, apricots, peaches…(whatever your heart desires! I used nectarines and apricots), then topped with a surprisingly yummy pastry creme and baked….pure delicious, people! If you would like the recipe, and trust me, you do, you can visit Michelle’s blog and she’ll fix you right up! As always, you can see TONS more galettes on the other TWD members’ rockin’ blogs here.

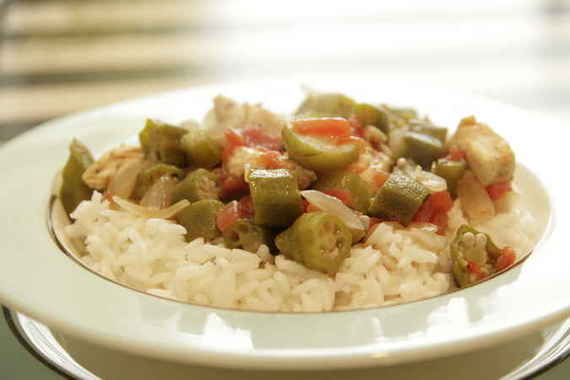
My sister is one of those hard working women – with a job, a husband, a kid, a house and everything else to take care of, I don’t know how she manages to find time to cook (and sometimes she doesn’t – but a pizza night every now and then never hurt anybody, right?). Sometimes she’ll stumble across a recipe that was extra yummy and kindly pass it on to me (woo hoo!). The latest recipe she’s given me was this Okra Gumbo. Surprisingly easy and super fast, but really really tasty at the same time! Its one of those dinners that you can have on the table in no time on a busy night , yet it tastes like its been cooking all day! Hubby really enjoyed it, as did I! Thanks, big sis!! Keep the recipes comin’!
Lindsay’s Okra Gumbo
1-16 oz. package frozen cut okra, unthawed
1 onion, chopped (I used half)
1-15 oz. can diced tomatoes (don’t drain them)
2-3 slices bacon
salt & pepper and cajun seasoning (lots) to taste
(I added 1 1/2 chicken breasts cut up into small pieces for a little extra flavor)
In a large pot over medium-high heat, cook bacon, reserve grease. Remove the bacon from the pan and add the onion, cooking until translucent, then add the chicken (season it with a little s&p before tossing in) and sautee until cooked through. Add the frozen okra and tomatoes; season with plenty of salt and pepper and lots of Cajun seasoning (yum!), then add the bacon back in and cook over medium to low heat for 15 -20 minutes until heated through.
Serve over white rice. *Here’s a little tip: throw in a splash of white vinegar – it helps to cut the okra’s “sliminess” and you don’t taste it a bit!
Ok, ok, so I didn’t go to Tuscany. I’ve never actually been to that part of Italy. But I guess the point is that I have been to Italy; last summer – I was fortunate enough to visit a tiny little coastal town called Vietri sul Mare on the Amalfi Coast. Bliss. Sheer bliss. Ok, not all of it. In fact, most of it was grueling, un-air conditioned, who-schedules-voice-lessons-at-eight-AM-after-a-midnight-performance-the-night-before WORK. I was there doing a summer opera program and between voice lessons, staging, and rehearsals we barely had time to sleep, let alone do all the sight-seeing, gelato eating, picture taking and shopping I had had in mind. Silly me. However, it was gorgeous and as busy as I made it out to be, there was time for plenty of gelato eating! (And another added plus – being a blonde, in a small southern town where blondes aren’t commonly seen does wonders for a girl’s self confidence! I’ve never been whooped and hollered at like that!) One of the things I miss most about Italy (obviously) is the food. I’ve never in my life had better pizza. Everything was so fresh and light. I ate like a big fat pig the entire time! But that’s neither here, nor there.

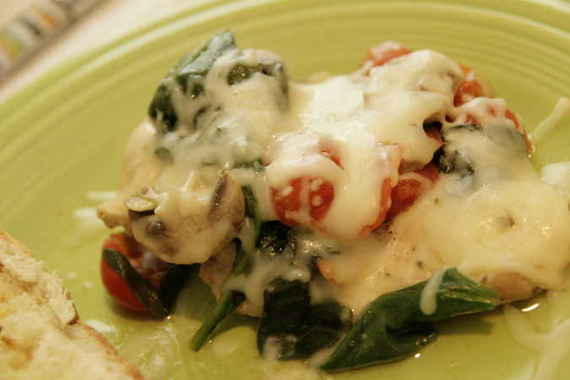
I’ve really been missing my little southern Italian town this summer. Its been exactly a year since I was there and I’m dying to go back. Since a trip to Italy isn’t really within our budget right now, I decided to do the next best thing and just make some yummy Italian food. I saw this recipe in Chelle’s blog – Brown Eyed Baker, formerly known as Sugar and Spice and knew it was just what I was looking for!
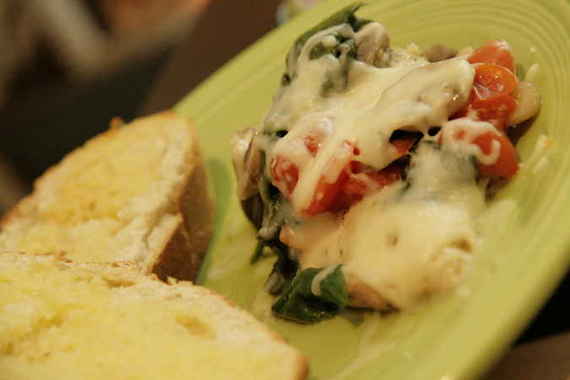
Tuscan Chicken
-Sugar and Spice blog
1 lb boneless chicken cutlets
1/2 teaspoon kosher salt
1/4 teaspoon pepper
2 tablespoons extra-virgin olive oil
1/4 cup white wine
1 bag fresh baby spinach leaves (5–6 oz)
1 cup fresh pre-sliced mushrooms (rinsed)…I left the mushrooms out
1 (14.5-ounce) can Italian-style diced tomatoes (undrained)-I used fresh grape tomatoes cut in half
4 ounces fresh mozzarella cheese
Preheat large sauté pan on medium-high 2–3 minutes. Season both sides of chicken with salt and pepper.
Place oil in pan; swirl to coat. Arrange chicken in pan and cook 3–4 minutes on one side or until lightly browned.
Turn chicken and add remaining ingredients to pan (except cheese). Cover and cook 4–5 minutes or until internal temperature of chickenreaches 165°F. Use a meat thermometer to accurately ensure doneness. Meanwhile, slice mozzarella thinly.
Remove pan from heat. Top chicken with cheese slices; cover and let stand 2–3 minutes or until cheese melts. Serve.
I hate to say it, but this was the first recipe of Dorie’s that I just flat out did not care for – at all! I thought the day would never come when I would dislike, hate even, one of Dorie’s recipes, but there really is a first time for everything, I guess.
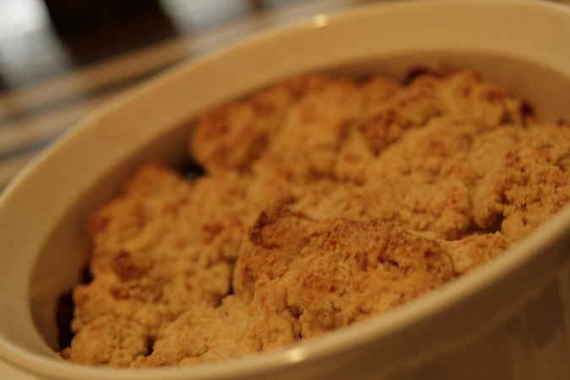
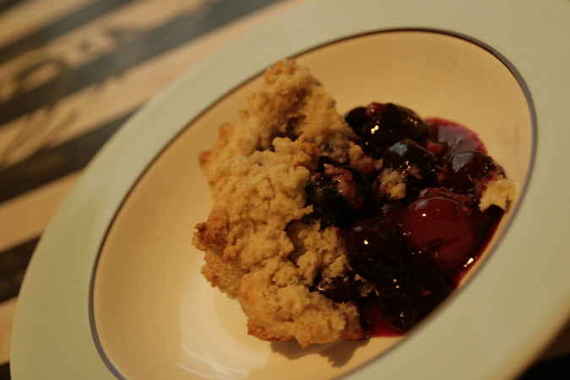
This week’s recipe was Cherry Rhubarb Cobbler, chosen by Amanda of Like Sprinkles on a Cupcake. To start with, I wasn’t too enthusiastic about another biscuit topping “cobbler” (not that it matters what I think – all that matters is the person who chose it, and if she wanted cobbler, than by gosh, cobbler is what she’ll get!), but its a cobbler containing rhurbarb….I think I’ve actually seen rhubarb in person once in my whole life around these parts….but not now apparently – the stuff is darned near impossible to find – so it would be a cherry rhubarb cobbler minus the rhubarb. Maybe that’s why mine was so unappealing – who knows. (At least it looks good, right?)
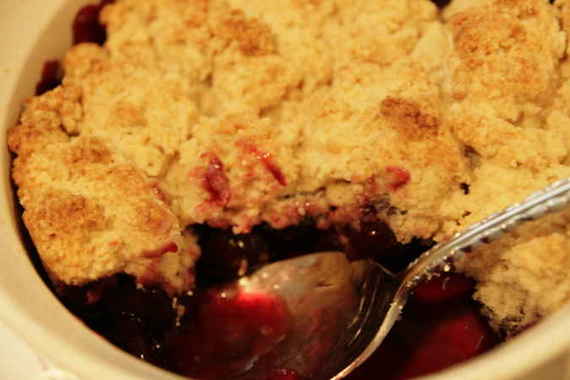
I bought a truck load of fresh cherries at my farmers market and was all excited to get home and start on my cherry cobbler. Until I realized I had no cherry pitter thingie. Great. I read on the TWD website that you could use a chopstick instead….so there I was in my kitchen, using a chopstick to try to pit my cherries. Five minutes into the process, it looked like I had murdered a small animal or something – bright, red cherry juice – EVERYWHERE. My face, my hair, my clothes, my walls, my hands – my fingers are still stained!- but I managed to get all those @#$%^&! cherries pitted, alright. During the whole process I kept thinking, “this had better be the best cherry cobbler known to man, or else I’m going to be really upset!” Against my better judgement, I decided to go ahead and make the biscuit topping instead of using a different topping like I did last time (the TWD gods were not amused at that), and hope for the best. I pulled it out of the oven and it looked delicious – juicy and red with a nicely browned crumbly topping. The taste, however wasn’t near as good as it looked. Both hubby and I were disappointed in the topping – it tasted like flour and nothing else – and the cherry filling was just “ok”. Now that could be due to the lack of rhubarb – so I won’t judge that part too much. Either way, it didn’t get eaten. And I was disappointed that I made something of Dorie’s that I didn’t care for. I guess it happens though – she can’t make everyone happy 100% of the time. So, there’s always next week (Summer Fruit Galette) and I’m particularly excited about it! Stay tuned!

Ok, ok, I’ll admit it – when I had heard people talking about this recipe, I was a little skeptical – even snobbish, if you will. The title just doesn’t sound very appetizing to me – “Crockpot Salsa Chicken” – I always imagined it as throwing chicken in the crockpot with some jarred salsa and letting it go. Blech. Then I read the actual recipe – chicken…salsa…taco seasoning…cream of chicken soup…wait, WHAT?! Cream of chicken soup?!…..with SALSA?? Double blech!! But THEN I actually saw a picture of the stuff on Annie’s blog, Cooking For Fun and it looked creamy and delicious! How could something that sounded so unappealing look so very enticing and comforting?? Well, I decided I just had to find out for myself if this was as delicious as it looked on Annie’s blog! To get a second opinion, I even called up my sister and gave her the recipe and the idea to make it for her family’s supper too! (we would compare notes later – that’s what sisters do, right?) So she made hers and I made mine; the result: SUCCESS!!! It was completely delicious! Hubby gobbled it up over rice, and my sister’s hubby ate his with tortillas and chips. I was surpised at how moist and flavorful the chicken was. My sis and I both agreed that this would be an excellent filling for enchiladas. I’ll admit, even as I was combining the ingredients, I was still a little wary of it, but as it cooked and the smell starting filling my apartment, I knew it was going to be darned tasty! So thanks a heap, Annie – you convinced me! Next time, I’ll think twice before turning my nose up at a recipe!
Crockpot Salsa Chicken
-Cooking For Fun blog
4 boneless, skinless chicken breasts
1 cup salsa-Fresh
1 package taco seasoning
1 can reduced fat cream of mushroom soup (condensed) or cream of chicken soup
1/2 cup reduced fat sour cream
Add chicken to slow cooker. Sprinkle taco seasoning over chicken. Mix salsa and soup (this was the part that looked a little iffy, but persevere! Its well worth it!); pour over chicken. Cook on low for 6 to 8 hours. Shred chicken with a fork. Stir in sour cream until heated, then serve over rice or tortillas. I topped mine with cheese. De-lish!!
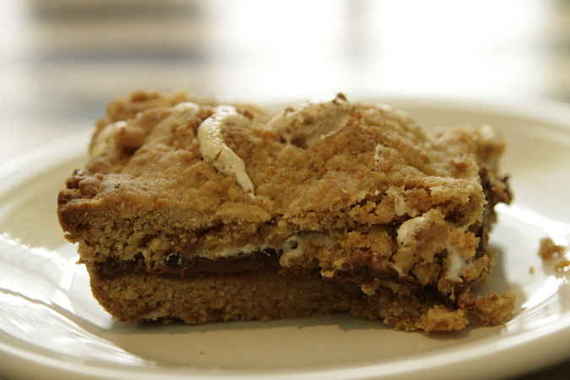
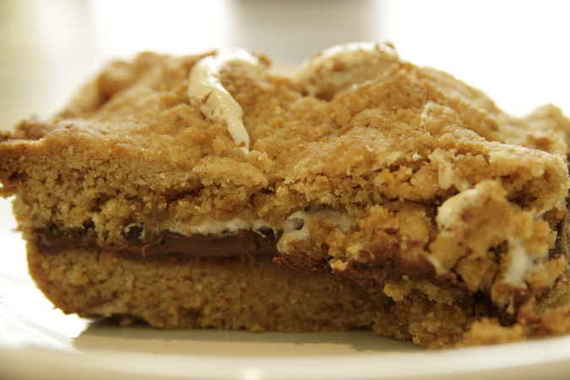
The other night was a serious “girl-on-the-edge-needs-chocolate” kind of night. I toyed with making the Pioneer Woman’s chocolate sheet cake (don’t worry, that will come shortly, I can assure you!) or a delicious chocolate cake I found in another of my favorite blogs, Joy the Baker – but I decided to take one last peek at my saved recipes from other cooking blogs and stumbled across S’more bars from Noodle Nights and Muffin Mornings – bingo. Anything with chocolate, marshmallow and graham cracker crumbs sounded utterly perfect to me, so on with the S’more bars!
These were delicious – even hubby, whose respones to my baked goods are usually along the lines of, “yeah, its pretty good” loved these and made a point to tell me over and over again how much he enjoyed them! I sent the rest of the bars to work with him the next day and he came home with rave reviews. Bullseye!
S’more bars
Noodle Nights and Muffin Mornings blog
Ingredients:
1/2 cup (1 stick) butter or margarine, softened
3/4 cup sugar
1 egg
1 teaspoon vanilla extract
1-1/3 cups all-purpose flour
3/4 cup graham cracker crumbs
1 teaspoon baking powder
1/4 teaspoon salt
4 (1.55 oz. each) Milk Chocolate Bars
1 cup marshmallow creme
Directions: Heat oven to 350°F. Grease 8-inch square baking pan.
Beat butter and sugar in large bowl until light and fluffy. Add egg and vanilla; beat well. Stir together flour, graham cracker crumbs, baking powder and salt; add to butter mixture, beating until blended. Press half of dough into prepared pan. Arrange chocolate bars over dough, breaking as needed to fit. Spread with marshmallow creme. Scatter bits of remaining dough over marshmallow; carefully press to form a layer.
Bake 30 to 35 minutes or until lightly browned. Cool completely in pan on wire rack. Cut into bars.
Yields 16 bars
I’ve been tagged again! Bakingblonde has tagged me to answer a few fun questions!
1. Last Movie I Saw In A Movie Theater?
The Dark Knight (really good!)
2. What Book Are You Reading?
The second book in the Outlander Series
3. Favorite Board Game?
Candy Land! 🙂
4. Favorite Magazine?
Bon Appetit
5. Favorite Smells?
Peach cobbler in the oven, bread, a new can of tennis balls, new car smell
6. Favorite Sounds?
a good mixed choir singing a really tight chord
7. Worst Feeling In The World?
knowing somebody hates you
8. First Thing You Think of When You Wake?
Its too early!
9. Favorite Fast Food Place?
Taco Bueno
10. Future Child’s Name?
n/a
11. Finish This Statement—“If I Had a Lot of Money, I’d…update my kitchen, go on more vacations and share with family
12. Do You Drive fast? Nah, not really
13. Do You Sleep With a Stuffed Animal?
No, but I do sleep with a small square pillow that my mom made me a long time ago
14. Storms—Cool or Scary?
Cool.
15. What Was Your First Car?
a purple (ack!) ford explorer
16. Favorite Drink?
At the moment, anything with coconut rum mixed in it
17. Finish This Statement—“If I Had the Time, I Would…
learn a foreign language”
18. Do You Eat the Stems on Broccoli?
Yes
19. If You could Dye your Hair Any Other Color, What Would It Be?
a pretty red color, I guess – I happen to love my hair color, though!
20. Name All the Different Cities In Which You Have Lived.
just two – both in TX
21. Favorite Sport to Watch?
Fightin’ Texas Aggie Football
22. One Nice Thing About The Person Who Sent This To You
She always has the most incredible baked goods on her blog – in fact, I just made her smore bars the other night – YUM!!!
23. What’s Under Your Bed?
a lot of boxes full of junk
24. Would You Like to Be Born As Yourself Again?
Um, yeah!
25. Morning Person or Night Owl?
Ew, deffinitely a night person – early mornings make me sick!
26. Over Easy or Sunny Side Up?
Over easy
27. Favorite Place to Relax?
by the pool
28. Favorite Ice Cream Flavor?
oreo or neopolitan
29. Of All the People You Have Tagged, Who Is the Most Likely to Respond First?
Who knows!
I am now tagging some wonderfull fellow bloggers, Please, Please, PLEASE go to their sites, they have great recipes sure to put a smile on your face!! Promise:
Jessica
Kelsey
Jaime
Melissa
If you get tagged, answer the questions in your blog, then tag 4 or 5 other food bloggers by listing their blogs on your own blog, then commenting on their blog to let them know they’ve been tagged! Be sure and let everybody know who tagged you!
For some reason, I’ve never been a big fan of meatball subs. They’ve just never really appealed to me. That all changed when I was perusing one of my favorite blogs, Sweet, Savory, Southern and I saw a recipe for turkey meatball subs. The picture looked so good, I decided I had to try this recipe. Good thing I did, too – YUM, these were excellent!! Hubby loved them and I was pleasantly surprised, myself! And I loved that it uses groung turkey – I really prefer to use turkey in place of groud beef. These were juicy and flavorful – I’ve made them twice now and they sure don’t disappoint!

Turkey Meatball Subs
from Sweet, Savory, Southern
1 lb lean ground turkey
1/3 cup finely chopped onion
1 tsp Italian seasoning
1 clove minced garlic
1/2 cup bread crumbs
1/4 cup grated parmesan cheese
1 tsp each salt and pepper
1-2 Tbsp extra virgin olive oil
*1 jar marinara sauce
*sub rolls
*provolone or mozzarella cheese-2 slices per sub
Mix all ingredients in a bowl until just combined. Heat a skillet over medium heat with about 1-2 Tbsp olive oil. Form the turkey mixture into balls and place in the skillet. Turn the meatballs every couple minutes to brown on all sides. Add marinara sauce to the pan, cover and let simmer over low heat about 15 minutes to ensure the meatballs are completely cooked. Place 4 meatballs on each sub roll that has been sliced lengthwise and spoon the marinara sauce over the meatballs. Top with cheese (I used shredded mozzarella this time, but provolone is delicious as well) and place under the broiler for a couple minutes to toast the bread and melt the cheese.
Hubby and I had a great 4th of July weekend over at my parents’ house with the family! There was TONS of good food, fireworks, and good ‘ol family fun! Here’s a few pictures of the festivities – enjoy!

Here’s my brother-in-law and Hubby (in the blue), trying to blow up a water bottle with a firecracker….hey, that’s what the 4th of July is all about, right? – trying to blow stuff up with fireworks!
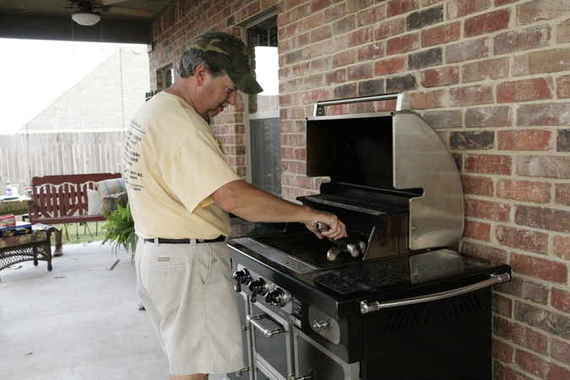
Here’s my daddy grillin’ up some brautwurst (yuck!)

My sister and her family! (She’s going to kill me for posting this picture!)
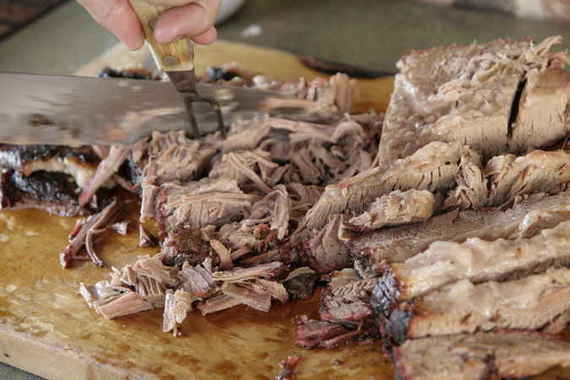
My dad’s smoked brisket…..oh yeah, baby!
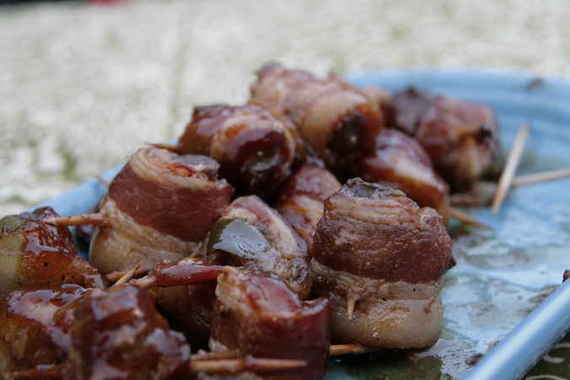
My sister’s “Man Catchers” – jalapeno pepper stuffed with steak, wrapped in bacon, and brushed with BBQ sauce, then baked – pretty tasty little devils!
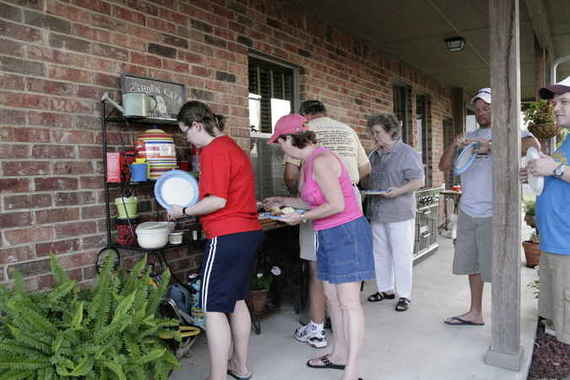
Everybody loadin’ up their plates with brisket, my mom’s baked beans and Nana’s potato salad (no onions, thank you very much!)

Me and my nephew!
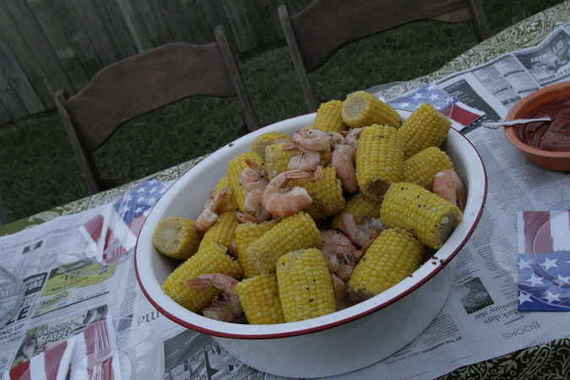
Shrimp boil! (Shrimp, potatoes and corn) We were supposed to have this for my birthday party last month, but it ended up getting canceled, so we decided it would be perfect for a 4th of July weekend meal!! And Lordy, was it!! This is one of my absolute favorite meals of all time…
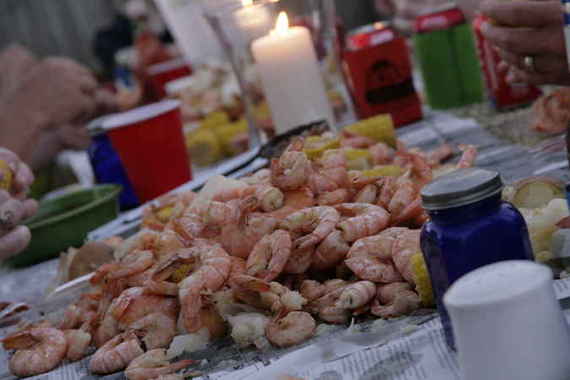
Perfection…..

Me and my family eatin’ shrimps! It was a great weekend! Hope everyone else had a happy 4th of July!!!
This week’s recipe was Dorie’s Double Crust Blueberry Pie, chosen by Amy of South In Your Mouth. I think pretty much all of us at Tuesdays With Dorie loved this pick and thought it was perfect for the 4th of July Holiday! I was really excited to try this recipe for two reasons: 1.) I’ve never had a blueberry pie before and 2.) I’ve actually never made my own piecrust! I couldn’t wait to get started…..only there were hardly ANY blueberries to be had in my grocery store. I don’t know if there’s a “blueberry shortage” or what, but it was near impossible for me to find fresh blueberries (unless I was willing to spend a fortune…which I wasn’t, thank you very much!). So, I had planned on using frozen blueberries; that is, until my good buddy Jessica, over at My Baking Heart invited me to come blackberry picking with her and her mother! YEE HAW! I’d never gone pickin’ for anything before, so I decided fresh blackberries would be delicious!! We got TONS of ripe, delicious blackberries (sorry, Jess sent me the pictures, but I couldn’t figure out how to get them onto my blog, so if you want to see pics from our little outing, go visit her blog – she’s got ’em up!) and came home and made our pies.
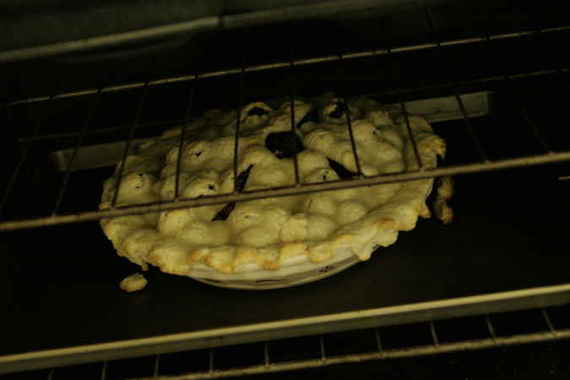
Unfortunately, I had a bit of trouble with my pie crust. I don’t know if I didn’t let it chill long enough before baking or what, but something just didn’t seem right as it was in the oven (as you can see by the picture above!) My crust was MELTING OFF!! It was the strangest thing! Not only that, but it burned rather quickly, too, even covered with foil. However, it was still delicious! I took the pie to my mom and dad’s house for the 4th of July weekend and the crust was a big hit. The blackberry filling was good…just very, very, VERY runny. I guess blackberries weren’t the wisest choice here. We ended up having to eat it with spoons! However, it was still pretty tasty with my mom’s homemade vanilla icecream over the top of it!
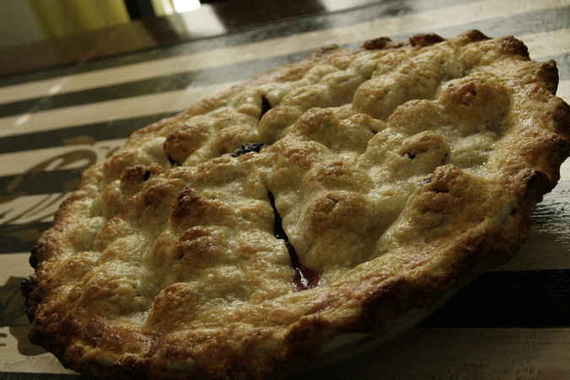
Sorry for the crappy pics….I didn’t get ANY good ones of the inside of the pie, mostly because its “innards” were running all over the place and hardly looked suitable for a close-up. Regardless of the appearance of this pie, it was really tasty and my whole family enjoyed it! Nex time, I’ll definitely try it with the fresh blueberries, though!


