Well, I spoke too soon….thanks to Hurricane Gustav, it looks like we won’t be going to Mexico after all….@#!$%^&*$!!!
Share:

VIEW COMMENTS (2)
Well, I spoke too soon….thanks to Hurricane Gustav, it looks like we won’t be going to Mexico after all….@#!$%^&*$!!!
I won’t be posting anything until after September 3rd because hubby and I will be here:

Don’t be jealous….just kidding, be jealous! Ciao!
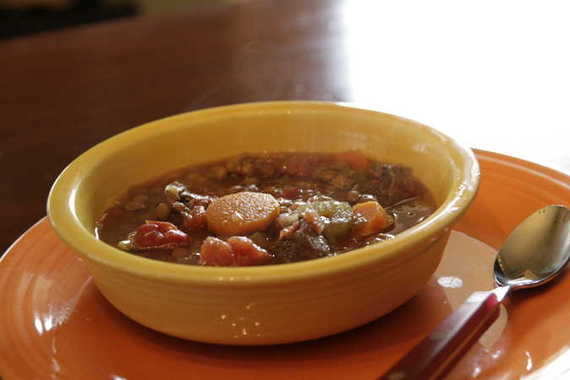
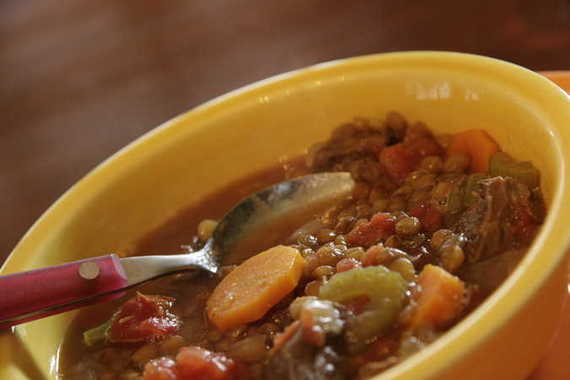
There were some girls over at one of my favorite cooking forums (the Nest’s What’s Cooking board) talking about recipes for lentil soup, which is where I got this one. It’s one of Giada DeLaurentiis’ recipes (and you can’t go wrong with Giada), and it’s thick, hearty and full of flavor. I think it would be perfect for a nice chilly Fall day or cold Winter night! I had never had lentils before and was definitely pleased with their taste/texture. I think they added a lot to this soup! I will definitely be making this again…soon!
Lentil Soup with Beef
-Giada DeLaurentiis
2 tablespoons olive oil
1 1/2 pounds boneless beef chuck, cut into 1-inch cubes
Salt and freshly ground black pepper
3 large celery stalks, chopped
2 large carrots, peeled and chopped
1 large onion, chopped
6 garlic cloves, chopped
1 1/2 teaspoons chopped fresh rosemary leaves
1 1/2 teaspoons dried oregano
6 (14-ounce) cans beef broth
1 (28-ounce) can diced tomatoes in juice
2 cups (about 11 ounces) lentils, rinsed
1/3 cup chopped fresh Italian parsley leaves
Heat the oil in heavy large pot over medium-high heat. Sprinkle the beef with salt and pepper. Add half of the beef and cook until brown, about 8 minutes. Using a slotted spoon, transfer the beef to a bowl. Repeat with the remaining beef. Add the celery, carrots, onion, garlic, rosemary, and oregano to the pot. Saute until the onions are translucent, about 8 minutes. Return the beef and any accumulated juices from the bowl to the pot. Add the broth and tomatoes with their juice. Bring the soup to a boil. Reduce the heat to medium-low. Cover and simmer until the meat is just tender, stirring occasionally, about 1 hour. Add the lentils. Cover and continue simmering until the lentils are tender, about 40 minutes. Stir in the parsley. Season the soup, to taste, with salt and pepper. Ladle the soup into bowls and serve.
(This makes A LOT of soup, so plan for company that night!)

Well, let me just start off by saying- I’m thrilled. Really. Not only do I absolutely adore baking cookies, eating cookies, decorating cookies, giving cookies and everything possible to do with cookies, but I’m finally getting to bake cookies for Tuesdays with Dorie! This is the first real “cookie” recipe chosen (well, unless you count the very first TWD recipe, which was Shortbread…I guess you might count that, but I choose not to)!!! Groundbreaking!! Spectacular!! And what a doozy of a pick – Granola Grabbers, chosen by Michelle of Bad Girl Baking!! Honestly, I wasn’t expecting much….I mean, how good can they be? Granola…eh. Nuts…eh. Coconut…eh. Raisins…YUCK. You can see my attitude toward these cookies was less than positive…..at first!
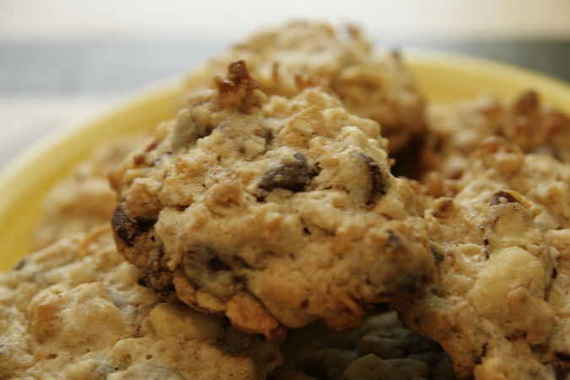
I decided to give these cookies a shot – of course I substituted chocolate chips for the raisins, duh! And they were delicious….hubby loved them!! The granola I used had a touch of cinnamon that went perfectly with the chocolate chips and peanuts! Incidentally, I did NOT send these cookies to work with hubby the next day…nope, these babies stayed safe at home with mama this time! In case you’re curious as to what’s in these, I’ll give you the gist: granola, chocolate chips, wheat germ (my first time using this – surprisingly a pleasant addition!), coconut, salted peanuts and almonds – really tasty combo, really. I was lucky enough to have my very good, long-time friend, Susan stop by for a visit the day I made these and she was kind enough to sample them and give her opinion. Her response was, “Mm, these are good! Good call leaving out the raisins..really good call.” Coming from Susan, I was thrilled.

This is a fantastic cookie recipe, really! Do me a favor and head on over to Michelle’s blog and get the recipe. You won’t be sorry – your kids/grandkids/parents/best friends/neighbors/boyfriends/girlfriends/whoever will be oh-so-glad you did!! Thanks Michelle, you bag girl baking, you! 😉
One of our favorite restaurants, Texas de Brazil, has a signature drink that hubby and I love to order everytime we go – its called a Caipirinha. Or as my mom likes to call it- a “grown up limemade” – made from fresh limes, sugar and sugar cane rum – this has got to be one of the most refreshing cocktails I’ve ever tasted.

Well, hubby had had a pretty rough day at work, and I thought it might be a nice treat to come home to a nice cold “grown up limemade” (that’s what I’ll just refer to them as from now on, mmkay?) It was a little tricky to find Sugar Cane Rum, but I must say, well worth it! The recipe is so incredibly easy, and the result – so incredibly relaxing! Hubby enjoyed two of them (like I said, it was a hard day!)! I think now we’ve found our new “go-to” cocktail!

The Caipirinha (fondly referred to as “Grown Up Limemade”)
Sugar Cane Rum (such as Cachaca, or whatever kind you can find!)
1 lime, cut into 8 small pieces
Simple Syrup (I used 1/2 cup sugar and 1/4 cup water and ended up with plenty)
Crushed ice
Put the lime pieces in a glass and crush with a pestil until all the juice is worked out; pour desired amount of simple syrup over the limes (I used probably around a tablespoon, but you can use more depending on how sweet or sour you like it). Add the ice, then pour a shot or two of the rum into the glass (also depending on how strong you like it – I didn’t add a whole heck of a lot, but you certainly can!) Give the glass one last stir and serve! Mmmmm!!
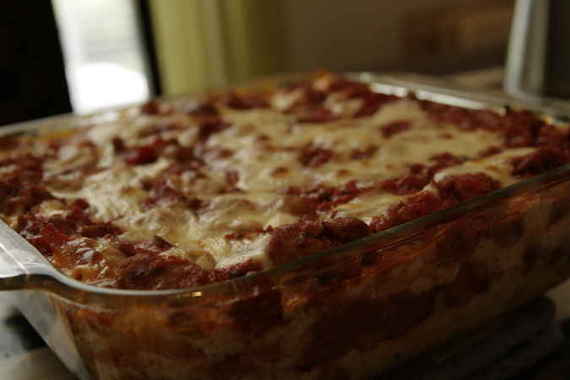
I know, I know – this is a terrible picture! But it was late, there was limited natural light left in my dining room, and we were hungry, dangit! I was in a hurry! So anyway, this is the Pioneer Woman’s recipe for lasagna. I’ve actually never (I know…its sad) made a homemade lasagna before and this one looked pretty good -I’m a big fan of all of her recipes, so I thought I’d give it a go. My sister made it for her family, too (she’s also a big fan of P-Dub). So here it was – my first time to ever make lasagna! I personally didn’t really like it. Probably for a number of reasons that would be completely my fault. First, I used 2 pounds of ground turkey instead of the 1 pound sausage and 1 pound beef that she calls for; secondly I dumped in a ton of dried oregano before realizing she didn’t actually call for oregano, but dried basil…oops (I really don’t care for oregano that much); thirdly, I didn’t let it set long enough after cooking before serving, so when I tried to serve it, it ran all over the place (good thing it was just me and hubby!). So there you have it – 3 mistakes that could’ve easily led to my disliking this recipe; then again, it could just be that I’m really picky about lasagna (my mom has the best!) and set my standards too high. My sister didn’t love it either, but she said her hubby thought it was the best lasagna he’s ever eaten. I guess its just a matter of opinion! At least I can say I’ve made my own lasagna before!
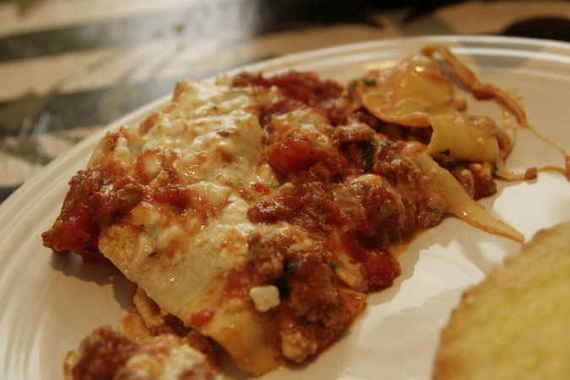
And there’s my crappy picture of the lasagna running all over the place…its terrible, I know. Don’t judge! Anyhow, if you’d like the recipe, click here.
And now I leave you with a random picture of my husband (cute, isn’t he?) eating watermelon….don’t ask why – I just thought it was cute!


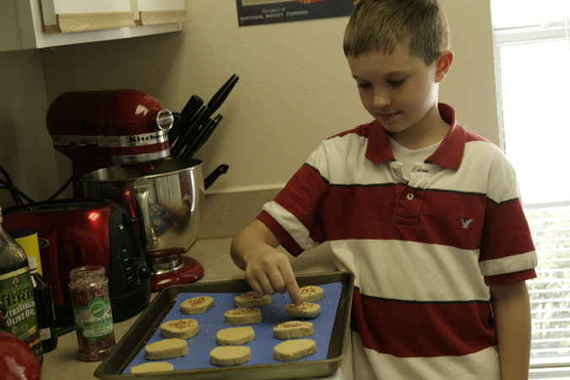
Ok, so my nephew doesn’t exactly call me “Fun Aunt Amy” so much as just “Amy”, but hey, its my blog and I’ll write what I want! These past 3 days, hubby and I have had the pleasure (and at times, a nice new form of birth control) of having our nephew (my sister’s kid) come and stay with us before he has to go back to school in the fall. I thought it would be a nice “last vacation” for him, considering our apartment has an awesome pool, we have a Wii, lots of fun games and puzzles, and then there’s the fact that “Fun Uncle Joel” lives here (forget “Fun Aunt Amy” – when Joel walks through the door, “Fun Aunt Amy” could dance around with underwear on her head and would go completely unnoticed!). But alas, Uncle Joel has to work during the day, so it was up to “Fun-at-one-time-but-starting-to-get-a-little-dull Aunt Amy” to do the entertaining.

This kid has an undying love for sugar cookies – forget chocolate chip or even brownies….its always sugar cookies. Everytime. So I decided making cookies would be a fun activity for us to do together. Naturally, I turned to my baking Bible – Baking From My Home To Yours by Dorie Greenspan. And lemme tell ya – these cookies rocked! I don’t even like sugar cookies – but these were nice and chewy (mainly because I sliced them pretty thick instead of rolling out the dough and using cookie cutters) and had a great flavor. Needless to say, my nephew loved them (which I had been a little worried about – he’s a bit of a picky eater!) – he polished them off pretty quick!

He was in charge of the sugar sprinkles – don’t they look pretty?! I think they gave them the perfect touch of sparkle! (And I have to say, the dough was pretty tasty in itself – we helped ourselves to a few little “scraps” along the way!)
Grandma’s All-Occasion Sugar Cookies
-Baking From My Home To Yours
2 cups all-purpose flour
1/2 tsp. salt
1/2 tsp. baking powder
1 stick plus 2 tablespoons (10 tablespoons) unsalted butter, at room temperature
1 cup sugar (I used half white, half light brown)
1 large egg
1 large egg yolk
1 tsp. pure vanilla extract
Sugar or cinnamon sugar, for dusting (optional)
1. Center a rack in the oven and preheat the oven to 350 degrees. Line two baking sheets with parchment or silicone mats.
2. If you are making roll-out cookies, working with one packet of dough at a time, roll out the dough between sheets of plastic wrap or wax paper to a thickness of 1/4 inch, lifting the plastic or paper and turning the dough over often so that it rolls evenly.
3. Lift off the top sheet of plastic or paper and cut out the cookies — I like a 2-inch round cookie cutter for these. Pull away the excess dough, saving the scraps for rerolling, and carefully lift the rounds onto the baking sheets with a spatula, leaving 1 1/2 inches between the cookies. (This is a soft dough and you might have trouble peeling away the excess or lifting the cutouts; if so, cover the dough, chill it for about 15 minutes and try again.)
4. After you’ve rolled and cut the second packet of dough, you can form the scraps into a disk, then chill, roll, cut and bake.
5. If you are making slice-and-bake cookies, use a sharp thin knife to slice the dough into 1/4-inch-thick rounds, and place the rounds on the baking sheets, leaving about 1 1/2 inches of space between the cookies.

YUM! These were so good, and SO easy to make – it took no time (of course, I did have help making these!)!!

And here we go (drumroll, please!) my nephew took this last picture himself!! Aren’t you impressed?! I know I certainly am! Looks like we have a photographer in the making!

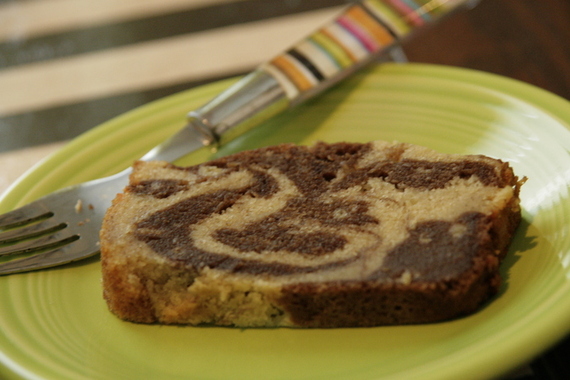
…but this cake is!! Tee hee, there’s my sad attempt at a little humor……ok enough of that! This week’s recipe was the Black and White Banana Loaf, chosen by Ashlee of A Year In The Kitchen, and I gotta say – the more I thought about it, the more I decided this was a fantastic pick! Way to go, Ashlee!! It seems like an awful lot of the picks lately have either been chocolatey and richer than rich or a fruit cobbler or some sort. (Don’t get me wrong, I love rich and I love me some cobbler, but I can only handle so much, right?) This cake..loaf..bread..whatever you want to call it absolutely hit the spot! It was slightly chocolatey, but not knock-your-socks-off-go-into-a-sugar-coma chocolatey – just a hint of chocolate, and it was the perfect amount. And the banana flavor was just strong enough, but not too strong – again, perfect. Both hubby and I (and hopefully my parents – I left half of the loaf with them!) thoroughly enjoyed it – it was the perfect amount of sweetness and really moist!

I got lucky and my marbling somehow turned out perfectly (well, in my opinion it did, at least!). Some of the folks at TWD had said their batter was too runny and that there marbling didn’t quite turn out, so naturally I was afraid the same thing would happen to mine, but I guess the baking gods were smiling upon me and my loaf!

If you want the recipe, head over to Ashlee’s blog and check out her take on the Black and White Banana Loaf. Also, check out our TWD site to see all the other fabulous bakers’ versions of this weeks’ recipe! I’m just gonna tell you right now – you want this recipe…its stinking GOOD.
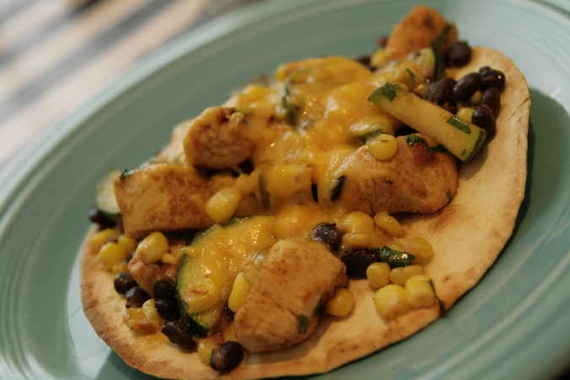
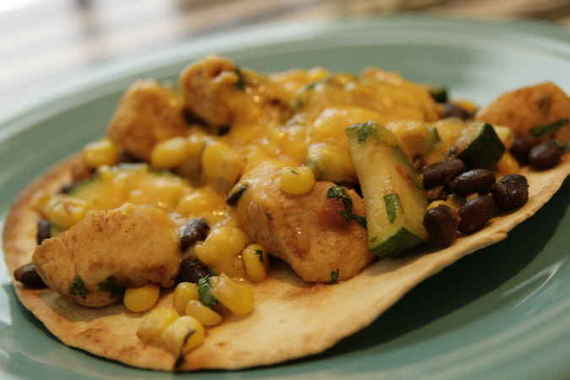
Well, Renea over at Sweet, Savory, Southern hits another bullseye! I’m telling you folks, this has quickly become one of my favorite food blogs! I catch myself making her recipes all the time, and to top it off, everything of hers that I’ve made has been a huge hit! The woman can cook, I’ll tell you that! Well, this latest recipe was no exception – light and fresh and just plain delicious (not to mention, easy!)!
Chicken and Summer Vegetable Tostadas
by Renea at Sweet, Savory, Southern
1 teaspoon ground cumin
1/4 teaspoon salt
1/4 teaspoon black pepper
2 teaspoons olive oil
12 ounces chicken breast tenders (I diced up the chicken into bite-size pieces before cooking)
1 cup chopped red onion (I omitted)
1 cup fresh corn kernels (I used frozen)
1 cup chopped zucchini (about 4 ounces)
1/2 cup salsa
3 tablespoons chopped fresh cilantro, divided
4 (8-inch) fat-free flour tortillas (I used 2 soft taco sized flour tortillas)
Cooking spray
1 cup (4 ounces) shredded Monterey Jack cheese (I used cheddar)
(I also added a can of black beans, drained and rinsed)
Preheat broiler.
Combine first 3 ingredients, stirring well. Heat oil in a large nonstick skillet over medium-high heat. Sprinkle the spice mixture evenly over chicken. Add chicken to pan; sauté for 3 minutes. Add onion, corn, and zucchini (and beans-if using) to pan; sauté for 2 minutes or until chicken is done. Stir in salsa and 2 tablespoons cilantro. Cook 2 minutes or until liquid almost evaporates, stirring frequently.
Working with 2 tortillas at a time, arrange tortillas in a single layer on a baking sheet; lightly coat tortillas with cooking spray. Broil 3 minutes or until lightly browned. Spoon about 3/4 cup chicken mixture in the center of each tortilla; sprinkle each serving with 1/4 cup cheese. Broil an additional 2 minutes or until cheese melts. Repeat procedure with remaining tortillas, chicken mixture, and cheese. Sprinkle each serving with about 3/4 teaspoon of remaining cilantro. Serve immediately. (I also topped mine with shredded lettuce and diced tomatoes)
Last week, I was asked to be a member of one of my favorite baking sites – BlakeBakes.com! Today they posted these brownies, my very first post!! Go check it out!!! YAAAAY!!


