This will be the last TWD cookie post for December…sad, I know. Next week is butterscotch pudding, though, so that’s something different to look forward to! I’ve actually been sick all night last night and all day today and I feel like crap, so this post will most likely be short and sweet (I’d really just like to get some sleep, y’know?)
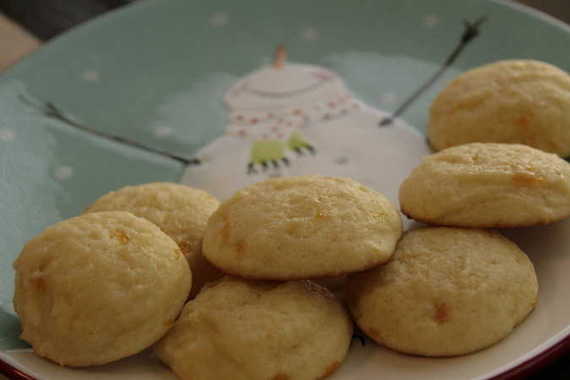
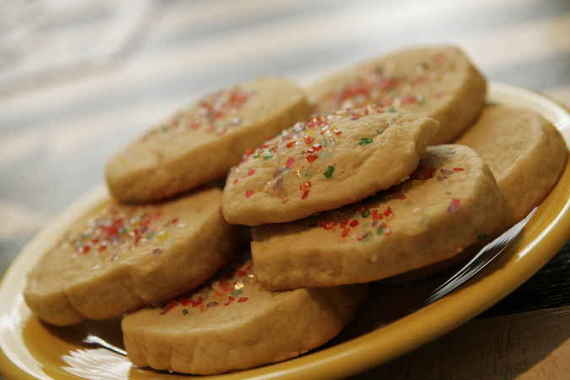
This week’s cookie was Buttery Jam Cookies, chosen by Heather of Randomosity and the Girl. These were surpisingly really good cookies – essentially, it’s just a soft, pillowy sugar cookie with apricot jam mixed in with the dough – sounds good, huh? I served these at a little Christmas shindig I was having the other night and they were a hit with my guests – I also sent some to work with hubby and he said his coworkers went nuts over them too! Yay Dorie! Another smash hit!
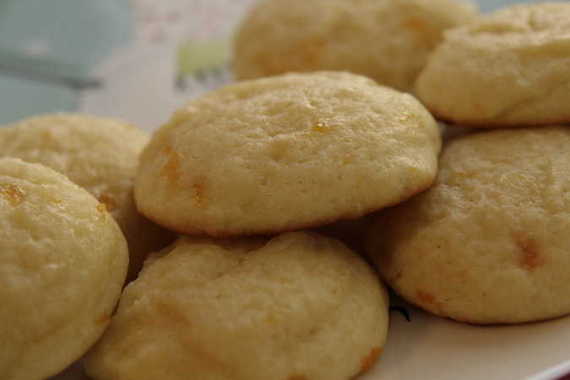
These are a really subtle cookie – not too sweet, with just a hint of apricot (or whatever jam you choose to use). I bet they’d be absolutely perfect with a cup of tea. If you’d like the recipe, go visit Heather’s blog. Happy baking and merry Christmas!!
**There is an updated post on this recipe- if you’d like to see it, click here
I like to think of myself as sort of a “fancy” girl – I really love big, elaborate, overdone things….nothing gets me excited like getting a big fat present, or being on stage and getting one heck of an applause. Big, elaborate stuff is great…really; but honestly, it’s the simple little things that make me really happy. Simple things like my hubby getting home from work everyday (I get so excited when I hear the garage door opening); or having a fire going in my fireplace; my mom loading me up with all of her leftover Christmas decorations; watching my favorite Christmas movie with a mug of hot chocolate; the hot guy on Lost. It’s all about the simple things.
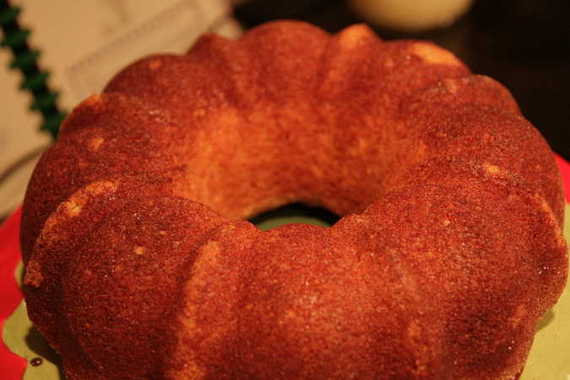
This cake is definitely one of those simple things that puts a big ‘ol smile on my face and a “mmmMMM!” on my lips. My mom’s Cinnamon Pound Cake.
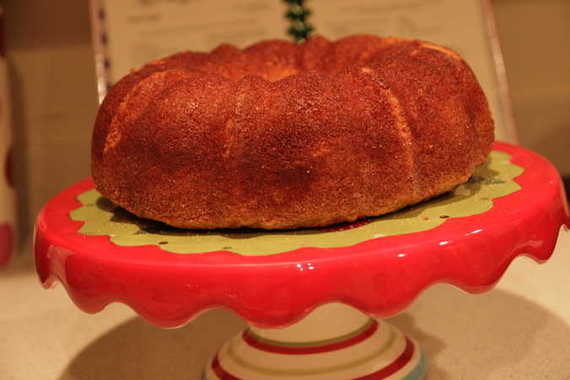
I didn’t really have that much of an appreciation for this cake when I was a little younger. My mom would make it (usually around Christmas, or in the winter) and everybody just scarfed it up (um, yeah, ‘scarfed’ is a word) and went on and on about how good it was. I personally didn’t think it was all that great- I mean, I liked it alright…I just didn’t get the “wow” factor. Don’t know why. I was in high school…I had to be difficult – otherwise everybody would’ve been bored. It wasn’t until after I was married, and was having my parents and in-laws over for a nice dinner before Christmas that I ever made this cake on my own. I was searching for a really good dessert – something that would make everybody know in their heart of hearts that I was the best little wife and cook there ever was (I don’t think such a dessert exists…) and I kept coming up empty handed. Either it was too difficult or too simple. Finally I somehow decided on the cinnamon pound cake, and as it turned out, that cake was the perfect end to a mediocre dinner (I had only been married like, 2 months…I was still working on the whole “company over for dinner” thing. I think I served a casserole…hehe). It was so delicious with a big cup of strong coffee – everybody loved it. Including me! Somehow, my tastes had changed and I grew to love that cake in just one evening! Now I make it every single year….and it’s SOOOOOO good! And SOOOOOO simple!! And the best thing is, it tastes best in the morning with your coffee…I love cake for breakfast. This cake always gets rave reviews, no matter where I take it. I sent some to work with hubby and he said his coworkers went nuts over it. Try it! I promise you’ll love it!
Cinnamon Pound Cake
4 tablespoons sugar
2 tablespoons cinnamon
1 yellow butter cake mix (don’t use white cake mix – it has to be butter!)
1 package instant vanilla pudding
1/2 cup canola oil
1 – 8 oz. container sour cream (you can use reduced fat, but in my opinion, it doesn’t taste the same)
4 eggs
Preheat oven to 350 degrees and grease a bundt pan.
Mix the sugar and cinnamon together in a small bowl and sprinkle half of the mixture in the greased bundt pan – shake it all around to coat the entire pan. Mix cake mix with pudding, oil, sour cream, eggs and other half of cinnamon/sugar mixture. Pour into pan and bake for 45 – 50 minutes until springy. Cool for 20 minutes before taking out of pan.
Well, I’d be lying if I said I had baked my cookies this week like a good little TWD baker – I didn’t. In fact, I was so busy making those 12 batches of cookies for my mother-in-law, I didn’t even get around to thinking about this weeks’ recipe! I know….bad Amy, bad! BUT– the good news is, I’ve made these cookies before, so I can at least say that I’ve tried them and they’re the most perfect sugar cookies I’ve ever eaten!
This week, Ulrike of Kuchenlatein chose Grandma’s All-Occasion Sugar Coookies, and let me tell you – these are awesome sugar cookies! They’re my go-to sugar cookie recipe from now on. I made them when my nephew came to visit for a few days and we made these together – he said they were the best cookies he’d ever had!

Go check out Ulrike’s blog for the recipe! Sorry I sort of “cheated” this week and posted re-run pictures! Happy baking!
First, let me clarify – before I got married, the extent of my baking (besides helping my mom in the kitchen every now and then) was break and bake cookies or a boxed cake mix of some sort. In college, I baked a few things from time to time for Tyler and Seth, the boys who lived across the way from my roommate and me; but really, when it came to “real” baking – not using boxed mixes or slice-n-bake cookies- I didn’t do much of it at all! Then I started dating my hubby and somehow, my affections came out through baking…who ever saw that coming! I would send him boxes of cookies in the mail (he was at one college, and I was at another) and bake him special cakes when he’d come to visit for the weekend. So now, after two years of marriage, somehow my baking abilities have gone from store bought cookie dough to making up my own kinds of cookie recipes, homemade frostings, ganache, and all kinds of other things! Yay me! I totally found my niche…baking is what I love doing now (besides opera) and I’m getting better and better everyday! (I still have a LONG way to go, however!)
So since I’ve started this food blog, my friends and family have started seeing me as more of a serious cook/baker. They ask for recipes and call with cooking questions, which is amazingly flattering; and most recently, my mother-in-law asked if I would make cookies for her work Christmas party! How exciting! Can I call myself a professional caterer now?? No? Ok fine….worth a try….
She said I could make any kinds I wanted, but the only request she had was for me to make the oatmeal with golden raisins, pecans and coconut that I had made for them recently. No problem! So…without further ado, here are the heaps and mounds of cookies I made yesterday!
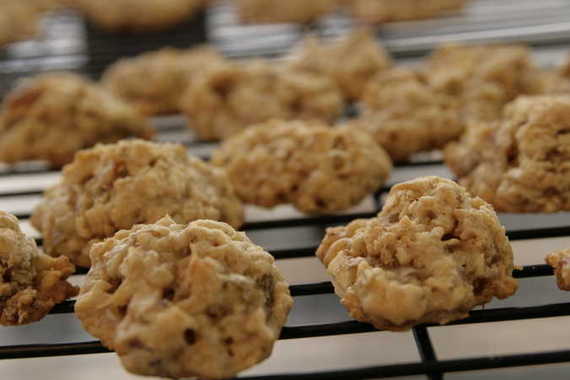
First up, Jan’s favorite. Essentially, an oatmeal raisin cookie, jazzed up a bit…Amy style! (I’m also sending these particular cookies into Joelen’s Holiday Cookie Swap blogging event, by the way!)
Oatmeal with Golden Raisins, Coconut and Pecans
1 1/2 cups old-fashioned oats
1 cup all-purpose flour
1/2 teaspoon baking soda
1/2 teaspoon baking powder
1/2 teaspoon salt
1/2 cup (one stick) plus 3 tablespoons unsalted butter, at room temp.
1/2 cup packed brown sugar
1/2 cup granulated sugar
1 large egg
1 tablespoon half and half
1 teaspoon vanilla extract
1 teaspoon pumpkin pie spice
1 cup coarsely chopped pecans
1/2 – 1 cup (however much you want, really) shredded sweetened coconut
1 cup golden raisins
Preheat oven to 350 degrees. Combine oats, flour, baking soda, baking powder, salt and pumpkin pie spice in a bowl. Set aside. In a separate bowl, cream both sugars and butter until light and fluffy and smooth. Add egg, half and half and vanilla and blend until smooth. Stir in the oat mixture, walnuts, raisins and coconut. Drop dough onto a cookie sheet lined with parchment paper in rounded spoonfuls (or you can use a cookie scoop) about 2 inches apart. Bake for about 13 -15 minutes or until edges of cookies are golden brown. Transfer to a wire rack for cooling.
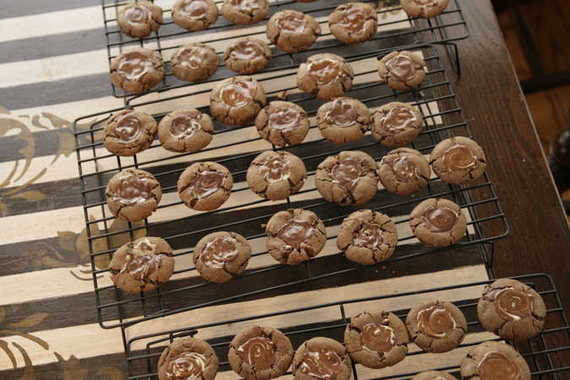
Second: the chocolate mint cookies (which I have appropriately re-named, “Chocolate Mint Puddles”). A full recipe makes about a TON of these cookies…but they’re so amazingly good!! My favorite Christmas cookie, as a matter of fact! How can you go wrong with chocolate and Andes mints??


Chocolate Mint Puddles
-allrecipes.com
3/4 cup butter
1 1/2 cups brown sugar
2 tablespoons water
2 cups semisweet chocolate chips
2 eggs
2 1/2 cups all-purpose flour
1 1/4 teaspoons baking soda
1/2 teaspoon salt
3 (4.5 ounce) packages chocolate covered thin mints (Andes mints)
In a saucepan over medium heat, cook the sugar, butter and water, stirring occasionally until melted. Remove from heat, stir in the chocolate chips until melted and set aside to cool for 10 minutes. Pour the chocolate mixture into a large bowl, and beat in the eggs, one at a time. Combine the flour, baking soda and salt, stir into the chocolate mixture. Cover and refrigerate dough for at least 1 hour.
Preheat oven to 350 degrees F. Grease cookie sheets. Roll cookie dough into walnut sized balls and place 2 inches apart onto the prepared cookie sheets.
Bake for 8 to 10 minutes in the preheated oven, be careful not to overbake. When cookies come out of the oven, Press one mint wafer into the top of each cookie and let sit for 1 minute. When the mint is softened, swirl with the back of a spoon or toothpick to make a pattern with the green filling of the mint wafer. For smaller cookies, break mints in half.

Third on the list, my absolute favorite chocolate chip cookie – the “BFCCC” (big, fat, chocolate chip cookies…I think chewy is supposed to go in there somewhere, too…). I made these not long after hubby and I were married and they became an instant hit with my entire family!
And in the haste of my cookie-making….this happened: A prime example of what NOT to do when you’re making cookies for your mother-in-law:

UGH. Just don’t ask…..its the spatula’s fault! That’s all I’m going to say about it!
Big, Fat, Chocolate Chip Cookies (the BEST!)
-allrecipes.com
2 cups all-purpose flour
1/2 teaspoon baking soda
1/2 teaspoon salt
1 cup unsalted butter, melted
1 cup packed brown sugar
1/2 cup white sugar
1 tablespoon vanilla extract
1 egg
1 egg yolk
1 cup semisweet chocolate chips (I use almost an entire package of chips…)
Preheat the oven to 325 degrees F. Sift together the flour, baking soda and salt; set aside.
In a medium bowl, cream together the melted butter, brown sugar and white sugar until well blended. Beat in the vanilla, egg, and egg yolk until light and creamy. Mix in the sifted ingredients until just blended. Stir in the chocolate chips by hand using a wooden spoon.
Drop cookie dough 1/4 cup at a time onto the prepared cookie sheets. Cookies should be about 3 inches apart.
Bake for 15 to 17 minutes in the preheated oven, or until the edges are lightly toasted (If you’re making smaller cookies like mine, bake them for about 12 minutes). Cool on baking sheets for a few minutes before transferring to wire racks to cool completely.
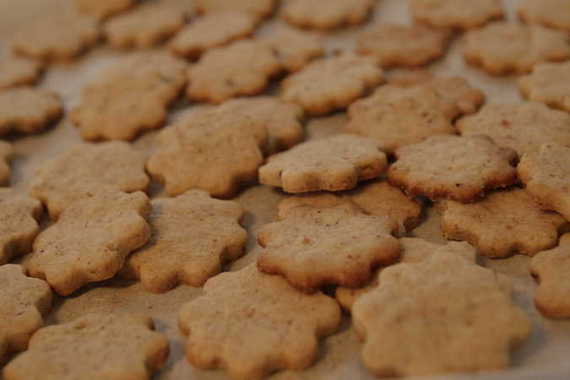
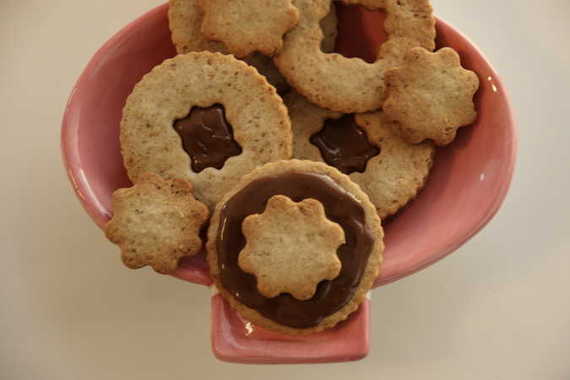
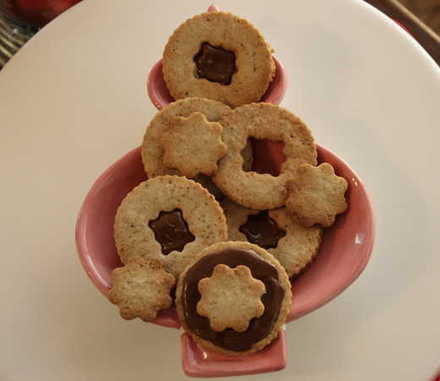
And last but not least, last week’s Tuesdays with Dorie cookie – the Linzer Sable (except that I didn’t make them into sandwich cookies, so I guess they’re just Sables…)
Linzer Sables
-Dorie Greenspan
1 1/2 cups finely ground almonds, hazelnuts or walnuts
1 1/2 cups all-purpose flour
1 1/2 teaspoons ground cinnamon
1/4 teaspoon salt
Scant 1/4 teaspoon ground cloves
1 large egg
2 teaspoons water
1 stick (8 tablespoons) unsalted butter, at room temperature
1/2 cup sugar
Whisk together the ground nuts, flour, cinnamon, salt and cloves. Using a fork, stir the egg and water together in a small bowl.
Working with a stand mixer, preferably fitted with a paddle attachment, or with a hand mixer in a large bowl, beat the butter and sugar together at medium speed until smooth, about 3 minutes, scraping down the bowl as needed. Add the egg mixture and beat for 1 minute more. Reduce the speed to low and add the dry ingredients, mixing only until they disappear into the dough. Don’t work the dough much once the flour is incorporated. If the dough comes together but some dry crumbs remain in the bottom of the bowl, stop the mixer and finish blending the ingredients with a rubber spatula or your hands.
Divide the dough in half. Working ,,~th one half at a time, put the dough between two large sheets of wax paper or plastic wrap. Using your hands, flatten the dough into a disk, then grab a rolling pin and roll out the dough, turning it over frequently so that the paper doesn’t cut into it, until it is about 1/4 inch thick. Leave the dough in the paper and repeat with the second piece of dough. Transfer the wrapped dough to a baking sheet or cutting board (to keep it flat) and refrigerate or freeze it until it is very firm, about 2 hours in the refrigerator or about 45 minutes in the freezer. The rolled-out dough can be wrapped airtight and stored in the refrigerator for up to 3 days or in the freezer for up to 2 months. Just thaw the dough enough to cut out the cookies and go on from there.
Getting ready to bake: Center a rack in the oven and preheat the oven to 375 degrees F. Line two baking sheets with parchment or silicone mats.
Peel off the top sheet of wax paper from one piece of dough and, using a 2-inch round cookie cutter-a scalloped cutter is nice for these-cut out as many cookies as you can. Transfer the rounds to the baking sheets, leaving a little space between the cookies. Set the scraps aside-you can combine them with the scraps from the second disk and roll and cut more cookies.
Bake the cookies one sheet at a time for 11 to 13 minutes, or until the cookies are lightly golden, dry and just firm to the touch. Transfer the cookies to a rack to cool to room temperature.
Repeat with the second disk of dough, making sure to cool the baking sheets between batches. Gather the scraps of dough together, press them into a disk, roll them between sheets of wax paper or plastic wrap and refrigerate until firm, then cut and bake.
So there you have it – the plethora of cookies (12 batches in all) I’ve been busy making. This has really been a lot of fun, though… I couldn’t justify making all these different kinds of cookies for just hubby and me – so this gave me an excuse to get in the kitchen and bake my little heart out! 🙂 Happy baking and Merry Christmas!!
How exciting!! I am so giddy about being a member of TWD during the Christmas season!! And not only that, but to actually have a food blog during all this wonderful holiday baking (Sing For Your Supper is only 8 months old, so holiday blogging is a new experience for me!)! I love baking Christmas cookies – like every cook/baker, my love for holiday baking started when my sister and I were kids and my mom would let us help her make all kinds of Christmas cookies. One particular kind I can remember making the most were called Santa’s Whiskers- sugar cookies that had a rim of coconut and maybe a few other things, I can’t quite remember. I actually never ate those cookies – I didn’t like them (it’s a coconut thing), but really enjoyed making them with my mom. So, naturally, I was super excited to see all the cookies chosen for TWD’s December line-up! Linzer Sables, Sugar Cookies, Buttery Jam Cookies….all kinds of fun stuff, and perfect for the holidays!
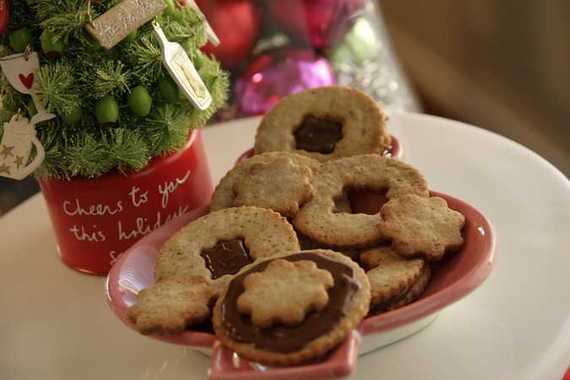
This week’s recipe was Linzer Sables, chosen by Noskos of Living the Life. Crisp, buttery cookies cut into cute shapes and filled with jam (or in my case, Nutella…genius!). These were great…I actually misread the recipe, as I so often do, and added 1 1/4 teaspoons of salt instead of 1/4 teaspoon (JEEZ, Amy!!), but they were still really good – you didn’t even notice the extra bit of salt! The Nutella was DELICIOUS all smushed up between these little cookies….sheer bliss!

A little tip: these cookies are perfect with some steaming hot chocolate on a cold night….especially after you’ve just been out in the cold all night trying to hang Christmas lights on the dang house. Just a suggestion.
Go check out Noskos’ blog if you would like Dorie’s recipe for Linzer Sables…..these are perfect for your next Christmas party!


Tuesdays with Dorie Holiday “Twofer” Pie: a blend of pumpkin and pecan
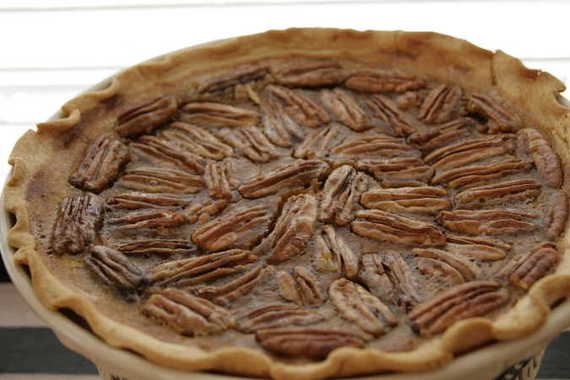
Happy Thanksgiving, ya’ll! (I know – you’re probably wondering why I’m blogging on Thanksgiving evening instead of enjoying family time….well, I figured blogging about pie might be a little more fun than watching A&M get slaughtered by Texas….hubby isn’t happy.) This week’s TWD recipe was chosen by Vibi of La Casserole Carree. As I said before, it’s a Holiday “Twofer” pie – a layer of pumpkin pie and a layer of pecan. Extremely tasty. The dark rum added a whole lot of flavor.
Holiday Twofer Pie
-Dorie Greenspan
1 9-inch unbaked pie crust
For the Pumpkin Filling:
1 cup canned unsweetened pumpkin puree
2⁄3 cup heavy cream
1⁄2 cup (packed) light brown sugar
1 large egg
1 large egg yolk
2 tsp. dark rum
1⁄2 tsp. pure vanilla extract
1⁄2 tsp. ground cinnamon
1⁄4 tsp. ground ginger
1⁄4 tsp. salt
For the Pecan Filling:
1⁄2 cup light or dark corn syrup
1⁄4 cup packed light brown sugar
2 tbsp. unsalted butter, melted
1 egg
1 egg yolk
1⁄2 tsp. pure vanilla extract
1⁄4 tsp. ground cinnamon
1⁄8 tsp. salt
1 1⁄2 cups (about 7 oz.) pecan halves or pieces
For the pumpkin filling: Pulse all ingredients together in a food processor. Leave filling in bowl.
For the pecan filling: In a bowl, whisk together all ingredients except pecans until smooth.
Preheat oven to 450°. Roll dough out to a 12″ circle on a floured counter, turning dough over frequently; keep counter floured. Slide dough into the fridge for about 20 minutes to rest and firm up. Fit dough into a buttered 9″ pie plate; cut excess dough to a 1⁄4″–1⁄2″ overhang. Fold dough under itself, so that it hangs over the edge just a tad, and flute or pinch the crust to make a decorative edge.
To assemble: Give the pumpkin filling one last quick pulse, then remove bowl, rap it on counter to debubble batter, and pour filling into crust. Top pumpkin filling evenly with pecans, then pour over pecan filling. Poke down any pecans that float to the top and aren’t covered with filling. Bake pie for 10 minutes. Reduce oven temperature to 300° and bake for another 35–40 minutes, or until it is evenly puffed and a slender knife inserted into the center comes out clean. Transfer pie to a cooling rack and let it stand until it is just warm or until it reaches room temperature.
Here are just a few more Thanksgiving pictures! Enjoy!

Hubby, brother-in-law, nephew and Daddy playing football across the street.

My Thanksgiving Table
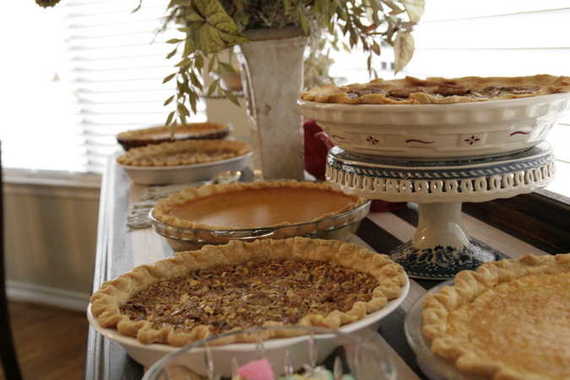
Pies galore! Pumpkin, pecan, buttermilk, and of course, my TWD pie.

Nephew having his pie on the floor! Silly boy!
It was a great day! Hope everyone else had a wonderful Thanksgiving! On to the Christmas decorating!!
Thanksgiving is upon us – one of my absolute favorite holidays. To me, Thanksgiving means having all of my family together, eating the best food we’ll eat all year long (I have to admit, the canned gelatinous cranberry sauce goo is my favorite part! And hubby’s too, incidentally – we so belong together!), and most importantly, the start of the Christmas holidays! The day after Thanksgiving is when we pull out the Christmas tree, ornaments, lights and our favorite holiday music and decorate our little hearts out! My favorite day of the year….seriously.
BUT – Thanksgiving isn’t just about food and family – it’s about giving thanks. The more I live, the more I learn just how much I have to be thankful for in my life. Especially this year. Allow me to take a moment to get real personal and share some of the things I am most thankful for (If you don’t want to take the time to read about my thankfulness, that’s cool- just scroll down and at least check out my bread!):
I’m thankful for my hubby. All the time. Even when we fight, because that means we’re a part of something worth fighting for. This past year has been the hardest of our married life, but we worked together and came through our troubles even stronger and more “together” than we started out.
A loving family – both my own and my husband’s. Especially my mommy. 🙂
My new house – it’s everything I ever dreamed of and I love being in it.
I’m thankful for Baba.
I’m thankful that I’ve already made my greenbean casserole – one less thing I have to do tomorrow.
The ability to sing. I would be one boring, plain-vanilla girl if I didn’t have my voice.
I’m thankful for my kitchen – it’s my favorite room in the house! I’ve made some wonderful meals and goodies in that kitchen!!
My blonde hair….seriously. I know it sounds silly, but this is my Thanksgiving list!
My friend Jessica – it’s nice to have a close friend again.
I’m thankful for my parents’ new house and all that goes along with it (no more Josephine – woo hoo!!!)
Of course there are tons of things I’m leaving out (our troops, the food on our table, our safety and health, etc) but there’s simply too many to list today, so I decided to keep it brief!
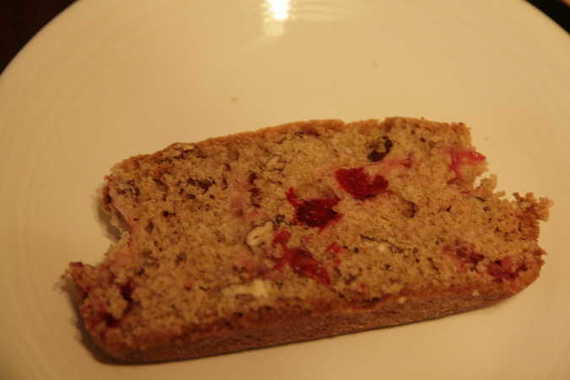
One last thing I’m thankful for is my cranberry orange bread….it’s delicious, it’s good with coffee….it’s good bread (even if the pictures aren’t!)!
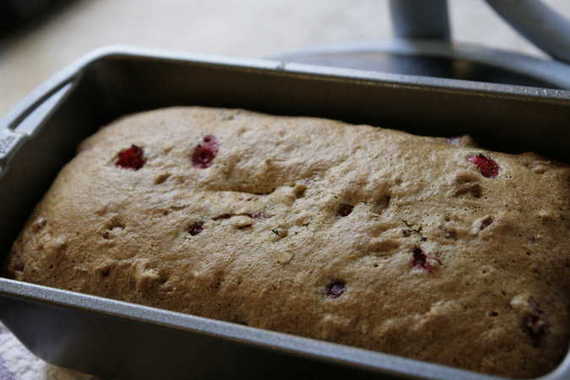
I first made this bread last year at Thanksgiving and it was a great success – not too sweet, nicely tart, and really tasty, so I decided to make it again – this time for hubby’s parents who came up to help us with some fix-it projects this week (thank ya’ll again!!).
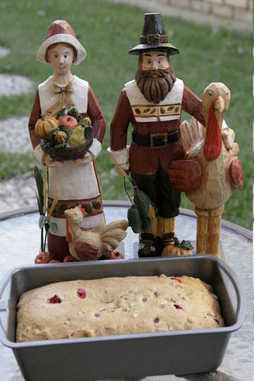
(and since it’s the Thanksgiving season, I thought I’d let the pilgrim people in on the bread action!)
Cranberry Orange Bread
-Allrecipes.com
2 cups all-purpose flour
1 cup sugar
1 1/2 teaspoons baking powder
1 teaspoon baking soda
1/2 teaspoon salt
1 egg
1/2 cup orange juice
Grated peel of 1 orange
2 tablespoons melted butter or margarine
2 tablespoons hot water
1 cup fresh or frozen cranberries
1 cup coarsely chopped walnuts (I used pecans)
In a large mixing bowl, combine dry ingredients. In another bowl, beat egg. Add orange juice, peel, butter and hot water. Add to flour mixture, stirring just until moistened. Gently fold in cranberries and walnuts. Spoon into greased 9-in. x 5-in. x 3-in. loaf pan. Bake at 325 degrees for 60 minutes or until toothpick inserted near the center comes out clean. Cool for 10 minutes before removing to a wire rack.
(Please, please, please forgive the horrible picture…..I was in a hurry and it was already dark!) 🙂
HAPPY THANKSGIVING, YA’LL!!!
**This post has been updated- click HERE to view it**

Do you like my fireplace? Its the first one hubby and I have ever had! We’ve always lived in an apartment, so when we moved into this house (which has two fireplaces, by the way!), we were super excited to have our first fire! So its no surprise that as soon as the weather changed and got a little cooler, we got a big fire in the fireplace and had a cozy little picnic on the floor in front of it!
It doesn’t get cold here in Texas until much later than the other (normal) states. In fact, here I am writing this post a week before Thanksgiving and its about 65 degrees outside (which we consider pretty chilly, by the way). So needless to say, as soon as the temperature drops below 80 degrees, I bust out my stock pots, fuzzy house shoes, and blankets and get ready for some cold weather comfort food! As I’ve said a million times, hubby loves his soups, so that’s the first thing I think of when it gets chilly outside. This potato soup is a perfect meal for a chilly evening at home – and it only tastes better when you eat it on a blanket on the floor in front of your blazing fireplace! YUM!! (sorry for the crummy picture, it was already dark outside and I was too hungry to care)

Potato Soup
-my mom’s recipe
5 -8 medium sized Russet potatoes, peeled and cut into chunks (this will make a pretty big pot, but if you want enough for a large crowd, I’d use 8-10)
1 yellow onion, chopped
salt and pepper to taste
milk (approx. 1/2 – 1 cup, depending on how “soupy” you like it)
Put the potatoes and onion in a large stock pot and cover with water; let it all boil together for 10 – 20 minutes, or until potatoes and onion are extremely tender and mushy. Drain most of the water (you can leave some in if you want a thinner consistency), then mash up the potatoes with a potato masher or a large spoon (if you want it super smooth, you could use a blender, but I just use a masher – I like a few lumps) and return the pot to low heat. Add the milk until you get the desired consistency, then season with desired amount of salt and pepper. Stir constantly for 2 -5 minutes, then remvove from heat and serve. I like to top mine with cheddar cheese and bacon bits.
Well, our vacation to Mexico was completely wonderful! We really enjoyed the food, scenery, weather and of course, the relaxation and couldn’t have asked for a better trip! BUT, it really is great to be home and blogging again! Here are just a few pictures from our trip to Playa del Carmen…enjoy!


I’ve got a few posts stored away that I’ll be posting in the next couple of days, so I’ll see you soon!
Back in August hubby and I had vacation plans to go to Mexico for a week for our anniversary, but thanks to dadgum Hurricane Gustav, we had to reschedule. So guess what….ITS TIME TO GO TO MEXICO!!! Finally!!! I’ll be back in a week – see ya then!!!

…….wasting away again in Margaritaville…la, la, laaaaaa!!


