I CAME THIS CLOSE TO NOT MAKING THESE!!! What an awesome dessert I would’ve missed out on…when I think about it, it makes me shudder! As you see below, we adopted a dog this weekend, so baking wasn’t really on the top of my “to-do” list. Luckily, at the last minute I decided not to be a pansy and just get in the kitchen and bake! Boy am I glad I did!
I mean, look at these babies! Chock full of butter, chocolate, brown sugar and FAT. I ask you: does it get any better??? Well does it?! I think not, readers….I think not. In fact, these were so good, I didn’t send the leftovers to work with hubby the next day….that’s big.
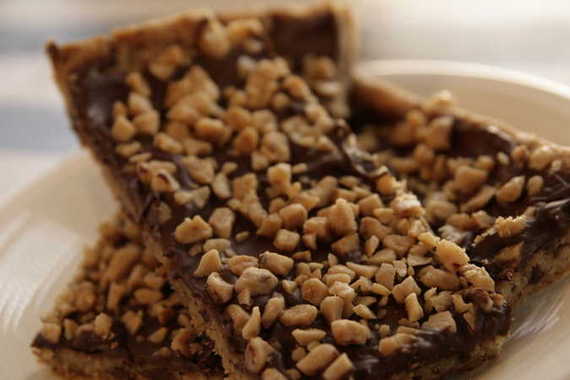
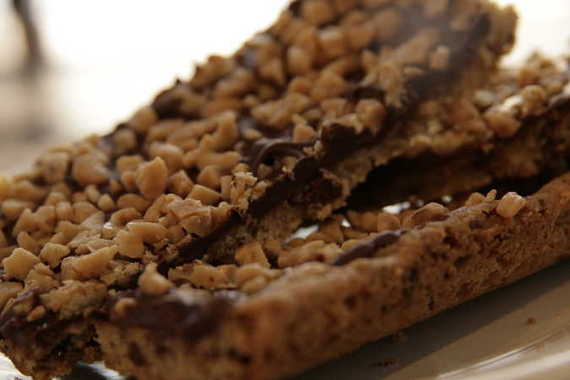
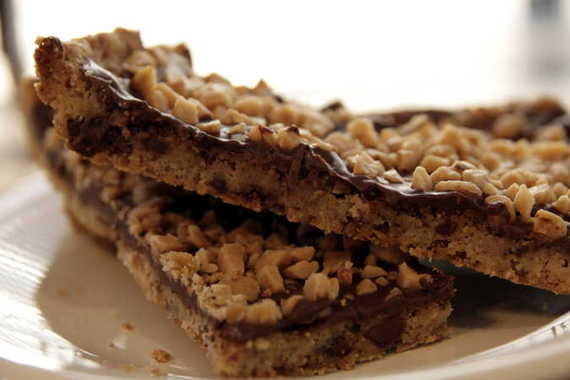
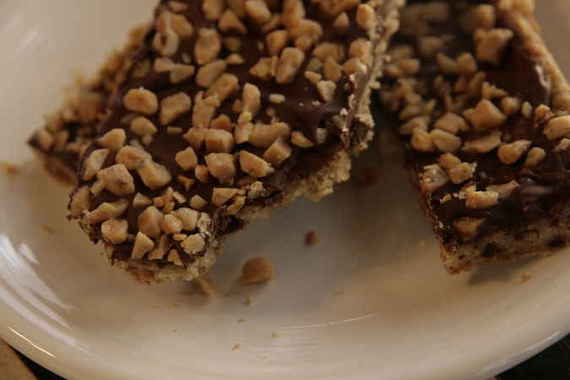
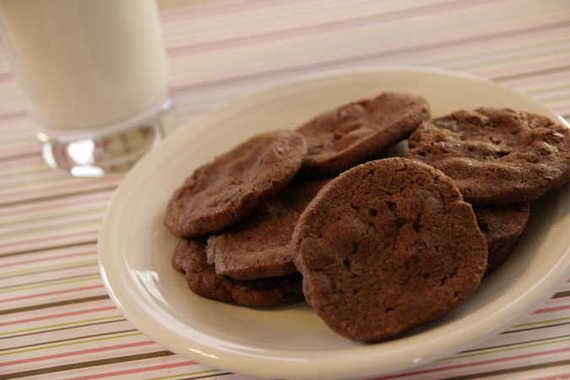
Now that I’ve got your interest peaked (or have I? Probably not, but I’ll pretend I’m that entertaining…) I’ll tell you what these beauties are! Caramel Crunch Bars, chosen by Whitney of What’s Left On the Table?. A layer of shortbread with espresso crystals, chocolate, and a touch of cinnamon, topped with melted bittersweet chocolate and little toffee bits. Um…yum.
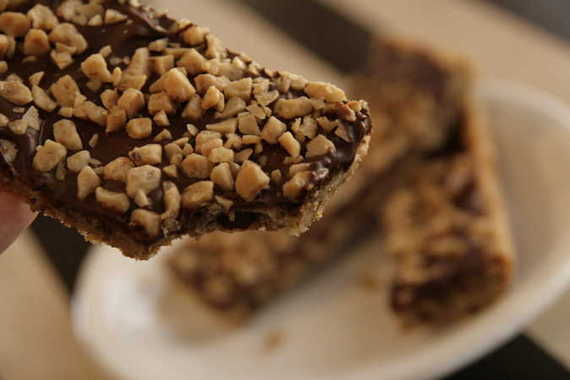
I made the mistake of only making half of a batch of these….and just let me tell you, I came pretty darn close to making a second batch today! I guess restraint is a good thing….. These were super duper easy – 30 minutes to make! Perfect for an afterschool treat (for those of you who have kids) or for a quick dessert. I’m telling you; give these a try! You won’t be sorry! Go check out Whitney’s blog for the recipe and make these this week!!!

(Ok, I know this post has nothing whatsoever to do with food or cooking, but I just couldn’t resist!) This is our new girl, Izzy! We adopted her from a local rescue society just last week. This has probably been one of the most stressful times for hubby and me – at times we felt like we were trying to adopt a child it was so involved! After submitting our application, we waited two weeks for a reply, after we talked to a nice lady on the phone, we were told we needed to provide 3 personal references (thanks Mommy, Courtney and Alyshia!!). After they contacted our references and decided we sounded somewhat decent, they arranged for us to meet Izzy; after we met her (and fell in love!), they came over to do a “home visit” to make sure our home was adequate and well-suited for a dog. A few days after that, we were able to finally adopt Izzy – it was a grueling process, but ultimately totally worth it!

And really, I think its great that these people are so thorough with their adoption process – it ensures that the dog goes to a loving home and will be taken care of for the rest of its life.

Unfortunately, Izzy hasn’t had it easy. She was a stray, and when she was found by the rescue society, they noticed that someone had put a rubber band around her nose and mouth. It had been there so long the rubber band had grown into her skin and nasal cavity, and was badly infected. They had to put her under and surgically remove it. It boggles my mind that there are people out in this world who would do that to a poor little puppy….

BUT – Izzy recovered beautifully, and she’s a very happy, energetic little girl! We love her so much already! She has so much personality – she loves her squeak toys and likes to hide from me under the couch! We are so happy to have her with us and are so glad we chose to adopt – people don’t realize how many sweet, lovable pets are out there just waiting to be taken home. Do yourself a favor and adopt a pet! It will brighten your life tremendously!!
Hope you enjoyed the pictures of our new little girl! Stay tuned – tomorrow I’ll be posting Dorie’s Caramel Crunch Bars…..SO good. Seriously. Prepare yourself.
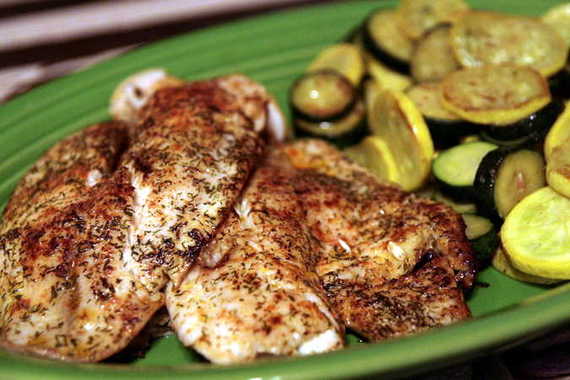
My old college roommate and close buddy, Courtney is working toward becoming a better cook. Now that we’re both in the real world and not living in our tiny college apartment anymore, our alternating dinners of mac-n-cheese and spaghetti just won’t cut it anymore. (I’m doing my best to move past these habits, too!) I told Courtney I would help her think of some quick and easy recipes to get her started, and so far she’s been making some pretty good stuff – I made this fish just for her.
Super Easy Tilapia
*serves 1 – 2
2 tilapia fillets
Salt
Pepper
Paprika
Dill
Fresh lemon juice
Cayenne pepper (just a pinch; optional)
Extra virgin olive oil
Heat 1 or 2 tablespoons olive oil in a pan over medium heat; season fish with salt, pepper, paprika, dill, lemon juice and cayenne pepper to taste. Place fish in pan and cook for about 3 minutes on each side or until inside of fish is cooked through and “flaky”.
Serve with grilled or sauteed zucchini and squash (I just slice them thin, season with salt and pepper, and saute them in a litte olive oil in a skillet for about 7 – 10 minutes or until tender).
So here’s a winner for you, Courtney – give this a try this week; I promise you’ll love it!
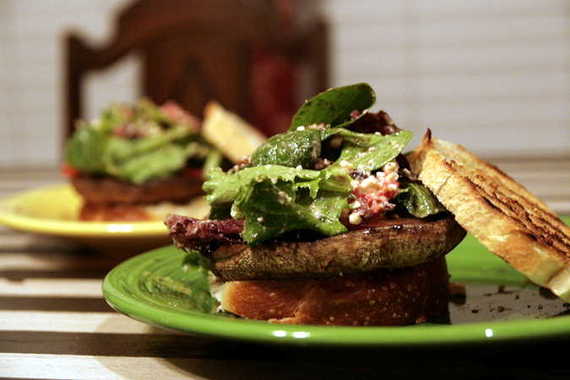
This is going to be a short post because I mean, how many different ways can you say how much you love something? I could go on and on, but I choose not to drive you crazy. I have found one of my new favorite meals. So satisfying, yet healthy – these Mediterranean Portobello Sandwiches are AWESOME. I mean, come on – feta, roasted red peppers, Kalamata olives…all on top of a delicious grilled portobello cap – Y.U.M.
Mediterranean Portobello Sandwiches
-Eating Well Magazine, June/July 2006 Issue
1 clove garlic, minced
1/2 teaspoon kosher salt
2 tablespoons extra-virgin olive oil, divided
4 portobello mushroom caps, stems and gills removed
4 large slices country-style sourdough bread, cut in half
1/2 cup sliced jarred roasted red peppers
1/2 cup chopped tomato
1/4 cup crumbled reduced-fat feta cheese
2 tablespoons chopped pitted Kalamata olives
1 tablespoon red-wine vinegar
1/2 teaspoon dried oregano
2 cups loosely packed mixed baby salad greens
Preheat grill to medium-high. (I used my indoor grill pan) Mash garlic and salt on a cutting board with the side of a knife until it’s a smooth paste. Mix the paste with 1 tablespoon oil in a small dish. Lightly brush the oil mixture over portobellos and then on one side of each slice of bread.
Combine red peppers, tomato, feta, olives, vinegar, oregano and the remaining 1 tablespoon oil in a medium bowl. Grill the mushroom caps until tender, about 4 minutes per side; grill the bread until crisp, about 1 minute per side. Toss salad greens with the red pepper mixture. Place the grilled mushrooms top-side down on 4 half-slices of the bread. Top with the salad mixture and the remaining bread.
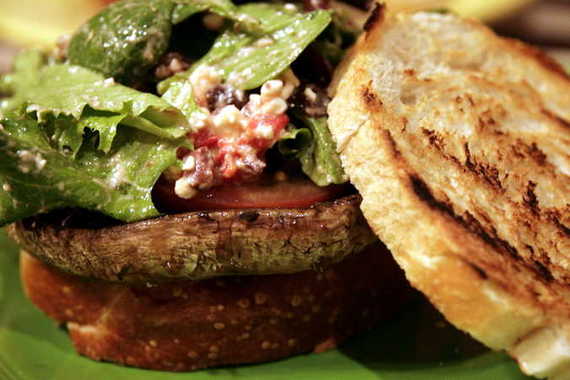
Now I’ll warn you, these are super messy – don’t expect to eat these without a little juice dripping down your hands and wrists. (Mmmm…portobello sandwich juice…..) But it’s definitely worth it. So as soon as Spring comes around, bust out your grills and give these babies a try! Or if you’re like me and you can’t wait until warmer weather – just use your indoor grill pan. Enjoy!

Well, I hope everybody had a really nice Valentine’s Day! I know I did – hubby sent me these beautiful tulips (my favorite flower) and took me to the museum – it was a great day…except the part where hubby started choking on the cheese fondue that I screwed up in the first place thus scaring the crap out of me and really grossing me out to the point of not being able to finish my meal which made us both go into hysterics from laughing so much yet still kinda grossed out so we thought we’d just open the second bottle of champagne and try to forget everything….yeah, except for that. Good times. Note to self: next time you’re making cheese fondue, try not to double the amount of cheese you’re supposed to put in. Oops.

So anyway, let’s move on to this cake – the Devil’s Food White Out Cake, chosen by Stephanie of Confessions of a City Eater. This is the gorgeous black and white cake on the cover of Dorie’s book, Baking From My Home To Yours. The cake itself was totally easy to make – it took no time. It sort of reminded me more of a brownie or the Chocolate-Chocolate Cupcakes we made back in October than a normal chocolate cake – it was definitely rich and chocolatey. The icing is what sort of scared me, though – it’s a fluffy, marshmallowy icing, and it starts with a simple syrup that has to reach a specific temperature before being added to egg whites, which eventually all gets whipped up together. You have to use a candy thermometer. I don’t have a candy thermometer and didn’t really feel like buying one…so I used a meat thermometer and a prayer. Thank the good Lord (and my meat thermometer) it worked! I know – it’s sort of a “back-woods” way of doing things (“you might be a redneck if…”), but hey, it worked didn’t it? Don’t judge.

Personally, I’m not a big fan of this icing -it’s just a wee bit too sweet, if you ask me. Give me buttercream or cream cheese anyday! However, it still made for a very delicate, pretty cake – I enjoyed taking pictures of this. You’re supposed to slice the two layers of cakes into four and crumble the fourth layer to top your cake with – but somehow my layers ended up pretty scrawny, so I just sliced a tiny bit off of one layer and made do with only a few crumbs. So normally, this would be a tall, fluffy looking cake…..just use your imagination, hm?

I think this would be a perfect birthday cake for a kid – it’s really chocolatey and way too sweet….that’s what they like, right? That’s what I liked, anyway.

If you want the recipe for this cake – head on over to Stephanie’s blog. She’s got lots of other great stuff on there, too!

Aaaaaaand, one more picture…..then I’ll go. I swear.


Yep – that’s right. I won all that great stuff! My fellow food blogger Jamie, of My Baking Addiction was hosting a Valentine’s themed baking giveaway on her blog and I was lucky enough to WIN!! All this stuff comes from an awesome online baking store and bakery called The Baker’s Nook. They have tons of great stuff – everything a baker could possibly ever need! Among some of my goodies were tons of cookie cutters, Wilton cookie icing and sparkle gel, cupcake liners, cookie stencils, sprinkles and oh so much more! THANKS, JAMIE!! Needless to say, I’ve had a fantabulous time playing with all the free goodies I got – here is just one sample of some of the awesome cookies I made:

This recipe for sugar cookies comes from my Great-grandmother, Baba, who passed it down to my grandmother, Nana, who passed it down to my own mommy, who passed it down to me and my sister. I love recipes like that – the ones that are good enough to hold up through the years and be passed down from generation to generation. It’s not a secret recipe or anything – in fact, its from the very first cookbook that Baba ever bought (when she was a young bride!). Here it is for those of you who are looking for a no-frills plain and simple sugar cookie (they’re actually called Refrigerator Cookies because you keep the dough in the fridge and just pull it out whenever you want cookies).
Baba’s Refrigerator Sugar Cookies
-The American Woman’s Cookbook
(* this makes a TON of dough, so you might want to do like I did and halve the recipe. You’ll still have enough for about 2 dozen cookies!)
6 cups flour
4 teaspoons baking powder
1/2 teaspoon salt
1 1/2 cups shortening (I used a mixture of butter and shortening)
3 cups brown sugar
2 eggs, well beaten
2 teaspoons vanilla
Sift flour, baking powder and salt together. Cream shortening and sugar until fluffy. Add eggs and flavoring and mix well. Add dry ingredients. Divide dough into portions and form into logs. Chill. Take out when needed and slice very thin and bake at 375 degrees for 10 to 12 minutes.
*Or you could do like I did and roll the dough out and cut out shapes. Either way, the dough needs to be chilled first.

For those of you who haven’t seen Jamie’s blog – I suggest you head over there immediately! I get some of my best baking recipes from her – she’s fabulous! Happy Valentine’s Day!!!
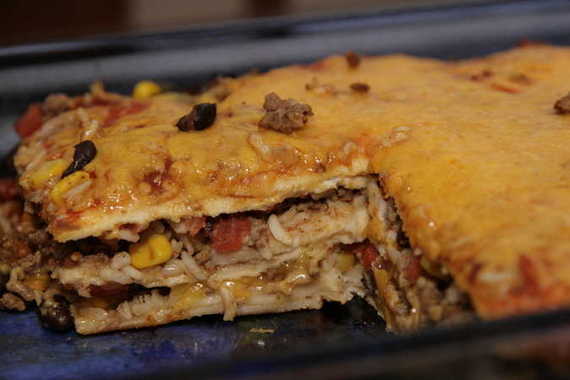
Here’s yet another winner from Renea over at Sweet, Savory, Southern– I think this is something like the fourth or fifth recipe of hers that I’ve made and loved. This time around, it’s her Mexican Casserole – we had it last night with homemade guacamole and raspberry margaritas…a very pleasant meal, indeed! The recipe made enough for us to have it again tonight – yippee!!
Mexican Casserole
-Sweet, Savory, Southern
1 lb lean ground turkey (I used really lean ground beef)
1/2 an onion, diced (As always, I used onion powder)
1/2 cup corn kernels (canned or frozen) *I also added a can of black beans
1 bag Mintute rice
1 packet taco seasoning (or make your own with chili powder, cumin, salt, garlic powder and paprika)
10 oz can diced tomatoes with chilies
14 oz can enchilada sauce (small can)
shredded mexican cheese
6- 8″ tortillas
Preheat oven to 375. Begin by sauteing the onion in a little olive oil until it begins to soften, about 4-5 minutes. Add the ground meat to the pan. While the meat is browning, cook the rice according to the package directions and set aside. Once the meat is browned, drain any fat or liquid from the pan. Add the corn kernels, taco seasoning and 3/4 cup water. Stir to combine. Add the rice and stir. Spray a 9×13 baking dish with cooking spray. Add 1/2 the can of enchilada sauce to the bottom of the pan. Next, make a layer with two tortillas. They should overlap a little. Add a layer of the meat mixture and then 1/2 the can of diced tomatoes with chilies. Add a thin layer of shredded cheese. Add two more tortillas and repeat the layers, ending with a layer of tortillas. Top with the additional enchilada sauce and cheese. Cover the pan with foil and bake for about 25 minutes. Remove the foil and allow to cook an additional 5-10 minutes. Let sit 5-10 minutes before serving.
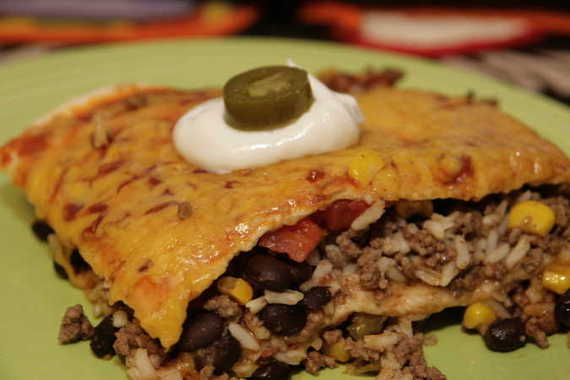
YUMMY! Like I said earlier, this goes great with some homemade guacamole and a big ‘ol pitcher of margaritas (just don’t take the plastic pour spout-thingie off your tequila bottle…because then the cap wouldn’t fit back on and you’d have to duct tape it so it would stay on. Makes no sense to you? Yeah, me neither, but somehow it happened….) Enjoy!
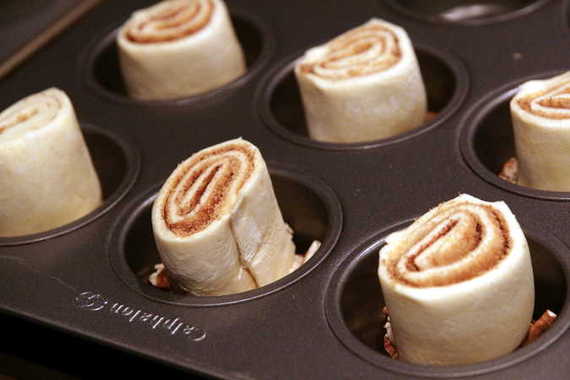
When Jessica was staying with us for the weekend, I wanted to have something really good for breakfast. So, naturally, the first person I turned to was Ina Garten. I love this woman. Especially her new cookbook – Back to Basics. She has a great recipe in her new book for Easy Sticky Buns that uses frozen puff pastry – perfect!
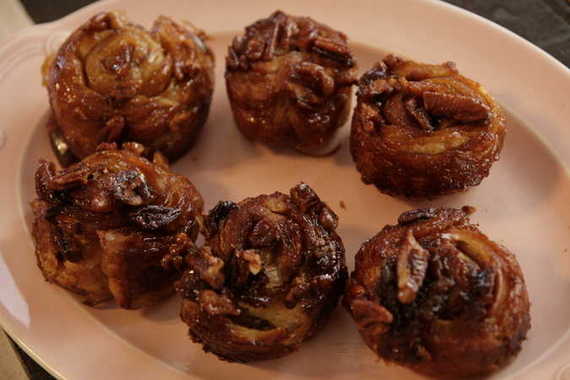
These were so good and SO easy – they came together in about 40 minutes total! That way I didn’t have to get up at the crack of dawn….eeeeexcellent.
Easy Sticky Buns
-Barefoot Contessa – Back to Basics
12 tablespoons (1 1/2 sticks) unsalted butter, at room temperature
1/3 cup light brown sugar, lightly packed
1/2 cup pecans, chopped in very large pieces
1 package (17.3-ounces/ 2-sheets) frozen puff pastry, defrosted
For the filling:
2 tablespoons unsalted butter, melted and cooled
2/3 cup light brown sugar, lightly packed
3 teaspoons ground cinnamon
1 cup raisins (I left them out – yucky!)
Preheat the oven to 400 degrees F. Place a 12-cup standard muffin tin on a sheet pan lined with parchment paper.
In the bowl of an electric mixer fitted with the paddle attachment, combine the 12 tablespoons butter and 1/3 cup brown sugar. Place 1 rounded tablespoon of the mixture in each of the 12 muffin cups. Distribute the pecans evenly among the 12 muffin cups on top of the butter and sugar mixture.
Lightly flour a wooden board or stone surface. Unfold 1 sheet of puff pastry with the folds going left to right. Brush the whole sheet with the melted butter. Leaving a 1-inch border on the puff pastry, sprinkle each sheet with 1/3 cup of the brown sugar, 1 1/2 teaspoons of the cinnamon, and 1/2 cup of the raisins. Starting with the end nearest you, roll the pastry up snugly like a jelly roll around the filling, finishing the roll with the seam side down. Trim the ends of the roll about 1/2-inch and discard. Slice the roll in 6 equal pieces, each about 1 1/2 inches wide. Place each piece, spiral side up, in 6 of the muffin cups. Repeat with the second sheet of puff pastry to make 12 sticky buns.
Bake for 30 minutes, until the sticky buns are golden to dark brown on top and firm to the touch. Be careful – they’re hot! Allow to cool for 5 minutes only, invert the buns onto the parchment paper (ease the filling and pecans out onto the buns with a spoon) and cool completely.
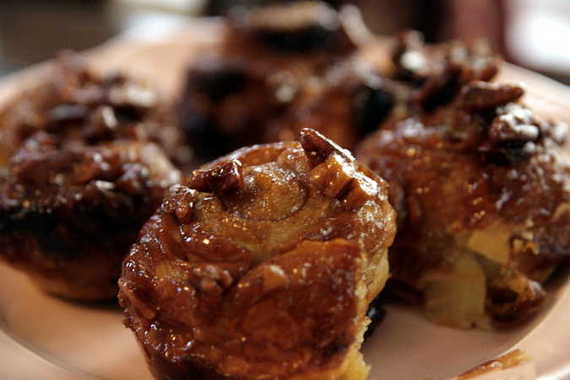
Give these a try this weekend…say, Valentine’s morning, maybe? A little breakfast in bed, perhaps? Hmmm?? 🙂 Enjoy!
Yes, that’s right – today is officially “World Nutella Day” – what a beautiful holiday…although, for some reason hubby and I were not given the day off. Jeez. Some people have no respect for food! And in case you’re thinking, “huh? there are food holidays?” , allow me to take a moment to fill you in on some of the delicious food-related holidays: there’s National Maple Syrup Day, Bologna Day, I believe there’s a whole month set aside for Grilled Cheese, National Ice Cream Day…there’s a ton of ’em! So anyway, back to Nutella- for those of you who are unfortunate enough to never have had the stuff, Nutella is sort of like the peanut butter of Europe, so to speak. It’s smooth and chocolatey, with a nutty flavor and it’s devine spread on bread, cookies, stuffed into pastries…all kinds of delicious possibilities.
When I was in college, I was lucky enough to go to Germany and Austria with my choir and tour. That’s where I first discovered my love for Nutella. They serve it for breakfast over there – they have all kinds of breads, deli meats and cheeses, jams, fruit…..and Nutella. And that’s where it began – every single morning, I would grab a baguette and tons of little travel size packs of Nutella and that was breakfast. Still one of my favorite snacks. A year or so later, still in college, when I was learning German, my teacher gave me a little tip – “yes, its good on bread, but its even better if you toast the bread first, then butter it and THEN spread the Nutella, that’s what I do!” And that was all she had to say. Four years later and I still eat my Nutella that way.
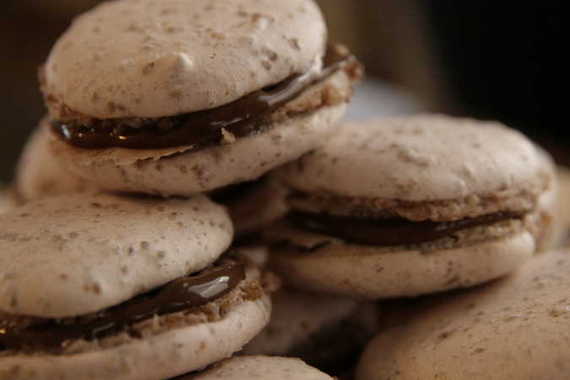
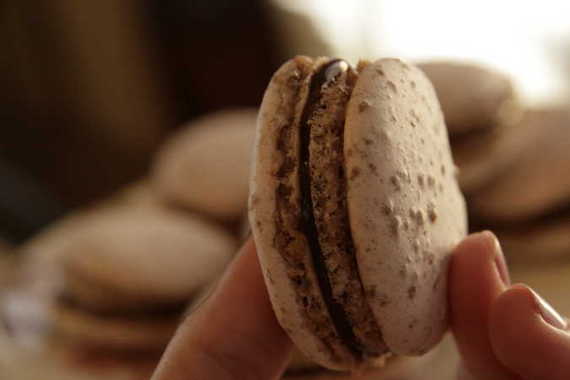
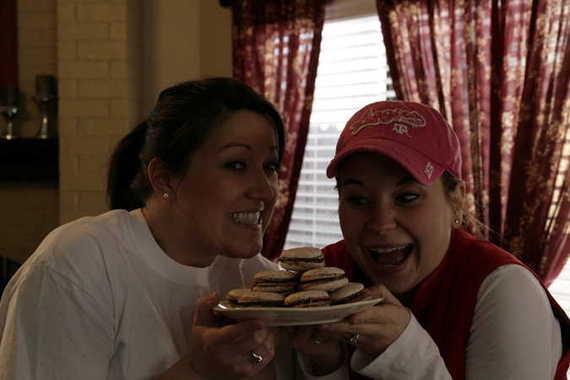
So anyway, I guess it’s lucky that a couple of weeks ago, when my good buddy Jessica came to visit Joel and me, we decided to make these French Macarons….filled with none other than Nutella!
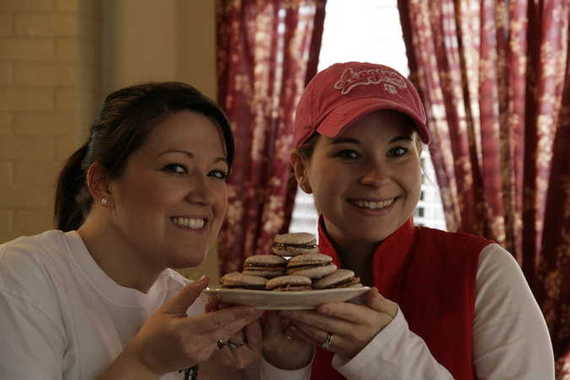
(That’s her on the left…isn’t she pretty?) By the way, Jess is celebrating World Nutella Day today as well – check out her Palmiers! AND – if you want to see our French Macarons from her perspective, visit her lovely blog – My Baking Heart. Ok, ok, enough of that – onto the Macarons! I had always wanted to make these, after seeing them countless times on some of my favorite food blogs, but I always thought they’d be too hard for the likes of me. So when Jessica came, I thought it might be a fun idea to try them together – and I could surely use the extra expertise! Normally, these call for ground almonds, but all I had was pecans (which is while they’re all bumpy!), so we thought we’d make them “Southern Pecan Macarons”. Genius. You know, there’s a reason us girls have our own blogs. Smarts, my friend, smarts.

These were surprisingly easy to make – the hardest part was walking away and letting them “rest” for 2 hours (I’m an impatient girl), but other than that, we had these babies done in no time! And boy are they tasty- Nutella worked as a perfect filling! Nom, nom, nom!
For those of you who aren’t familiar with Macarons, click here to learn all about them and see what they normally look like. And here’s the recipe:
French Macarons
-David Lebovitz
1 cup (100 gr) powdered sugar
½ cup powdered almonds (about 2 ounces , 50 gr, sliced almonds, pulverized)
2 large egg whites, at room temperature
5 tablespoons (65 gr) granulated sugar
Preheat oven to 375 degrees F. Line two baking sheets with parchment paper and have a pastry bag with a plain tip ready (or in our case, a ziploc bag with the tip cut out).
Grind together the powdered sugar with the almond powder so there are no lumps; use a blender or food processor since almond meal that you buy isn’t quite fine enough.
In the bowl of a standing electric mixer, beat the egg whites until they begin to rise and hold their shape. While whipping, beat in the granulated sugar until very stiff and firm, about 2 minutes.
Carefully fold the dry ingredients, in two batches, into the beaten egg whites with a flexible rubber spatula. When the mixture is just smooth and there are no streaks of egg white, stop folding and scrape the batter into the pastry bag (standing the bag in a tall glass helps if you’re alone).
Pipe the batter on the parchment-lined baking sheets in 1-inch (3 cm) circles (about 1 tablespoon each of batter), evenly spaced one-inch (3 cm) apart. Let sit out on the counter for 1-2 hours until they form a “skin”.
Bake them for 10-12 minutes. Let cool completely then remove from baking sheet. Fill with filling and sandwich cookies together.
Eat and ENJOY! (I’m probably going to hate myself tomorrow for posting that picture….) HAPPY WORLD NUTELLA DAY!!! ~Amy
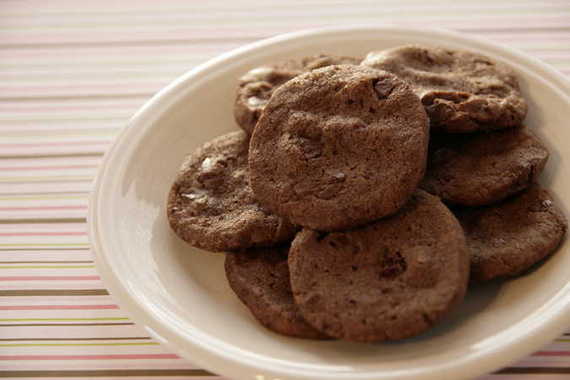
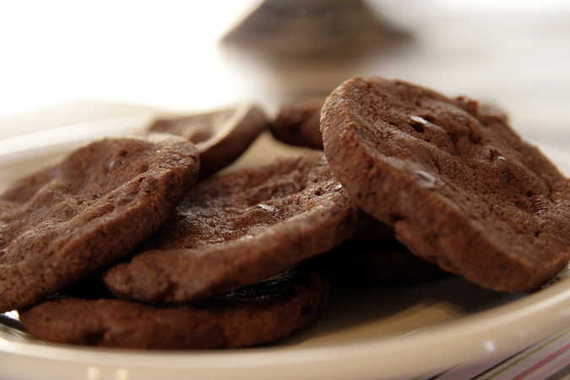
Those of you who have been reading my blog since the beginning know that these cookies have already been featured – shortly before I started Sing For Your Supper, I bought Dorie Greenspan’s Baking From My Home To Yours, and decided that I would make her World Peace Cookies right off. That was the first recipe of Dorie’s I ever made – and the rest, as you know, is history. Well that was almost a year ago, and I’ve been dying to make these amazing cookies again – thankfully Jessica of Cookbook Habit chose them for this week’s TWD recipe! Yay Jessica!!
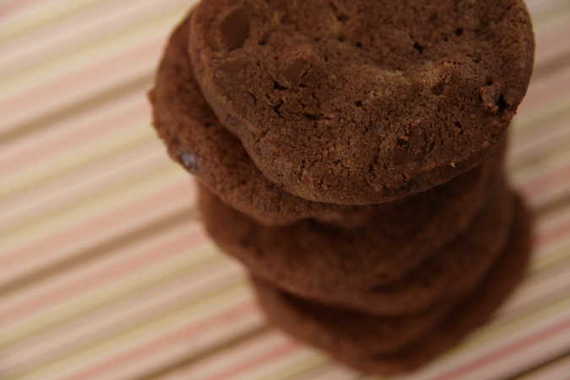
These cookies rock for two reasons: 1.) they’re light and crisp – I usually don’t like crunchy cookies, but these are just too good to resist; and 2.) they’re SALTY. The sea salt mixed with the dark chocolate just gives these babies something extra special. A girl could really lose herself in these cookies….
So you’re probably asking yourself, “why did she go to all the trouble of taking new pictures when all she had to do was use the same pictures as last time?” Oh – you’re not asking yourself that? Ah. Well just pretend you are…. The answer is because the pictures I took last time sucked. They were not TWD-worthy. Plus, I love taking pictures of my food!

Ok, so I already have the recipe for these posted on my blog from the last time I made these cookies, but for routine’s sake, I’ll inform you that you can get the recipe from Jessica’s blog if you want it. These really are awesome cookies – I suggest you give them a try; especially if you’re one of those people who love the combination of salty and sweet! YUM!