Mother Nature threw me a curve ball last week. We had been enjoying our first days of perfect Spring weather here – I was working on lots of projects outside in the sun, taking our dog on lots of walks, eating dinner al fresco…it was great; then the next week – BAM! 40 degree weather, high winds, cold rain and dark skies. Bummer. You know what they say – “If you don’t like the weather in Texas, just wait…” You can always count on Texas weather to be weird, wacky and ever-changing. So I just decided to make the best out of the situation and make a delicious, comforting tuna casserole for dinner (I love a hearty casserole when the weather is bad…makes you feel all warm and cozy). So as I was searching for recipes, it seemed like every single one went something like this: 1 can tuna, 1 can cream of mushroom soup, 1 package noodles. Sorry, but no thanks. I needed a serious casserole for some serious weather (Not that I have a problem with condensed soups…I use them in a few things!) So I googled “no soup tuna casserole” – and actually found a few good ones! Including this one:

This was hands-down the best tuna casserole I’ve had yet! And hubby went nuts over it- he said, “I really appreciate a good tuna casserole, and this one is awesome!” That’s all a girl needs to hear, in my opnion. This came together in no time and it keeps really well in the fridge if you have leftovers. I highly recommend this casserole – it’s just perfect all around!
Tuna Casserole
8oz Spaghetti, broken into 4ths
1/2 an onion, diced
1 green pepper, diced
1 package (or 1 small can) mushrooms, diced
1/2 cup frozen peas
1 small can sliced black olives (optional)
3 oz butter
5 tbsp flour
1 1/2 cups chicken stock
1 cup milk
Handful chopped fresh parsley
1/2 cup shredded cheddar cheese
2 cans tuna, drained and flaked
Panko bread crumbs, sautéed in butter until beginning to brown
Preheat oven to 400°F.
Cook spaghetti as directed on package. Drain and rinse with cold water. Set aside.
Melt butter in a large saucepan and add onions and pepper. Sauté for a few minutes until beginning to soften. Add mushrooms, peas and olives. Sauté for another minute or two. Add in flour and cook for a further two minutes. Slowly stir in the stock, then the milk. Bring up to a boil until thickened, then remove from heat. Stir in parsley, tuna and cheese. Season with salt and pepper.
Add spaghetti to the pot and stir to coat.
Place in buttered casserole dish and sprinkle the breadcrumbs on top.
Bake for ten to fifteen minutes until top is golden.
*Alternately, you can skip the bread crumbs on top and just top with additional cheddar cheese, which I like to do often.
Recipe source: adapted from Tast.ie

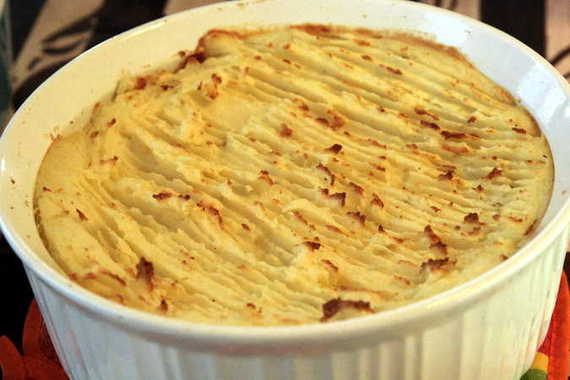
As you all know, yesterday was Saint Patrick’s Day (did you wear your green???). This holiday doesn’t really mean much to me (although it probably should, since I have a good chunk of Irish in me) and I don’t normally do anything to celebrate it except for pinching my hubby for not wearing green…hehe. In fact, I didn’t even have a single “Irish festivity” or dish planned for the occasion…until I saw this recipe for Shepherd’s Pie on one of my absolute favorite food blogs, For the Love of Cooking (apparently a lot of people like to make this dish on St. Patrick’s Day). Honestly, I’ve never really been “attracted” to shepherd’s pie…it never really looked appetizing to me – until yesterday. This recipe and the great-looking pictures really made me think twice about whether or not I wanted to try it. Amazingly enough, I happened to have all the ingredients I needed for it and I thought, “oh.. what the heck!” and set out to make my first shepherd’s pie.
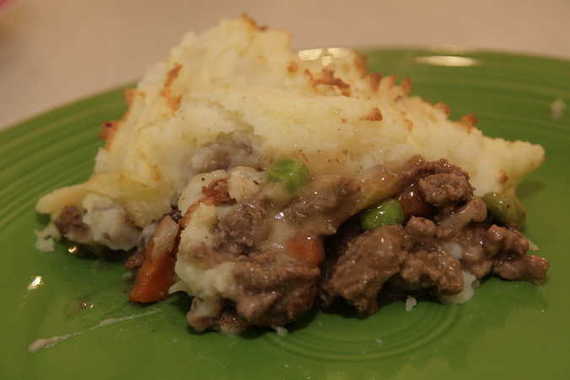
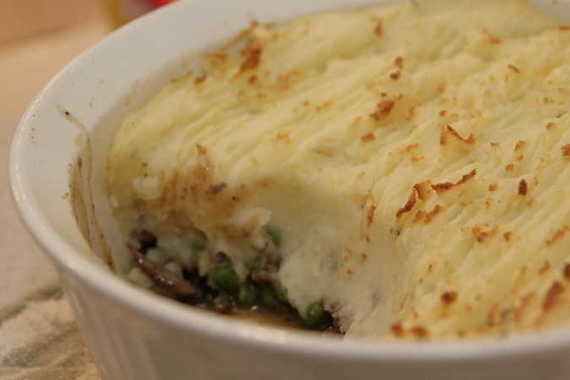
The verdict: it was really easy and absolutely SCRUMPTIOUS! Hubby and I both loved it. I think the milk, cheese, butter and sour cream in the mashed potato topping was what really made it extra special. This is one of our new favorites!
Shepherd’s Pie
-For the Love of Cooking
Mashed Potato Topping:
5-6 large potatoes, peeled and cut into thirds
1/4 cup of milk
3 tbsp sour cream
2-3 tbsp Irish garlic and herb butter (or regular butter)
1/2 cup Irish extra sharp cheddar cheese, grated
Sea salt and fresh cracked pepper
Boil a large pot of water. Peel the potatoes and cut into thirds. Boil the potatoes for 10-12 minutes or until fork tender. Drain potatoes and place back into the pan. Add the milk, sour cream, butter, cheddar cheese, sea salt and freshly cracked black pepper then mash with a masher or blend with a mixer until creamy and smooth. Cover with a lid and set aside.
Meat Filling and Sauce:
1 tsp olive oil
1/2 sweet yellow onion, diced (I didn’t have onion so I just used onion powder)
2 large carrots, diced
2 stalks of celery, diced
2 cloves of garlic, minced (I used garlic powder)
1 1/2 lbs of lean ground beef
1-2 tsp Worcestershire sauce (I doubled this)
1 cup frozen peas, thawed
Sea salt and freshly cracked black pepper, to taste
2 tbsp Irish garlic and herb butter (or regular butter)
2 tbsp flour
1 1/4 cup beef broth (I only had chicken broth, but it worked really well!)
While the potatoes are cooking, preheat the oven to 400 degrees. Heat the olive oil in a large skillet over medium heat. Add the onion, carrots and celery then cook until tender, about 4-5 minutes. Add the lean ground beef and cook thoroughly. Add the salt, pepper and Worcestershire sauce.
Once the beef is done cooking, mix the peas into the mixture until well combined. Pour the beef filling into a large baking dish and set aside. In the same skillet over medium heat, add the 2 tablespoons of butter and 2 tablespoons of flour. Mix thoroughly then slowly add the beef broth. Season with sea salt and pepper (I also added a few shakes of Worcestershire). Pour the sauce over the beef mixture and mix thoroughly. Top the beef and vegetable mixture with the mashed potatoes. Bake for 30 minutes. Let cool for a few minutes before serving. Enjoy.
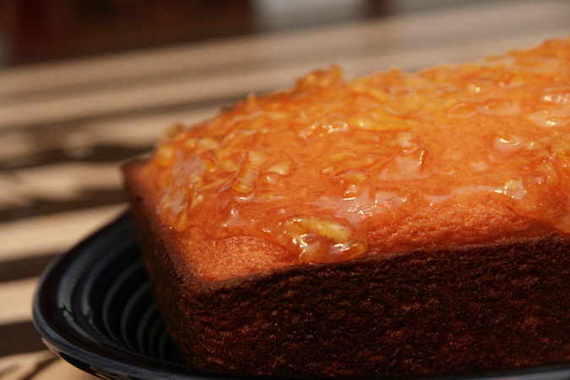
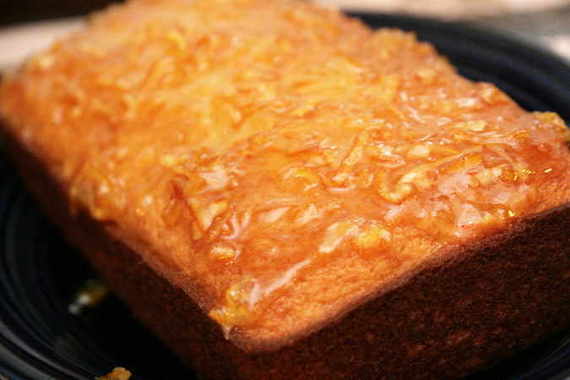
According to Dorie, this cake is as French as it gets. Apparently over in Paris, no person’s cooking repertoire is complete without this type of cake. Personally, I love the idea of baking something that is a favorite in people’s homes from another country and culture – it makes me feel special in a way. This French Yogurt Cake with Marmalade Glaze was chosen by Liliana of My Cookbook Addiction. It’s basically a lighter pound cake flavored with fresh lemon zest and topped with a lemon marmalade. Unfortunately, none of my grocery stores carry lemon marmalade, so I had to use orange. Boo. This was my first time using orange marmalade and I have quickly come to the conclusion that I don’t like it. The cake was still really good, but I just sort of scraped off the marmalade topping – bummer, because that’s probably supposed to be the best part. Honestly, this cake reminded me a whole lot of my most favoritest lemon cake – Ina’s Lemon Yogurt Cake, (but not near as good, in my opinion). I’m still really glad I tried this – I’ve been looking forward to this recipe for a long time now! I think next time I’ll try topping it with a little lemon curd…mmm, lemon curd.…..
If you want to feel really authentic and French-like, go over to Liliana’s blog and get the recipe for this cake! Perfect for Springtime!

Oops, how’d that get there?! Oh well…Izzy wishes everybody a happy St. Patrick’s Day!!

If someone asked me to make a list of my 5 favorite things in the world- my hubby, cheese and a warm plate of chocolate chip cookies would definitely be in the top 3 (not neccesarily always in that order…). My love for chocolate chip cookies is a deep and profound thing; there’s not much in life that get’s me as excited as making a big ‘ol batch of homemade chocolate chip cookies. I can remember when I first discovered that I was a “gooey, chewy and warm center” kind of gal- my sister and I were little girls and our Uncle Dit-Dit (that’s my uncle Steve- we called him Dit-Dit) had just moved into his first house and let us girls come over and check things out. It guess it must’ve been around Christmas, because he gave us each a cute little stocking filled with little toys and things and then he made us a batch of chocolate chip cookies. He said he liked them best with the gooey, slightly undercooked centers…so of course from then on, so did I (Honestly, I can’t believe I remember all this!). Incidentally enough, I also credit Uncle Dit-Dit for teaching me how to dunk my Oreos in milk- I can remember sitting at Nana’s kitchen table with Uncle Dit-Dit, and him showing me my very first Oreo dunk.) So, I guess I have good ‘ol Uncle Dit-Dit to thank for my being a raging cookie-holic.

I’ve tried many a chocolate chip cookie recipe – the BFCCC’s-my current favorite, Joelen’s CCC’s made with vanilla pudding, the classic Nestle Tollhouse recipe, and many others. I’m still wanting to try the famous NY Times’ recipe for “the perfect chocolate chip cookie”- that one has definitely made the rounds in the food blogging world. But lately I’ve tried the Pioneer Woman’s recipe and was really pleased. I love that it calls for coffee granules and milk chocolate chips as well as semi-sweet. I definitely left out the flaxseeds because well…flaxseed just ain’t got no place in chocolate chip cookies, in my opinion. Like I said, these were great – hubby really loved them too, but I’m still on the quest for the absolute best chocolate chip cookie…and getting closer every day!

Pioneer Woman’s Good Ol’ Basic Chocolate Chip Cookies
1/2 cup margarine
1/2 cup butter, softened
1 cup firmly packed brown sugar
1/2 cup white sugar
2 eggs
2 teaspoons vanilla extract
2 1/4 PLUS 2 tablespoons all-purpose flour
1 heaping teaspoon instant coffee granules
1 rounded teaspoon baking soda
1 1/2 teaspoons salt
3/4 cup semi-sweet chocolate chips
1 heaping cup milk chocolate chips
2 tablespoons flax seed, slightly crushed with rolling pin
Preheat oven to 375 degrees.
In a bowl, stir together butter, margarine, brown sugar, and white sugar until combined. Add eggs and vanilla and stir together.
In a separate bowl, stir together flour, instant coffee, baking soda, and salt. Add to wet ingredients in batches, stirring gently after each addition. Stir in flax seed if desired. (which it definitely was not.)
Stir in chocolate chips.
Drop balls of dough on a cookie sheet and bake 11 to 13 minutes. Remove from cookie sheet and eat warm.
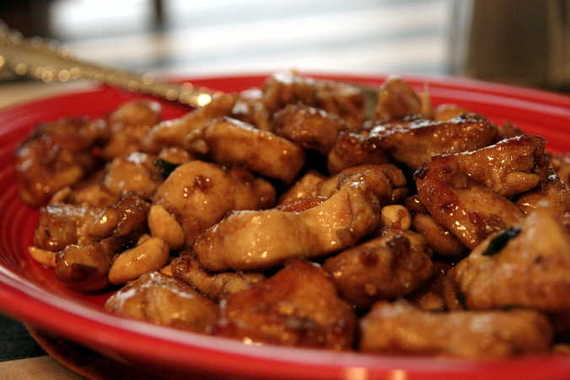
Big news everybody – BIG news! Last night, I had my first experience with cooking Chinese/Asian food!!! That deserves a big ‘ol freaking cookie! I know that sounds ridiculous, but for whatever reason, I’ve just never gotten around to cooking Chinese food – we usually just head over to Pei Wei or the local take-out place. But now that I’ve discovered these dishes, I think there will be a lot more Chinese food in the future! Yippee!
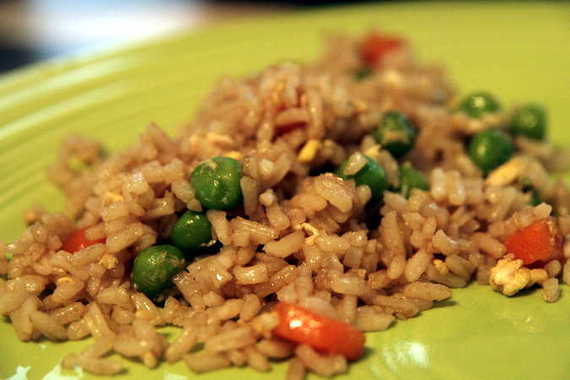
I’ve got a few of these type of recipes saved, but I chose this Kung Pao Chicken I saw on Pennies on a Platter recently because it has peanuts and I loooooove peanuts! It was super easy and took no time to put together. I paired it with a quick and easy recipe for Fried Rice that I found on Allrecipes.com. And voila! The perfect meal!
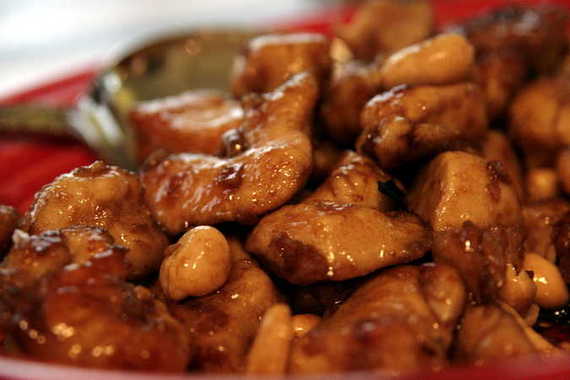
The sauce for this chicken was delicious and simple, and of course I loved the crunch of the peanuts. I think next time I’ll add a little more heat – maybe a little Cayenne pepper or a chopped chili- a little more “PAO”! Hehe…
Kung Pao Chicken
-Blog Chef
1lb boneless, skinless chicken breasts (cut into 1” pieces)
1 tablespoon cornstarch
2 teaspoons sesame oil
3 tablespoons green onions (chopped)
3 garlic cloves (minced)
½ teaspoon crushed red pepper flakes
½ teaspoon ground ginger
2 tablespoons rice wine vinegar
2 tablespoons soy sauce
2 teaspoons sugar
1/3 cup dry roasted peanuts
Combine chicken and cornstarch in a small bowl and toss to coat. Heat sesame oil in wok (or large deep-dish skillet) over medium heat, add chicken and stir fry 5-7 minutes or until no longer pink inside. Remove chicken from wok.
Add green onions, garlic, red pepper flakes and ginger to the wok and stir fry for 15 seconds.
Combine vinegar, soy sauce and sugar in a small bowl. Mix well and add the sauce to the wok.
Return chicken to the wok and coat with sauce. Stir in roasted peanuts. Heat thoroughly. Top with additional green onions if desired and serve over white rice. (Or fried rice, in my case!)
The fried rice took about 10 minutes total – I love recipes like this! I think next time I’ll add a little oyster sauce and a tad more soy sauce – other than that, it was perfect!
Fried Rice
-Allrecipes.com
2 cups enriched white rice (I used Minute Rice)
4 cups water
2/3 cup chopped baby carrots
1/2 cup frozen green peas
2 tablespoons vegetable oil
2 eggs
soy sauce to taste
sesame oil, to taste
Cook rice according to package directions. In a small saucepan, boil carrots in water about 3 to 5 minutes. Drop peas into boiling water, and drain. Heat wok over high heat. Pour in oil, then stir in carrots and peas; cook about 30 seconds. Crack in eggs, stirring quickly to scramble eggs with vegetables. Stir in cooked rice. Shake in soy sauce, and toss rice to coat. Drizzle with sesame oil, and toss again.

Here in Texas, the weather is about 70 degrees on average, the Bradford Pear trees are blooming again and absolutely gorgeous, people are out flying kites, walking their dogs and playing frisbee (Seriously. I live in Mayberry.) and there are mounds of beautiful, fresh lemons in my kitchen – that means Spring is finally here. Usually, I’m a winter kind of person – I love to bundle up in blankets with my hot cocoa and my hubby in front of a fire and just relax. But this winter was a little less-than-cozy…our heater sucks, so we were freezing cold from November through February. These past few days have been the first that I’ve been warm in a few months. Sad, I know. So naturally, now that the weather has warmed up, I’ve been wearing shorts and of course, making all kinds of lemon desserts. That’s where these custards come in.

Bridget of The Way The Cookie Crumbles chose this weeks’ TWD recipe – Lemon Cup Custards. I was beyond excited when I saw her choice – I love lemon and I love custard. However, these were a little too “eggy” for me….Dorie even said herself that this is a very eggy dessert and those of us who aren’t big fans of desserts like this might want to skip this week. Honestly, I thought I was going to love these and its a crying shame I didn’t. I love flan, and I thought these would be similar, but really they weren’t, in my opinion. Too bad, but I’m really glad I made them and got to try them.

Even though I didn’t care much for this recipe, it was still a delight to be using lemons again. I absolutely love the scent of fresh lemon zest – it makes the whole kitchen smell so fresh and “springy”. Now I’m dying to make this lemon cake again! I guess it’s a good thing that next week’s TWD pick is a French Yogurt Cake with lemon marmalade – can’t wait for that one!

Don’t let my opinion of these custards scare you – if you’re a fan of custard and lemon, you might love this! It’s worth a try, anyway! Head over to Bridget’s blog and get the recipe – its really easy and only uses 4 ingredients.

Now get out there and enjoy Spring! Plant some flowers, take your dog on a long walk, sit outside at night with your hubby and enjoy a bottle of wine, or bake something with lemon – that’s the best way to enjoy the weather! Gosh, I sound like a big, stinking hippy, don’t I? Oh well…guess I should embrace it…“If you’re goinggggg to Saaaan Fraaaancisco…be sure to weeeear some flowers in your haaaaaaair….” Um…sorry. Don’t know exactly where that came from.


This is how we do pot roast in my family – or as I used to call it when I was little, “roast-pot-beef”. Not sure why, really. Pot roast is a typical “Sunday Dinner” meal; its just one of those meals that tastes better after church on Sunday – maybe God makes it taste better, I don’t know. In my family, “Sunday Dinner” is sort of a holiday, in that, we all get together, eat until our sides hurt, then sit in the living room and visit; just like Thanksgiving, Christmas, or Easter. When I was a kid, we usually had most of our Sunday Dinners at Nana’s house (don’t get me wrong, my mother hosted her fair share of them too, but it seems like we were at Nana’s more), and Nana would usually ask my sister and me what we wanted her to fix – Lindsay’s answer was pretty much always fried chicken, but mine was always roast-pot-beef; with carrots, potatoes, rolls and some sort of delicious nobody-can-make-it-as-good-as-Nana dessert. Bliss.
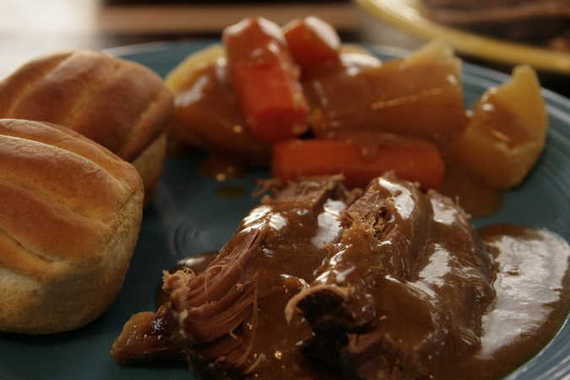
I still, to this day, would much rather eat my mother’s or Nana’s pot roast. Mine’s ok, but there’s just something about theirs that makes me eat about three times as much as a dignified lady ought to eat. Hehe…dignified. But, living an hour away from my mother and Nana makes it much more difficult for us all to get together for our Sunday Dinners; and when there’s just no way hubby and I can make the trip, I just make do with my own pot roast. So here it is, for your enjoyment…or not, whatever.
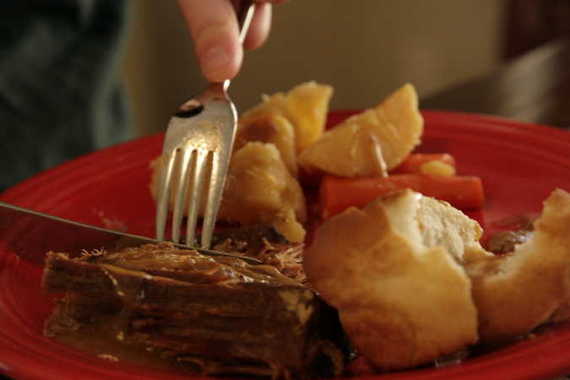
(Hehe – you can see Hubby’s reflection in his fork!)
Easy Pot Roast
I usually start with a nice lean chuck roast or round roast – really, whatever is on sale. Season it with plenty of salt, pepper and a little garlic powder, put it in the crock pot with about 1/2 cup water. If you want it to be ready by lunchtime, put it in the night before and cook it on low until the next day; around 10 or 11am, take the roast out, and add your potatoes and carrots (for the two of us, I use about 2 potatoes and 4 or 5 carrots), then add the meat back on top of the vegetables and continue to cook for another hour or so, until the vegetables are tender.
If you want the roast for dinner instead of lunch, put the roast on in the morning, and cook on low all day – add vegetables in the last hour of cooking.
To make the gravy, take the roast and vegetables out of the crock pot and place on a platter and cover with foil. Dump all of the cooking juices from the crock pot into a shallow pan over medium heat; add a little flour (about 2 tablespoons) mixed in with about 1/3 cup hot water to the pan and whisk constantly to thicken. Add salt and pepper to taste. *If your roast doesn’t give off enough juice, you can always add about half a jar of store-bought beef gravy.
*Note: both my mom and Nana cook their pot roast in the oven instead of the crock pot, but I think the crock pot is easier for some reason. Maybe that’s why mine isn’t as good as theirs…

“…raindrops on roses and whiskers on kittens, bright copper kettles and really freaking good spaghetti sauce…” What? It works….
For years now (seriously) I’ve been searching for a meat sauce made with brown sugar. I know it might sound strange, but its good! When I was in college, one of my friends’ roomates made us all spaghetti; and the homemade meat sauce she served over it was sort of sweet. Very memorable, to say the least. So I’ve been trying to find a similar recipe since then – all to no avail. Until now – yippee!!
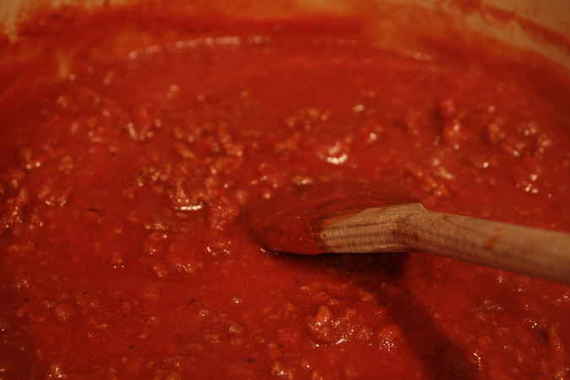
I was telling my mom about this the other day and she remembered that she had an old recipe for a slightly sweet spaghetti sauce. When she read it off to me I wasn’t totally convinced, but decided to give it a try anyway. Well thank goodness I did, because I have now found my new favorite spaghetti sauce!!! I can finally stop buying the cheap canned kind and adding extra spices to make it semi-decent…I now have my very own go-to meat sauce recipe…Hallelujah! And the great thing is, it makes a ton, so you can freeze half of it for another time – perfect. Now I know this recipe is less than authentic (I’m sure Italians would most definitely turn their noses up at this sauce) – it doesn’t have carrots, celery, onion or anything like that – but I figure since I’m a tacky American anyway, I might as well make tacky Americanized spaghetti sauce, eh? Enjoy –
Amy’s New Favorite Spaghetti Sauce
2 lbs. ground beef
2 teaspoons garlic powder (or you could chop your own if you really want to)
2 teaspoons brown sugar (mine were more like heaping teaspoons)
1 teaspoon dried oregano (I also added a little dried basil)
1 teaspoon cayenne pepper
1 teaspoon black pepper
salt to taste
1 small can tomato paste
2 cans water (this is using the little tomato paste can)
2 cans tomato soup
1 can tomato sauce
In a large stockpot or dutch oven, brown meat and drain grease. Add all other ingredients, mixing well. Bring to a boil, then reduce heat to low and simmer for 3 hours. Enjoy! I know I certainly did!

Ooops. Yeah, I know – today is Tuesday and there is no TWD entry. No mouth-watering recipes from our beloved Dorie. No commentary with me falling all over myself trying to put into words how deep my love is for a certain dessert. Yeah none of that. I just didn’t get around to making the recipe this week. I know, I know – how very irresponsible of me. BUT – I did make this cake. A good ol’ chocolate bundt cake. Nothing fancy, or complicated – just tasty.
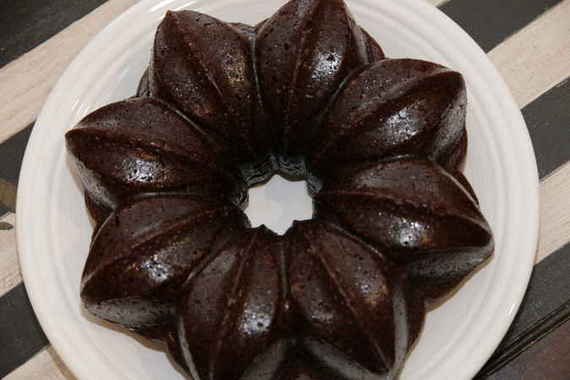
I got the recipe from Laure of Vintage Victuals the other day when I was searching for a good bundt cake recipe. I just bought a pretty new bundt pan – you know, one of those wobbly silicon ones, and wanted to put it to immediate use. This cake is chocolatey with a hint of cinnamon (which I love!), and really nice and moist. Although it’s mighty tasty eaten as is, I think it would be excellent with a glob of gooey chocolate frosting on top.
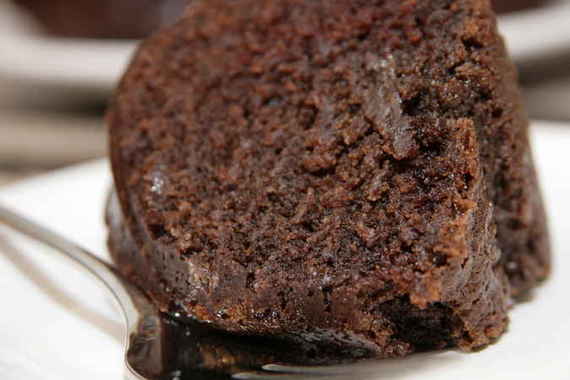
Thanks to Laure for sharing her family’s recipe with me!
Cinnamon Chocolate Cake
-Vintage Victuals
1/2 cup butter
1 cup water
1/2 cup vegetable oil
5 tablespoons cocoa powder
2 cups flour
2 cups sugar
1/2 teaspoon salt
1/2 cup buttermilk
1 teaspoon baking soda
2 eggs, lightly beaten
1 1/2 teaspoons cinnamon
1 teaspoon pure vanilla extract
Preheat the oven to 375 degrees. Grease a large bundt pan with cooking spray. Put butter, water, oil, and cocoa in a medium saucepan. Bring to a boil.
Meanwhile, whisk together flour, sugar, and salt in a mixing bowl. Pour the chocolate mixture into the bowl with the dry ingredients and mix well. Then, add the buttermilk and baking soda. Mix together the eggs, cinnamon, and vanilla in a small bowl, and add to the batter. Pour batter into prepared pan.
Bake 25 minutes. Allow cake to cool completely in the pan.

First of all, let me state, for the record that I do not consider this dish to be “authentic” or “homestyle” in any way. Although these are very delicious and have that slow-cooked taste, I do not count them as real chicken and dumplings. (There, Nana – that’s for you)
I found this recipe on one of my favorite food blogs – The Bitten Word and knew I wanted to try it. But first let me tell you – REAL, honest-to-goodness chicken and dumplings (or chicken-n-dumplins, as it is pronounced down here) are something I don’t cook. I won’t. I have no desire to. Because no matter how hard I try, or how delicious they may turn out to be, they’ll never be half as good as my Nana’s. That’s a recipe you just don’t mess with – it’s been around for…forever. All my grandmother has to do is pick up the phone to any one of us, be it my parents, my sister’s family, my family or my uncle’s family, and say, “I’m making chicken-n-dumplins..” and we’re THERE. Hubby and I live an hour away from Nana and Grandaddy, but we’ll gladly make the drive on any given day, in a moment’s notice for her chicken and dumplings.
So with that being said, I’ll go on with this recipe. These are what I like to think of as “Yankee” chicken and dumplings (no disrespect to you northerners out there), because they have carrots, onion, celery and white wine. The ultimate recipe (i.e. Nana’s) are made with just chicken, broth and dumplings. Also – they’re not “real” because the dumpling part is made with frozen biscuits, instead of a homemade dough. But, sometimes you need just such a recipe for nights when you want that home-cooked taste without standing over the stove for hours and hours. And these are PERFECT for that.

After making these – I’d have to say that they’re some of the best chicken and dumplings I’ve ever had. Hubby couldn’t say enough good things about them – he went on and on about how amazing they were. And the whole meal (minus the time it took to cook my chicken all day in the crockpot) took about 20 minutes to make!! You can’t beat that! I added some cornstarch to make it extra thick and creamy and a little butter – because Nana told me to – and it really added to the richness and creaminess. I cooked 1 pound of boneless, skinless chicken thighs for about 4 hours on high in my crockpot and they were so tender and moist. The only seasonings I used were salt and pepper – and lots of it. That’s all you need.
Easy Homemade Chicken and Dumplings
-The Bitten Word
1/4 cup olive oil
4 chicken thighs, bone in (or 4 bone-in or boneless chicken breasts)
2 medium onions, diced
2 cups diced carrots
2 cups diced celery
1 cup dry white wine
1/2 tablespoon salt (plus more to taste)
1/2 tablespoon fresh ground pepper (plus more to taste)
6 cups chicken stock
4 frozen biscuits (such as Pillsbury Grands Frozen Biscuits), thawed enough to cut into pieces
Pat the chicken dry and season with salt and pepper. Heat half of the olive oil (1/8 cup) in a large pot or Dutch oven over medium-high heat. Sear the chicken, turning the pieces so that all sides are slightly brown, about 3 to 4 minutes for each side. Remove the chicken pieces and place on a paper towel-lined plate. Add the remaining 1/8 cup of olive oil to the pot, along with the onions. Saute the onions until they’re soft, about 6 minutes. Add the carrots, celery, and white wine. Scrape up any brown bits from the bottom of the pot. Saute, stirring frequently, for another 6 minutes. Add the chicken back to the pot. Cover the meat and vegetables with chicken stock. Bring to a boil. Reduce heat to medium-low and simmer, partially covered, for 90 minutes. (This step is especially flexible. If your liquid is reducing too much, you may need to add more chicken stock. If the dish is too liquidy, turn up the heat and to reduce the stock more. The idea is to end up with a consistency of a very thick stew.) If the broth is not as thick as you would like, remove one cup of the broth into a measuring cup and whisk in 1 tablespoon of corn starch. Return the broth to the pot and stir. Remove chicken pieces with tongs and allow them to cool. Debone the chicken and shred the meat into small pieces. Return to the pot. Cut the frozen biscuits into thirds. Drop the pieces onto the top of the chicken and vegetable mixture. Cover and cook on medium-low heat for 8-10 minutes, until the dumplings are cooked through. Serve immediately.
*NOTE: I did mine a little differently – since I cooked my chicken in the crockpot, I just added it (with all of its juice) to the broth and cooked vegetables, then dropped my biscuits in. Much easier, I think!
We both thought these were excellent. I would make these again in a heartbeat. I just hope Nana doesn’t disown me…


