Well, this has been one crazy week. We are opening Carmen Saturday night and the rehearsals have been nuts lately! BUT- it’s going to be one fantastic show…this is by far the best opera I’ve ever been in- I’ve enjoyed it the most, too (regardless of the hard work). For those of you who don’t know the story of Carmen, here is a little background.
It’s definitely been a long couple of days. We started dress rehearsals Tuesday and I have three costume changes – one of which is a big, black, velvet Spanish lady costume with a ginormous Mantilla on my head that feels like it weighs about 50 pounds. It’s hotter than hades up on stage, too, which doesn’t help matters. My wig looks like something that came out of grandma’s attic and there’s a fall that attaches to the back, making it look like I have a jerry curl mullet. I have to smoke a fake cigarette, which I’m sure looks incredibly awkward since I’ve never smoked a day in my life and really have no idea how to hold it and look semi-natural. BUT – it’s all worth it to be a part of this amazing show – the music is fun to sing, the lady who plays Carmen is fantastic – you can’t take your eyes off of her! – and there’s an overall sense of pride being a part of something so magnificent.
Anyway, in honor of this weekend’s big premier, I thought a little Sangria might be fitting. I *love* sangria. Love, love, love it! I made this recipe the other night with quesadillas and black bean salad- so refreshing and delicious! Now that summer is on its way, I have a feeling there will be lots of pitchers of sangria!
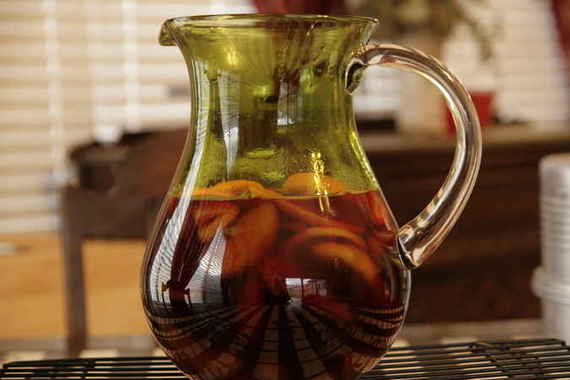
This recipe is pretty straight forward – I didn’t use the traditional shot or two of brandy, but it was still pretty tasty!
Red Wine Sangria
One bottle of your favorite red wine (I used Menage a trois)
2 or 3 cups Ginger Ale (however much you want, really- I didn’t measure, I just poured some in!)
2 blood oranges, sliced
2 lemons, sliced
A handful of sliced strawberries (again – however much you like)
One package frozen peaches, thawed, with their juice
Mix everything together in a large pitcher and chill until ready to serve. *If you want to be really cute and clever, you can freeze some grapes to use as ice cubes.

Everybody wish me luck for Saturday! Here’s hoping I don’t fall on my face, drop my fake cigarette, or my jerry curl mullet partially fall off and dangle to one side (again….). Enjoy your weekend!
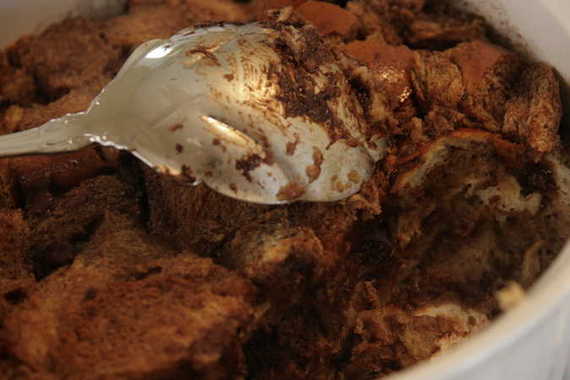
I love bread. I love chocolate. I love soggy, chocolatey bread. So you can imagine I thoroughly enjoyed this week’s TWD recipe chosen by Lauren of Upper East Side Chronicle (soon to be A Baking Blog), 4-Star Bread Pudding. I’m sure you all know how bread pudding works, basically you soak stale bread cubes in a milk mixture and bake it – deeeelicious. Dorie boils milk and cream together and mixes it together with eggs, sugar and chocolate; she pours it over stale Challah or Brioche and raisins or dried cherries and voila, chocolate bread pudding.
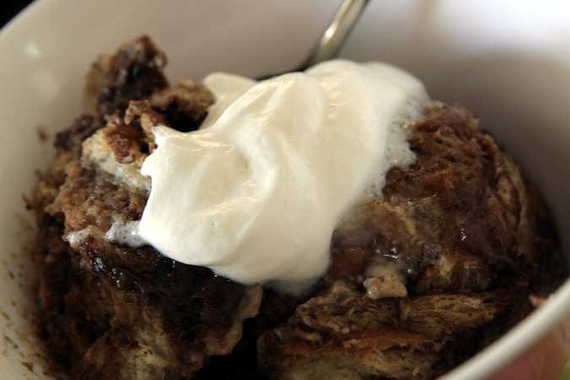
Now, I didn’t do excactly as Dorie told me to. I decided to pass on the option of the raisins or dried cherries (I don’t believe in fruit/chocolate mixtures- you know that!), I added a dash of cinnamon, and I also tossed in some semi-sweet chocolate chips with my bread. I ended up using twice the amount of chocolate called for and still could’ve used a tad more….I know..it’s a sickness. We’re looking into it. I used Challah bread, which was perfect – I love Challah. Especially the smooth, shiny crust – beautiful.
I personally think this recipe would be perfect at breakfast/brunch. To me, it seems to fit in somewhere in the family of my personal breakfast favorite, chocolate chip pancakes (with the whipped cream smiley face, thankyouverymuch!). I was really glad I added the extra chocolate chips – it really added to the “gooeyness” and in my opinion helped a lot with the taste and texture.
If you would like the recipe, head on over to Lauren’s blog and make yourself a chocolate bread pudding this weekend!
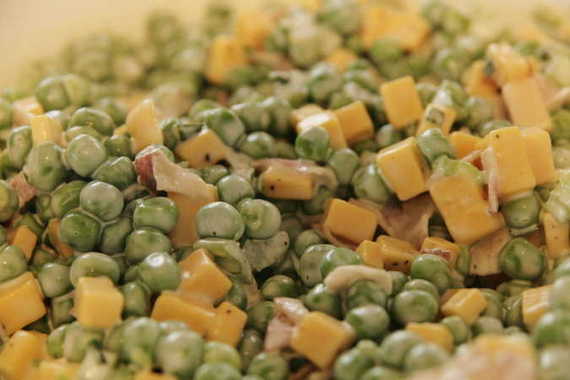
Ok, I know it’s probably one of my cheesiest titles yet, but I really do want to apologize for being MIA for over a week now (and, the post is about pea salad, so there you go). I promise I have a good excuse – the opera company I sing with is doing Carmen in a couple of weeks and I’m right in the smack middle of rehearsals. Driving 30 minutes to and from almost every night and every Saturday and Sunday, getting home after 10 or 11 o’clock in the evenings, trying to memorize music, and remember where I’m supposed to stand on stage without looking like a complete idiot (which still happens quite a lot, incidentally)….all this plus dog-sitting a poodle along with my own high energy pup and teaching voice lessons two days a week. This doesn’t leave much time for food-blogging. And to be quite honest, I haven’t cooked a thing in over a week – except this pea salad.
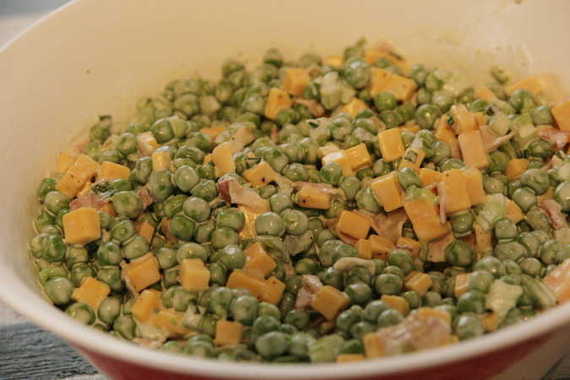
Easter was a really nice, welcomed break for the hubby and me. On top of the joy of celebrating Jesus’s resurrection, being with family, eating tons of Nana’s delicious ham and other yummy Easter-y things, it was just nice to have some time off and rest a bit. Although I didn’t rest too much – I was busy making a ginormous banana pudding (my mommy’s famous recipe) and this tasty pea salad! I had never had pea salad, and I’m not sure what made me want to try it, but for whatever reason I threw it together and decided to take it to my parent’s house for Easter Sunday. It was pretty good, too! I love the little cubes of cheese, and the bacon really gives it a good flavor. So, here is my “Peas Offering”, if you will (hehehe), and I promise I’ll try to do better with my food blogging in the coming weeks. Bear with me, ya’ll!
Creamy Pea Salad
One 10-ounce package of frozen tiny peas (thawed)
1/2 cup chopped fresh celery
3 green onions, chopped (I used only the green parts, otherwise I think it would overpower the salad)
3-4 slices of bacon, cooked, drained and crumbled or torn
1/2 cup cheddar cheese, cut into tiny cubes
1/2 cup real mayonnaise
1 or 2 tablespoons sour cream (depending on how much you like)
salt and pepper to taste
*I like to chop the celery and cheese about the same size as the peas, so everything is the about the same size
Combine all ingredients and chill until needed. Pretty straight forward, huh?
Ok, maybe not so much “Queen” – that would probably be Dorie, huh? Ok how about Princess?? Lady-In-Waiting? Court Jester?……..No? Ok fine. Just forget it, then….
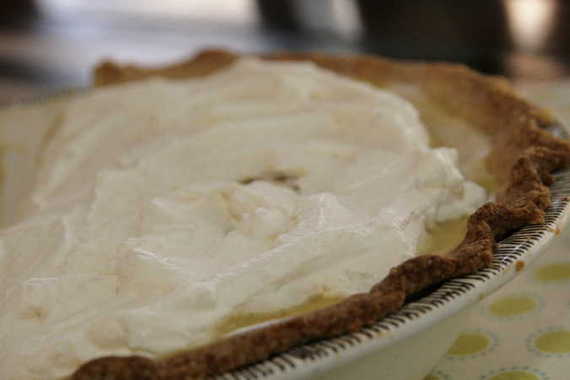
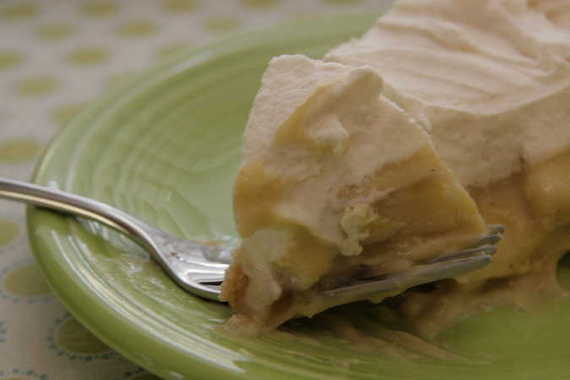
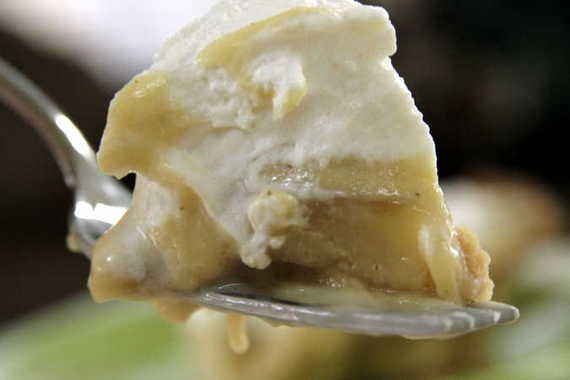
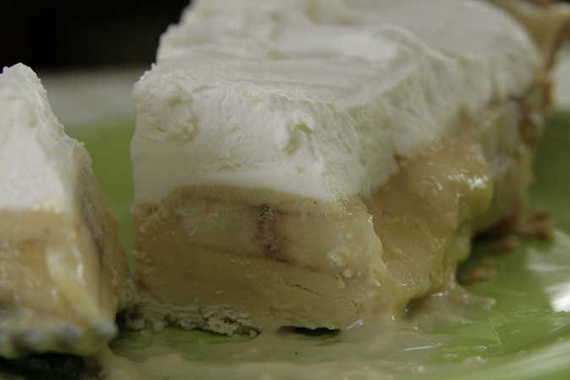
The day has finally come, my friends. The day when I, myself, lil ‘ol me gets to choose the recipe for Tuesdays with Dorie. When I got the email reminding me my turn was coming up, you would’ve thought I’d won a Tony award or something- I was so excited! In fact, there may have been some girlish squealing involved….maybe. It didn’t take long for me to decide – I flipped through the book two or three times, called everybody I could think of, and finally chose the Banana Cream Pie – nothing fancy, new-fangled or trendy. Just classic, good old fashioned pie. I love pie. Probably more than I love most desserts. It’s simple. It’s homey. It’s classic. Kinda like me, I guess. Funnily enough, my good ‘ol hubby doesn’t really like pie! HA!
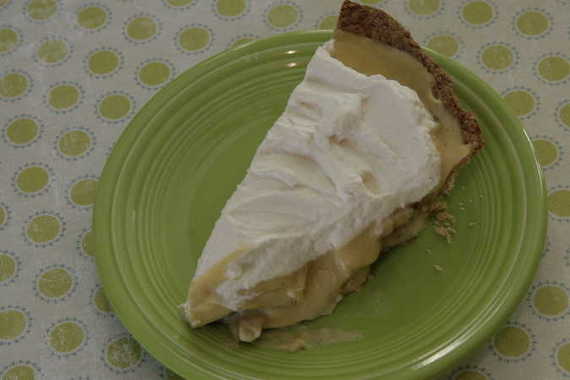
Believe it or not, this was my first ever banana cream pie – actually, my first cream pie, too! I love this recipe because it’s the way my great-grandmother made her cream pies- by slowly stirring the pastry cream over the stove top to get a rich, velvety pie filling. And I loved that little dash of cinnamon and nutmeg; it really gave it something special! And the sour cream in the topping…WOW. I think the topping may have been my favorite part!

I think the most important part about this pie is the crust. In my opinion, a pie is only as good as its crust and by-gosh, by-golly this crust recipe is as good as it gets! It’s simple and takes maybe 10 minutes to make. And it’s sooooo worth it, believe me! So don’t flake out on the crust (I’m so punny)- trust me, you want it with this pie!
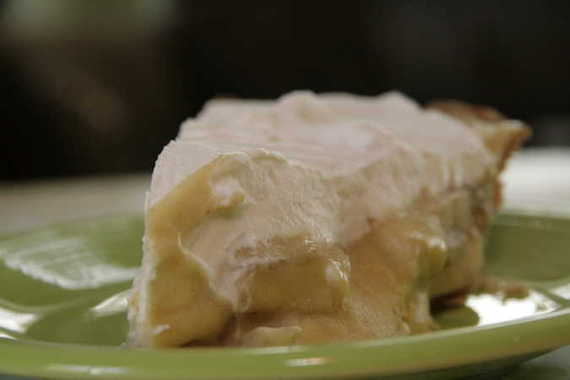
To give this pie the ultimate taste test, I decided to make it for my parents last week. Everybody loved it. Loved the filling, loved the crust – it was a hit and I was very satisfied! Even hubby, who doesn’t really like pie loved it – yippee! I hope all the other TWD bakers had as much success with this recipe as I did.
This is where I would normally say, “If you would like the recipe, head over to so-and-so’s blog, yadda yadda…” , but today I get to post the recipe to share with everybody! So, ahem, if you would like the recipe for this delicious, awe-inspiring pie, just SCROLL DOWN, BABY!! 🙂
Banana Cream Pie
-Dorie Greenspan (AKA: The Queen)
For the Custard
2 cups whole milk
6 large egg yolks
1/2 cup (packed) light brown sugar, pressed through a sieve
1/3 cup cornstarch, sifted
1/2 teaspoon ground cinnamon
1/8 teaspoon freshly grated nutmeg
pinch of salt
1 teaspoon pure vanilla extract
3 tablespoons cold, unsalted butter, cut into bits
3 ripe but firm bananas
1 9-inch single crust made with Good for Almost Everything Pie Dough, fully baked and cooled
For the Topping
1 cup cold heavy cream
2 tablespoons confectioners’ sugar, sifted
1 teaspoon pure vanilla extract
2 tablespoons sour cream
To Make the Custard: bring milk to a boil. Meanwhile, in a large heavy-bottomed saucepan, whisk the yolks together with the brown sugar, cornstarch, cinnamon, nutmeg and salt until well blended and thick. Whisking without stopping, drizzle in about 1/4 of the hot milk- this will temper, or warm the yolks so they won’t curdle- then, still whisking, add the remainder of the milk in a steady stream. Put the pan over medium heat and, whisking constantly (make sure to get into the edges of the pan), bring the mixture to a boil. Boil, still whisking, for 1 to 2 minutes before removing from heat.
Whisk in the vanilla extract. Let stand for 5 minutes, then whisk in the bits of butter, stirring until they are fully incorporated and the custard is smooth and silky. You can either press a piece of plastic wrap against the surface of the custard to create an airtight seal and refrigerate the custard until cold or, if you want to cool the custard quickly (as I always do) put the bowl into a larger bowl filled with ice cubes and cold water and stir occasionally until the custard is thoroughly chilled, about 20 minutes. (If it’s more convenient, you can refrigerate the custard, tighly covered, for up to 3 days.)
When you are ready to assemble the pie, peel the bananas and cut them on a shallow diagonal into 1/4-inch-thick slices.
Whisk the cold custard vigorously to loosen it, and spread about one quarter of it over the bottom of the piecrust- it will be a thin layer. Top with half of the banana slices. Repeat, adding a thin layer of pastry cream and the remaining bananas, then smooth the rest of the pastry cream over the last layer of bananas.
To Make the Topping: Working with a stand mixer fitted with the whisk attachment or with a hand mixer in a large bowl, beat the cream until it just starts to thicken. Beat in the confectioners’ sugar and vanilla and continue to beat until the cream holds firm peaks. Switch to a rubber spatula and fold in the sour cream.
To Finish: Spoon the whipped cream over the filling and spread it evenly to the edges of the custard. Serve, or refrigerate until needed.
Good for Almost Everything Pie Dough
– makes enough for a 9-inch single crust –
1 1/2 cups all-purpose flour
2 tablespoons sugar
3/4 teaspoon salt
1 1/4 sticks very cold (frozen is fine) unsalted butter, cut into tablespoon-size pieces
2 1/2 tablespoons very cold (frozen is even better) vegetable shortening, cut into 2 pieces
About 1/4 cup ice water
Put the flour, sugar and salt in a food processor fitted with a metal blade; pulse just to combine the ingredients. Drop in the butter and shortening and pulse only until the butter and shortening are cut into the flour. Don’t overdo the mixing—what you’re aiming for is to have pieces the size of fat green peas and others the size of barley. Pulsing the machine on and off, add 3 tablespoons of the water—add a little water and pulse once; add some more water and pulse again; and keep going that way. Then use a few long pulses to get the water into the flour. If after a dozen or so pulses, the dough doesn’t look evenly moistened or form soft curds, pulse in as much of the remaining water, or even a few drops more, to get a dough that will stick together when pinched. If you’ve got big pieces of butter, that’s fine. The dough is ready and should be scraped out of the work bowl and on to a smooth work surface.
Shape the dough into a disk and wrap it. Refrigerate the dough at least 1 hour before rolling. (If the ingredients were very cold and you worked very quickly, you might be able to roll the dough immediately—you’ll know: the dough will be as cold as if it had just come out of the fridge.) The dough can be kept in the refrigerator for up to 5 days or frozen for up to 1 month.
Have a buttered 9-inch pie plate at hand. You can roll the dough out on a floured surface or between sheets of wax paper or plastic wrap or in a rolling slipcover. If you’re working on the counter, turn the dough over frequently and keep the counter floured. If you’ve got time, slide the rolled out dough in the fridge for about 20 minutes to rest up and firm up.
To Fully Bake a Single Crust: Preheat the oven to 400°F. Butter the shiny side of a piece of aluminum foil (or use nonstick foil), fit the foil, buttered side down, tightly against the crust and fill with dried beans or rice or pie weights. Put the pie plate on a baking sheet and bake the crust for 25 minutes. Carefully remove the foil and weights and, if the crust has puffed, press it down with the side of a spoon (or lightly prick the crust). Return the pie to the oven and bake for about 10 minutes more, or until the crust is golden brown. Transfer the pie plate to a rack and cool to room temperature before filling.
I’d like to thank all of the TWD bakers for baking with me this week – and Dorie, for being so friggin’ amazing! I hope everybody enjoyed the pie!
Happy Baking,
Amy
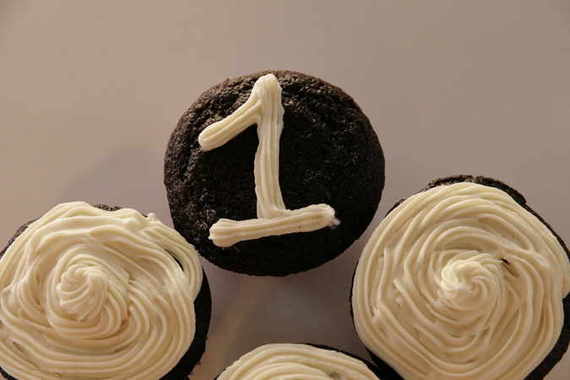
It has officially been ONE YEAR since my sweetheart of a husband created this blog for me and I entered the world of food blogging! I feel like singing..
Happy Blogoversary to me, happy Blogoversary to meeee, happy Blogoversary dear Sing For Your Suppeeeerrrrrr…HAPPY BLOGOVERSARY TO MEEEE!! Yaayyy!
Alrighty, thanks for letting me get that out of my system! It just feels good to sing, ya know?
A heck of a lot has happened in the past year – some good, some very, very bad, but no matter what we’ve been through, this blog has remained through it all. A way for me to escape from the busyness around me and just concentrate on something I have grown to love almost as much as I love to sing (almost)– food.
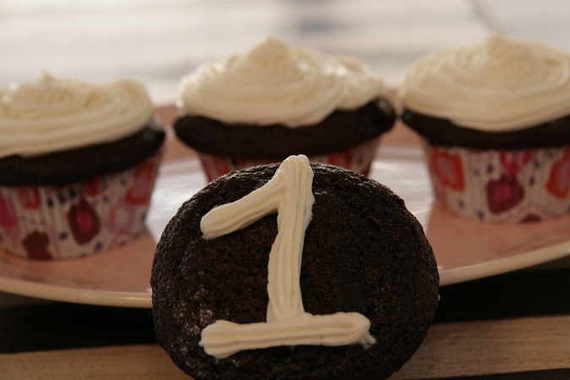
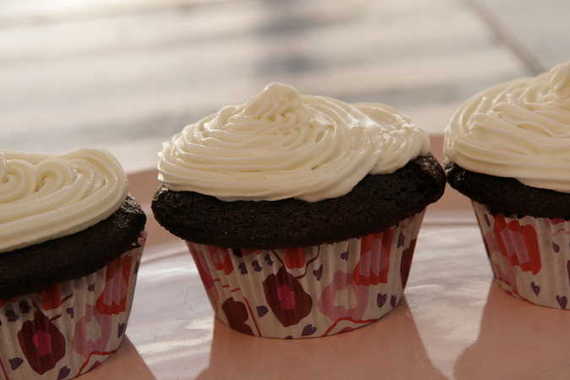
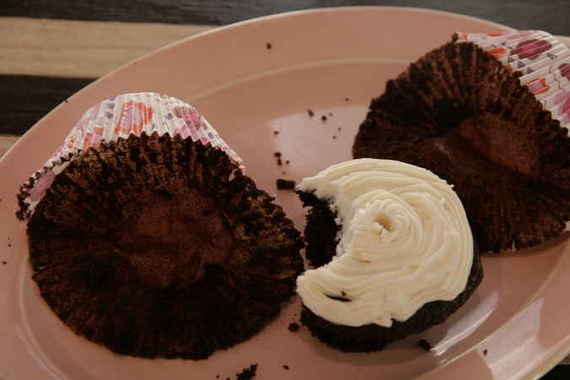
So to celebrate one year of this cute little food blog, I decided to make cupcakes! What better way to celebrate a 1st birthday than with cupcakes?! I chose the richest-sounding, most indulgent recipe for chocolate cake and buttercream frosting I could find, and in about an hour or so, I had sinfully delicious, indulgent blogoversary cupcakes! YUM! They were absolutely deeee-licious!! (and it worked out nicely because I sent the majority of the batch to work with hubby to celebrate the last work day of his closest co-worker – two birds with one stone! Yay!)
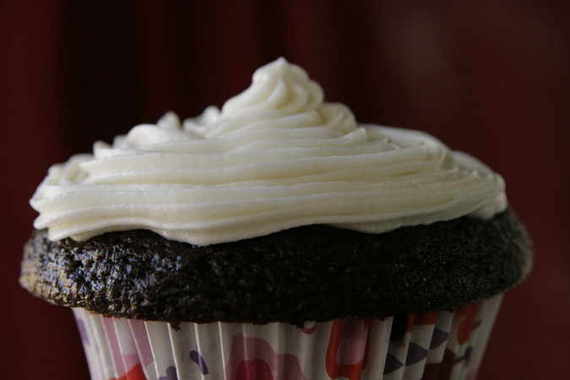
Black Magic Cake
-found on My Baking Addiction
2 cups sugar
1-3/4 cups all-purpose flour
3/4 cup HERSHEY’S Cocoa
2 teaspoons baking soda
1 teaspoon baking powder
1 teaspoon salt
2 eggs
1 cup buttermilk or sour milk*
1 cup strong black coffee OR 2 teaspoons powdered instant coffee plus 1 cup boiling water
1/2 cup vegetable oil
1 teaspoon vanilla extract
Heat oven to 350°F. Grease and flour two 9-inch round baking pans or one 13x9x2-inch baking pan. Stir together sugar, flour, cocoa, baking soda, baking powder and salt in large bowl. Add eggs, buttermilk, coffee, oil and vanilla; beat on medium speed of mixer 2 minutes (batter will be thin). Pour batter evenly into prepared pans. Bake 30 to 35 minutes for round pans, 35 to 40 minutes for rectangular pan or until wooden pick inserted in center comes out clean. Cool 10 minutes; remove from pans to wire racks. Cool completely. Frost as desired.
Yields 10 to 12 servings. *I got about 18 cupcakes out of it
* To sour milk: Use 1 tablespoon white vinegar plus milk to equal 1 cup.
Buttercream Dream Icing
-found on The Repressed Pastry Chef
1 stick salted butter – room temperature
1 stick unsalted butter – room temperature
1 cup shortening
1 tablespoon Clear Vanilla extract
2 pounds confectioner’s sugar (powdered sugar, 10x)
4-6 tablespoons very cold milk
Cream the butter and shortening in the bowl of an electric or stand mixer. Add the clear vanilla extract and combine well. Begin adding in the sugar a little at a time and mixing thoroughly after each addition. After all of the sugar has been added and mixed thoroughly, begin adding the very cold milk… one tablespoon at a time, combining very well after each addition (mixer on medium-high to high speed) until you reach the desired consistency. It should be light and fluffy.
The important thing is to work slowly when adding the milk. You can always add more… but you can’t take it away if you add too much and the icing is too thin. You want it to be thick enough to set up well… but you don’t want it so thick that you can’t pipe it out of a pastry bag or spread it with a spatula.
(*I made half of the batch and had plenty for all of my cupcakes)
Thanks to everyone who takes the time to stop by and read my blog – it almost wouldn’t be worth it without you! It’s so nice to know that people actually do read my posts, look at my pictures and try my recipes! THANK YOU!! And thanks for stopping by today and helping me to celebrate my one year blogoversary!!
Love,
Amy

I even wore my special cupcake pajama pants this morning for the occasion. (Izzy is helping me celebrate…) 🙂
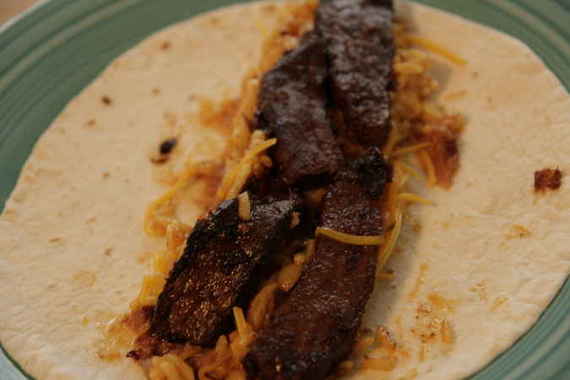
Ok, these are really terrible, horrible, no good, very bad pictures BUT I just had to post this recipe because it’s just that good. I’ve had it saved for several months now, but for some reason just now got around to making it. Let me just say that I have now made these twice within a week. They’re that good. Freaking awesome, in fact. The recipe is Josh’s Famous Burritos – a recipe found in the New York Times a while back. Go to the store tomorrow and buy some steak – you need to make these. As soon as possible.
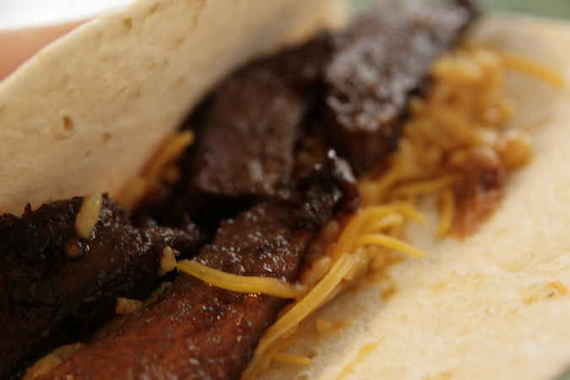
You’ll notice that these don’t really look like burritos – more like fajitas, in fact. This recipe needs the giant sized tortillas, but all I had on hand was the regular sized, so it didn’t quite fold like it should’ve…oh well- it still tasted the same. It’s really important to cook the meat at least an hour so it can get nice and tender and the liquid can cook down. The first time I made these (that’s when the pictures were taken too) was definitely the best batch – I made them again tonight (for my parents, in fact) and they weren’t quite as good as the first time – still freaking awesome, though. This famous Josh knows what he’s doing, I’ll say that. I made just a few changes to the original recipe – it’s one of those recipes that can be easily adjusted to your tastes; you can add or take away anything you want. I added a little of my favorite liquid steak seasoning to add a little extra flavor. I cut the recipe in half and had just enough for 4 people.
Josh’s Famous Burritos
-NY Times
2 pounds skirt steak
2 pounds hanger steak (if hanger is not available, substitute additional skirt steak)
1 1/2 teaspoons garlic powder, or as needed
3 tablespoons mild taco sauce
3 tablespoons vegetable oil
2 yellow onions, diced
2 yellow peppers, diced (I omitted)
4 medium jalapeños, with seeds, diced
6 chipotle chilies in adobo sauce, chopped, 1 tablespoon sauce reserved
1 package Wick Fowler’s 2-Alarm Chili Kit (I just used chili powder and cumin)
1 1/2 bottles Dos Equis Amber beer
1/2 cup prepared salsa, more for serving
flour tortillas, for serving
1 cup (lightly packed) chopped cilantro leaves, for serving
2 cups four-cheese shredded Mexican blend, for serving
2 cans refried beans, heated, for serving
1 box Spanish rice pilaf, prepared according to instructions on box, but made with 2 tablespoons salsa along with spice packet, for serving.
Preheat oven to 375 degrees. Lightly coat both sides of steaks with garlic powder and taco sauce. Place in a roasting pan and roast for 10 minutes. Turn steaks, sprinkle again with garlic powder, and roast for another 10 minutes. Cut meat into 1-inch slices and set aside.
Place oil in a very large skillet (14 inches or larger) over medium-high heat. Add onions, peppers and jalapeños. Sauté for 1 minute, and add chipotle chilies and sliced steak. Add all packets from Wick Fowler kit except masa and onion-and-garlic packets. Stir to coat well. Add beer, 1/2 cup water, reserved adobo sauce and 1/2 cup salsa.
Cook uncovered at a lively simmer, stirring occasionally, until most of the liquid has evaporated and sauce has thickened and coats meat, about 1 hour. Serve buffet style, allowing guests to assemble burritos in tortillas, filling them as desired with meat, cilantro, shredded cheese, salsa, refried beans and rice. For a classic burrito, fill tortillas, roll, then fold ends underneath.
Yield: 6 to 8 servings.
Again, please forgive the terrible pictures – I just couldn’t keep this recipe from you, though! Do yourself a favor and make these burritos this week!

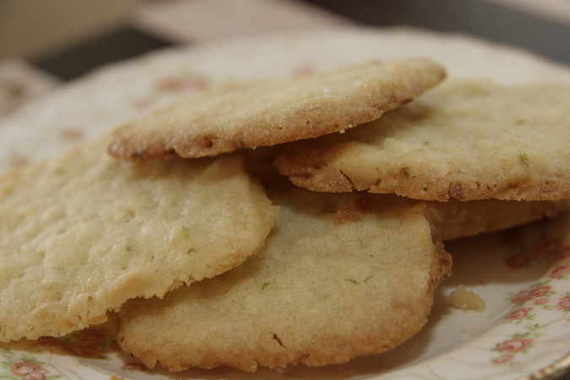
I know I didn’t come up with a dorky play-on-words title this time – it’s kind of hard to do that with some recipes. I mean, can you think of anything cutesy and catchy for coconut butter thins??? I really can’t…plus, it’s been one heck of a week and to be perfectly honest, I’m tired of thinking. So if it’s alright with you, I’ll just go with the obvious, no-thinking-required post title. Thank you.
This week, Jayne of The Barefoot Kitchen Witch chose Coconut Butter Thins. These are a really thin, crunchy, almost lacy-like cookie with bits of coconut and macadamia nuts and a little lime zest. The recipe also calls for a pinch of Coriander, but I decided to walk on the wild side and try a little curry powder in mine – very odd, yes, but it worked! Mine were also pretty salty (which I LOVED) because I used coarse sea salt- yum! These go into the oven as perfect little shortbread-looking squares, but they spread a little during baking, and come out more flattened and crisp. A nice surprise! You can really taste the lime zest, and surprisingly, you sort of forget that coconut is even in there! I couldn’t even taste it! I think these would be great as a late night snack with a cup of hot tea – they’re so dainty and crisp.
If you would like the recipe, head over to Jayne’s blog . And BE SURE to check my blog out next Tuesday because it’s MY TURN to pick the TWD recipe!!! I’m so stinking excited! Banana Cream Pie chosen by yours truly comin’ your way next week!!! Don’t miss it!
What’s for dinner this weekend? Need a good meal idea? Here’s all you’re gonna need: chicken, barbeque sauce, onions, cheese and tortillas. Have this stuff in your fridge? Good – now, do your husband (or wife…there might a few fellas reading) a big favor and make the following recipe.
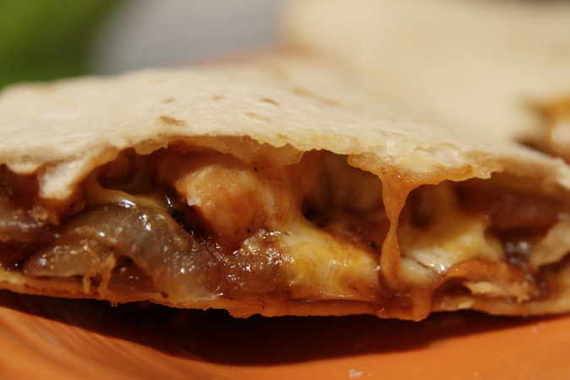
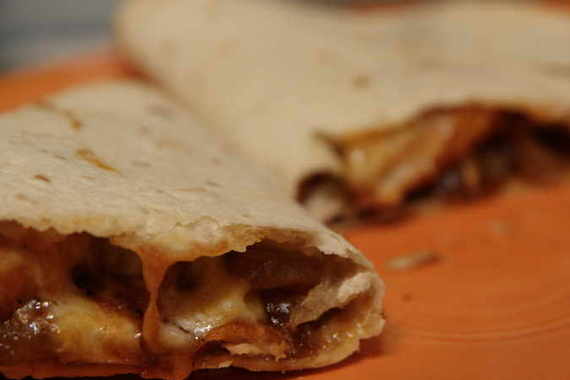
Texas Chicken Quesadillas. Miiiiiiighty tasty, in my opinion. Honestly, I don’t really know what makes these “Texan” – I guess the BBQ sauce; everybody knows we Texans slather it on everything we eat…right?? Um, no, not really. But whatever – let’s just go with it for now. This recipe has been really making the rounds in the food blogosphere – and every single foodie that’s made it has just raved about it. So I thought it was about time for me to give it a whirl. I’ll just come right out and say it – these are delicious. Melt in your mouth, cheesy, gooey, spicy, sweet…DELICIOUS. I don’t even like onions, but their so nice and carmelized, they take on a new, sweet flavor that I really dig…..really, really. And drizzled with a little homemade ranch dressing, these babies are pretty hard to beat! So, if you had any doubts about your Friday or Saturday night dinner – doubt no more. Make these quesadillas. Your hard-workin’ man (or lady) will thank you – trust me.
Texas Chicken Quesadillas
-Allrecipes.com
2 TBSP of oil
1-1/2 onions sliced into rings
1 TBSP honey
2 chicken breasts, diced
1/2 cup BBQ sauce
1 Cup shredded Mexican cheese
8 ten inch flour tortillas
Heat one tablespoon of the oil in a pan over medium high heat. Add the onions and cook until they begin to caramelize. Mix in the honey and stir until it is golden brown. Remove and set aside. Place the remaining oil in the pan and add the chicken. Cook through over a medium high heat. Stir in the BBQ sauce to evenly coat the chicken. Place the chicken, onions and cheese onto a tortilla, top with the other tortilla and cook in your quesadilla maker about 5 minutes. Alternatively, you can cook them in the oven at 350 degrees for 20 minutes. ENJOY!
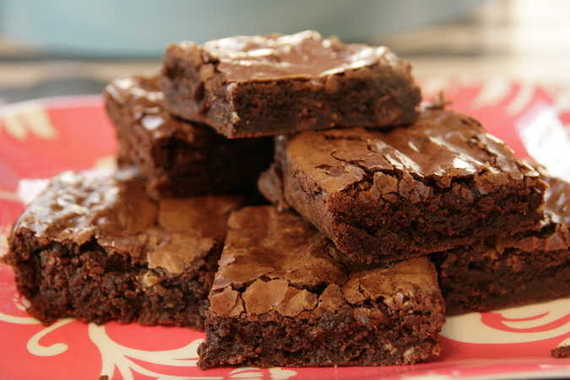
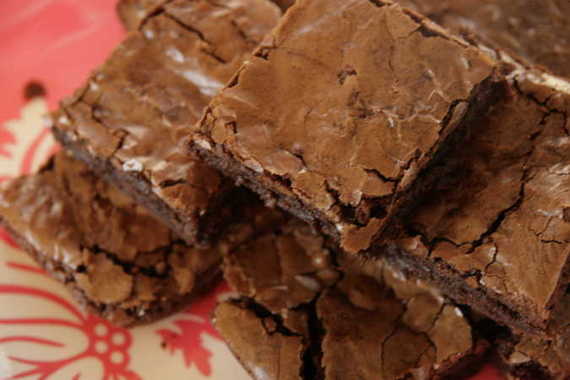
Ok, so you know how once I made that comment about how I have yet to find a brownie recipe as good as the boxed kind? Well, here it is. I’m thrilled. It seems like any “from scratch” brownie recipe I’ve made turns out with a thick, sugary crust on the top (yes, even Dorie’s recipes have turned out that way for me) that I always end up picking off – and it makes for a rather unsightly brownie. This recipe is perfect because you melt the sugar and butter together, thus giving you a paper-thin crust on top – which is what you want with a brownie. Yay!!
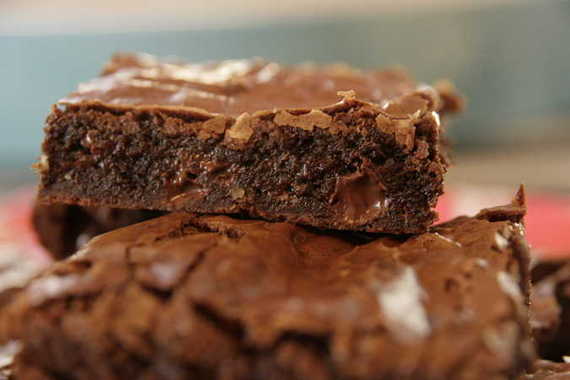
Let me just tell you – these brownies blew me away…rocked my socks off…made me wanna slap my mama (as Jess would say). They were GOOD. I took it a step further by adding a drop of peppermint extract and threw in some Andes mint chips along with the chocolate chips. Mmmm MMM! I have an undying love for all things mint/chocolate and these brownies are my new go-to “mint-chocolate-craving” recipe! I’ll probably use this brownie recipe for the rest of my life, too!

Fudgy. Chewy. Chocolatey. Minty. Need I go on? Do yourself a big favor and make these brownies TODAY!
Guaranteed Fudge Brownies
-King Arthur Flour (this is a great website with tons of recipes- check it out!)
1 cup (2 sticks) unsalted butter
2 1/4 cups sugar
4 large eggs
1 1/4 cups Dutch-process cocoa (regular cocoa is fine too)
1 teaspoon salt
1 teaspoon baking powder
1 teaspoon espresso powder, optional
1 tablespoon vanilla extract
1 1/2 cups All-Purpose Flour
2 cups chocolate chips
*I added about 1/4 teaspoon peppermint extract, 1/2 cup Andes mint chips and used half of the amount of chocolate chips called for
Directions
Preheat the oven to 350°F. Lightly grease a 9″ x 13″ pan
In a medium-sized microwave-safe bowl, or in a saucepan set over low heat, melt the butter, then add the sugar and stir to combine. Return the mixture to the heat (or microwave) briefly, just until it’s hot (about 110°F to 120°F), but not bubbling; it’ll become shiny looking as you stir it. Heating this mixture a second time will dissolve more of the sugar, which will yield a shiny top crust on your brownies.
While the sugar heats a second time, crack the 4 eggs into a bowl, and beat them with the cocoa, salt, baking powder, espresso powder, and vanilla till smooth. Add the hot butter/sugar mixture, stirring until smooth.
Add the flour and chips, again stirring until smooth. Note: If you want the chips to remain intact in the baked brownies, rather than melting in, let the batter cool in the bowl for about 20 minutes before stirring in the chips.
Spoon the batter into a lightly greased 9″ x 13″ pan. Bake the brownies for about 30 minutes, until a cake tester inserted into the center comes out clean, or with just a few moist crumbs clinging to it. The brownies should feel set on the edges, and the center should look very moist, but not uncooked. Remove them from the oven and cool on a rack before cutting and serving.
* I actually got the idea to make these from a fellow food blogger, but I don’t remember who. If you see this, please let me know who you are so I can give you credit! 🙂
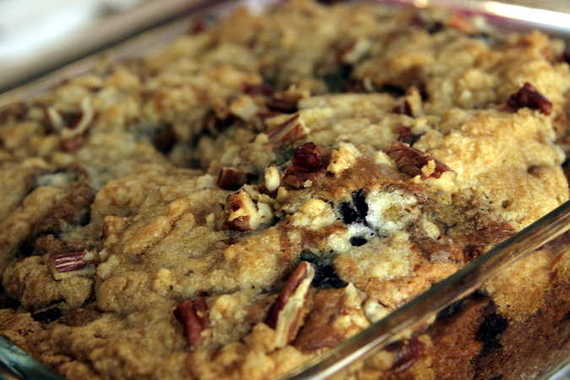
This week’s TWD recipe was Blueberry Crumb Cake, chosen by Sihan of Befuddlement. I was really excited when I saw this week’s choice – I’ve been eyeing this cake for a while now, plus, I have a delicious-smelling “Blueberry Scone” Yankee Candle that makes me crave any kind of blueberry baked goods whenever I burn it. I try not to burn it when I know I’m having company because I don’t want someone to walk into my house thinking I’ve made them some sort of yummy blueberry treat, when I really haven’t. But this weekend worked out perfectly because I was having company and got to burn my yummy-smelling candle because I was indeed baking a blueberry treat for them! Yippee!
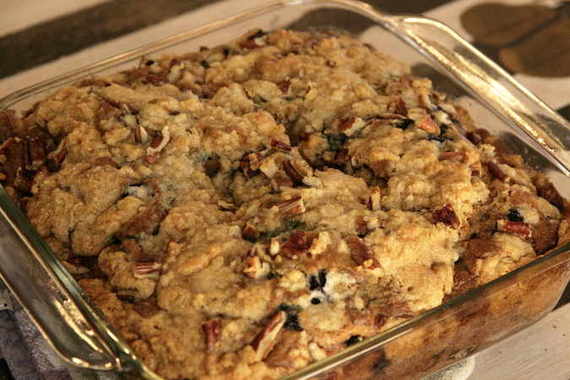
I had the most beautiful frozen blueberries for this cake – usually anytime I buy any kind of frozen berries, they’re all clumped together and sort of squished and not all together great-looking. But these blueberries were just perfect. Unfortunately, they didn’t have much flavor….at all. The lemon zest helped some, but not much – in fact, I couldn’t really even taste blueberries. Sad, yes, but it was still really tasty. The crumb topping is really the star of this cake – it’s buttery, slightly crunchy and sweet – I loved it! I can’t wait to try this recipe again, but with fresh blueberries or maybe some raspberries or blackberries. I give it two thumbs up!
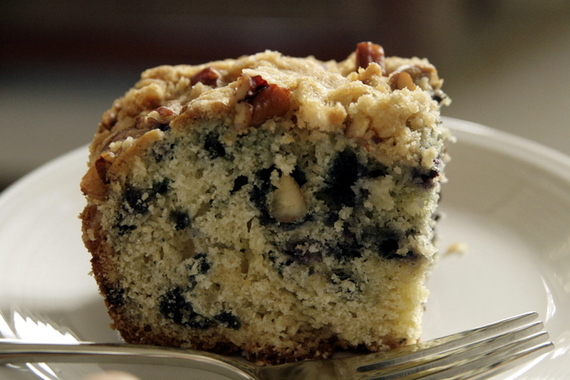
If you want the recipe, head over to Sihan’s blog. This is a great cake and tastes best in the morning with your coffee (at least in my opinion!) – give it a try this week!


