
This was by far, one of the stranger recipes I’ve made so far with TWD. A Raspberry Blanc-Manger, chosen by Susan of Sticky, Gooey, Creamy, Chewy (who is a fellow musician, by the way! Woot, woot!). You’re probably wondering what the heck a blanc-manger is…I know I sure was! Basically, it’s sort of a creamy jell-o, if you will….Panna Cotta meets flan…sort of. Honestly, it was just weird to me. Ground almonds, milk, whipped cream, gelatin and fresh raspberries get mixed together and chilled for a few hours, then topped with rasperry coulis. Sounds good, right?

I was very tempted to just skip this week, as I wasn’t really in the mood for anything that sounded all French and snooty-like, but I’ve been a little neglectful of my TWD duties lately, so I decided to give it a go. This probably shouldn’t have been as complicated and time-consuming as I made it…but for whatever reason, it was. And I couldn’t really get over the fact that the whole time I kept tasting it…it reminded me of Cream of Wheat (you know, the hot breakfast cereal?). I guess it was the ground almonds in there with the cream and milk – it just tasted…breakfasty. Still, once I added the raspberries, let it set in the fridge, and topped it with a really delicious raspberry coulis (I threw in a splash or two of Chambord liquer…yum!), it tasted pretty good.

I loved the light, airy texture of it – that part was fantastic. It felt really fancy – this would probably really impress company. I probably won’t make this again – just not my cup of tea, I guess. However, as always, I’m still really glad I tried it…plus, I like saying the name. Blah-mah-jay! Fun. As always, if you’d like the recipe, head on over to Susan’s blog. She’ll have it posted.

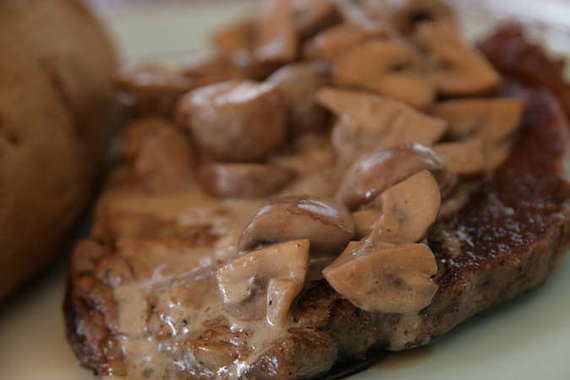
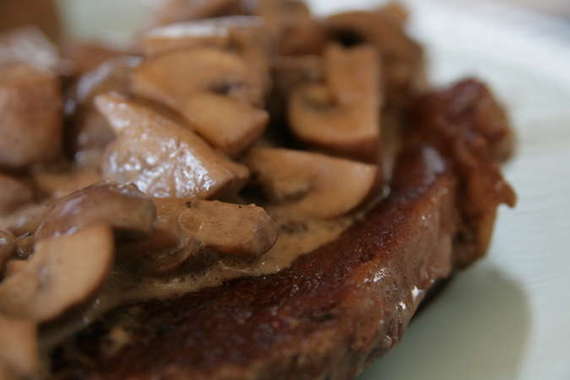
These are the steaks I mentioned a couple of days ago (one blog post below) that I made for my hubby last week. I have to say, I was a wee bit (ok more than a wee bit) proud of myself for finally (and successfully!) cooking steaks! I know – what kind of cook doesn’t know how to make a good steak, right? For some reason I had always thought steaks would be too finicky for me to handle – I just knew I’d overcook them or set my kitchen on fire or something else awful. BUT – these were surprisingly super duper easy! Once again, Ina Garten comes to my rescue and makes things that once looked challenging totally approachable for me. Love her! Her recipe is for Filet Minon, but I had some great looking Ribeyes that I wanted to use instead – they worked just fine!
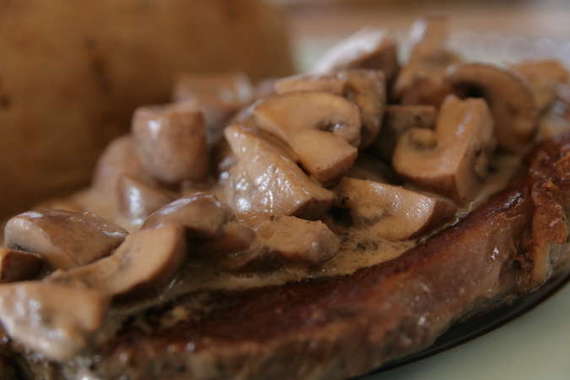
I decided to top the steaks with a mushroom cream sauce – I love mushrooms on my steak, so I thought this sauce would be really good on top – sure enough, it was deeeeelicious! Hubby absolutely loved the whole meal and I was quite surprised at how delicious it turned out (especially since it was so easy!!). Toot, toot tooooot! (That’s me tooting my own horn, if you can’t tell…).
Steakhouse Steaks
-Barefoot Contessa
2 (10-ounce) filet mignon (or in my case, Ribeye steaks)
2 tablespoons vegetable oil
1 tablespoon salt
1 tablespoon coarsely cracked black peppercorns
2 tablespoons unsalted butter, at room temperature, optional
Preheat the oven to 400 degrees F.
Heat a large, well-seasoned cast iron skillet over high heat until very hot, 5 to 7 minutes.
Brush the steaks with the vegetable oil on each side and season with salt and pepper.
When the skillet is ready, add the steaks and sear them evenly on both sides for about 1 1/2 minutes per side.
Top each steak with a tablespoon of butter, if using, and place the skillet in the oven. Cook the steaks until they reach 120 degrees F for rare or 125 degrees F for medium-rare on an instant-read thermometer. (To test the steaks, insert the thermometer sideways to be sure you’re actually testing the middle of the steak.)
Remove the steaks to a serving platter, cover tightly with aluminum foil and allow to rest at room temperature for 10 minutes. Top with mushroom cream sauce (recipe below) and serve. Enjoy!
Mushroom Cream sauce
-Adapted from Barefoot Contessa
2 pounds baby Portobello mushrooms
1/2 cup good olive oil
1 shallot, chopped
4 tablespoons (1/2 stick) unsalted butter
2 teaspoons kosher salt
1/2 teaspoon freshly ground black pepper
1 tablespoon Worcestershire sauce
1/2 cup heavy cream (you could also use half and half)
1 tablespoon dry red wine
Brush the caps of each mushroom with a clean sponge. Remove and discard the stems. Slice the small mushrooms thickly and cut the large ones in a large dice.
Heat the olive oil in a large Dutch oven or saucepan. Add the shallots and cook over low heat for 5 minutes, or until the shallots are translucent. Add the butter, mushrooms, salt, and pepper and cook over medium heat for 8 minutes, until they are tender and begin to release their juices, stirring often. Stir in the Worcestershire sauce, red wine and cream and cook for 2 more minutes. Serve warm over steaks.
This turned out to be one of the best meals I’ve made in a long time – hubby kept going on and on about how good it all tasted. I always feel so good when I put a good dinner on the table for my hard-working hubby – especially when he really loves it! I know this recipe will be in my recipe box from now on…it’s definitely a keeper!
OH! – and, be on the lookout….something new and exciting is in the works here at Sing For Your Supper!! I can’t wait!……………
Poor hubby has had a hard week. So last night I wanted to make him a nice, relaxing, delicious dinner that would hopefully let him forget his troubles for a while. That’s just what I did; pan-seared Ribeye steaks with a mushroom cream sauce, baked potatoes, gelato (all coming soon!) and this salad – it was a wonderful meal and a wonderful evening!
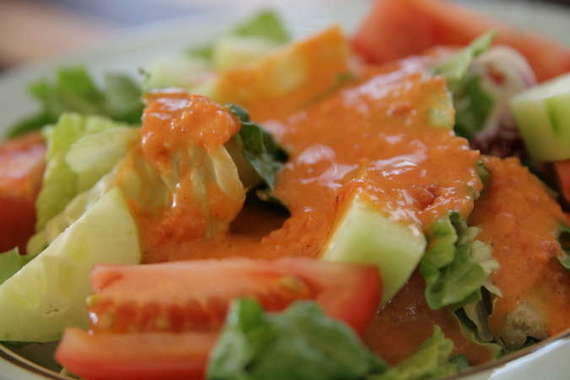
There is an Italian restaurant we like to go to that has the best house salad dressing; they make it with fresh tomatoes and it’s totally delicious. I’ve been meaning to try and recreate it at home so we can enjoy it anytime. So of course when I saw this recipe on Kayotic Kitchen, I knew I had to try it. While this recipe was great – it wasn’t quite like the restaurant style we love so much- pretty close, though. However, it’s good to have this recipe on hand – it’s delicious!!
Fresh Tomato Salad Dressing
-Kayotic Kitchen
3 Roma tomatoes
1 garlic clove
2 tbsp red wine vinegar
4 tbsp oil
pepper
salt
I put all ingredients in a blender and pureed it until smooth. Taste for seasoning and refrigerate until needed.
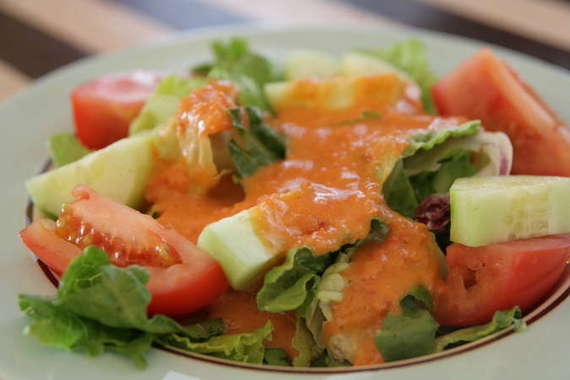
This was a great salad – it was a nice change of pace from regular ranch dressing and we both loved it! I think hubby enjoyed his meal tremendously…I know I did!
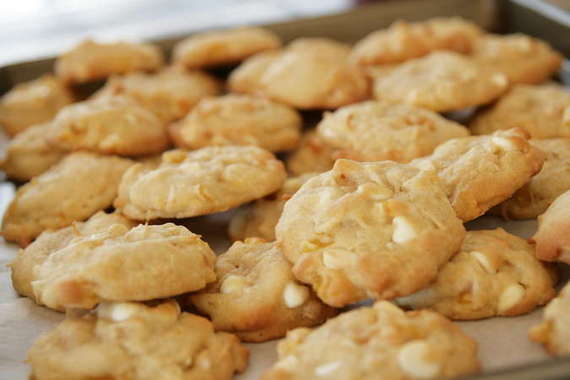
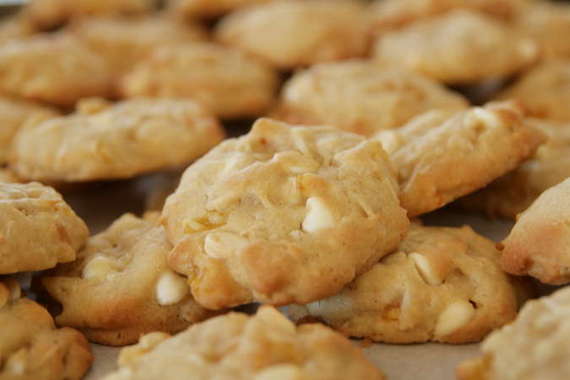
Back around Father’s Day, I wanted to make cookies for our dads, but I wanted something new and different. I love trying different flavor combinations and coming up with recipes that turn into new favorites. This idea came to me when I was lying in bed one night and couldn’t sleep – I started thinking about cookies and somehow apricots, white chocolate and coconut kept popping up. I knew both of our dads (and my mom, too) love white chocolate and coconut, and I thought chewy, dried apricots would be a nice compliment – so the next day, I got in my kitchen and these cookies were born!
I thought I was pretty lucky for my first time out – these really turned out exactly how I wanted them to; perfectly chewy and soft, but with lots of texture, a little tanginess from the apricots and lots of sweetness from the white chocolate chips. Both of our parents loved them (as well as my dog, who, while we were in the next room, decided to jump up on my dining room table and scarf down as many of these as she could before getting caught!)! The only thing I might do differently next time would be a little lemon zest to really bring out the apricots – other than that, I won’t change a thing. I decided to name these “The Amelia”, because, well, that’s me – plus, I really couldn’t think of anything clever. Maybe I’ll just start a whole line of named cookies – from now on, I could give each new cookie I create a person’s name to go with it – just so I can keep them all straight, you know? I love trying out and creating new and exciting cookie recipes – the possibilities are endless and on top of that, it’s so much fun! Plus, I always have plenty of willing guinea pigs – ready to try anything I throw at them!
The Amelia (Apricot, Coconut and White Chocolate Cookies)
3/4 cup unsalted butter, melted and cooled
1/2 cup granulated sugar
1/4 cup brown sugar
2 large eggs
1/4 teaspoon almond extract
1/2 teaspoon vanilla extract
2 1/4 cups flour
1 teaspoon baking soda
1/2 teaspoon salt
3/4 cup shredded coconut (sweetened or unsweetened is fine)
6 ounces white chocolate chips
1 cup dried apricots, chopped
Preheat oven to 350 degrees. In a mixing bowl, cream together the butter and sugars on medium speed until smooth. Add the eggs, almond extract, and vanilla extract and blend. In a separate bowl, mix flour, baking soda and salt and slowly add to the butter/sugar mixture. Stir in the coconut, white chocolate and apricots.
Drop by rounded spoonfuls on a cookie sheet lined with parchment paper. Bake until cookies are golden brown – about 15 minutes. Makes approximately 30 cookies. Enjoy!!
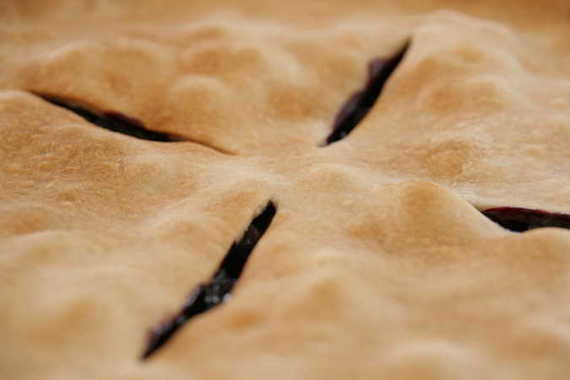
Believe it or not, I had never had blueberry pie until I made this one a couple of weeks ago! Weird, isn’t it? Blueberry pie is just one of those All-American type desserts, I think – it sounds so summery and delicious. I had tons of juicy, fresh blueberries from the farmers market and decided a double-crusted blueberry pie would be the most perfect way to use them!
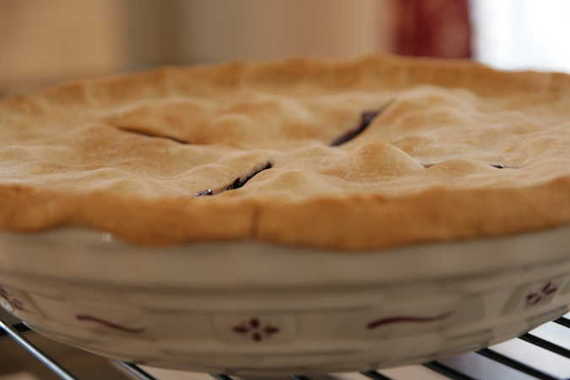
I decided to use Dorie Greenspan’s recipe for both the pie filling and the crust – her pie crust is to die for! However, after following her recipe exactly, my pie still (as always, it seems) turned out very runny and soupy! I emailed Dorie about it and she replied (how cool is that?!), suggesting adding a little extra cornstarch if needed, but usually, you can never know how much juice your berries will give off, so there’s no way to prepare for a runny pie. I could care less about the runny pie now….I got an email from Dorie and that’s all that matters!!
Double Crusted Blueberry Pie
-Dorie Greenspan
Double Crust pie dough, chilled (recipe below)
2 1/2 pints fresh blueberries
1 cup of sugar, or a little more, to taste, plus more for dusting
1/2 cup all purpose flour
Pinch of salt
Coarsely grated zest of 1/2 lemon
Squirt of fresh lemon juice, or a little more, to taste
1/4 cup dry bread crumbs (you can use packaged unseasoned crumbs)
1 large egg, beaten with 1 tsp of water, for egg wash
Sugar, for dusting
Butter a 9-inch pie plate (Dorie uses a standard Pyrex pie plate).
Working on a well-floured surface (or between wax paper or plastic wrap), roll out one piece of the dough to a thickness of about 1/8 – inch. Fit the dough onto the buttered pie plate and trim the edges to a ½ inch overhang. Roll the other piece of dough into a 1/8 inch thick circle and place it on a baking sheet lined with parchment or a silicone mat. Cover both the circle and the pie plate with plastic wrap and refrigerate while you pre-heat the oven and prepare the filling.
Position a rack in the lower third of the oven and pre-heat the oven to 425 degrees F.
Put the berries in a large bowl and gently stir in the sugar, flour, salt, zest and juice; let sit for about 5 minutes. Taste the filling and add more sugar and/or lemon juice, if needed.
Remove the pie shell and top crust from the refrigerator. Sprinkle an even layer of the breadcrumbs over the bottom of the shell. Give the filling a last stir and turn it into the crust.
Using your fingertips, moisten the rim of the bottom crust with a little cold water. Center the top crust over the filling and gently press the top crust against the bottom. Either fold the overhang from the top crust under the bottom crust and crimp the edges attractively or press the top crust against the bottom crust and trim the overhang from both crusts even with the rim of the pie plate. If you’ve pressed and trimmed the crust, use the tines of a fork to press the two crusts together securely. Using a small, sharp knife, cut 4 slits in the top crust crust and cut a circle out of the center, then lift the plate onto the baking sheet. (If you have time, refrigerate the pie for about 30 minutes. The pie can also be wrapped airtight and frozen for up to 2 months. Glaze and sugar it before you put it in the over and add at least 15 minutes to the baking time).
Brush the top crust with the egg wash, then sprinkle the crust with a little sugar, just to give it sparkle.
Bake the pie for 30 minutes. Reduce oven temperature to 375 degrees F, and bake the pie for another 30 minutes or so (total baking time is about an hour) or until the crust is a beautiful golden brown and the filling is bubbling up through the slits. If the crust seems to be browning too quickly, make a loose foil tent for the pie.
Transfer the pie to a rack and let it cool and settle for at least 30 minutes before serving.
Good for Almost Everything Pie Dough
For a 9 inch Double Crust
3 cups all purpose flour
1/4 cup sugar
1 1/2 tsp salt
2 1/2 sticks very cold unsalted butter, cut into tbsp size pieces
1/3 cup very cold vegetable shortening, cut into 4 pieces
About 1/2 cup ice water
Put the flour, sugar, and salt in a food processor fitted with a metal blade, pulse just to combine the ingredients. Drop in the butter and shortening and pulse only until the butter and shortening are cut into the flour. Don’t overdo the mixing- what you’re aiming for is to have some pieces the size of fat green peas and others the size of barley. Pulsing the machine on and off, gradually add about 6 tbsps of the water- add a little water and pulse once, add some more water, pulse again and keep going that way. Then use a few long pulses to get the water into the flour. If, after a dozen or so pulses, the dough doesn’t look evenly moistened or form soft curds, pulse in as much of the remaining water as necessary, or even a few drops more, to get a dough that will stick together when pinched. Big pieces of butter are fine. Scrape the dough out of the bowl and onto a work surface.
Divide the dough in half. Gather each half into a ball, flatten each ball into a disk and wrap each half in plastic. Refrigerate the dough for at least 1 hour before rolling (if your ingredients were very cold and you worked quickly, though, you might be able to roll the dough immediately: the dough should be as cold as if it had just come out of the fridge).
To Roll Out the Dough: Have a buttered 9 inch pie plate at hand.
You can roll the dough out onto a floured surface or between sheets of wax paper or plastic wrap or in a rolling slipcover. If you’re working on a counter, turn the dough over frequently and keep the counter floured. If you are rolling between paper, plastic or in a slipcover, make sure to turn the dough over often and to life the paper, plastic, or cover frequently so that it doesn’t roll into the dough and form creases.
If you’ve got time, slide the rolled out dough into the fridge for about 20 minutes to rest and firm up.
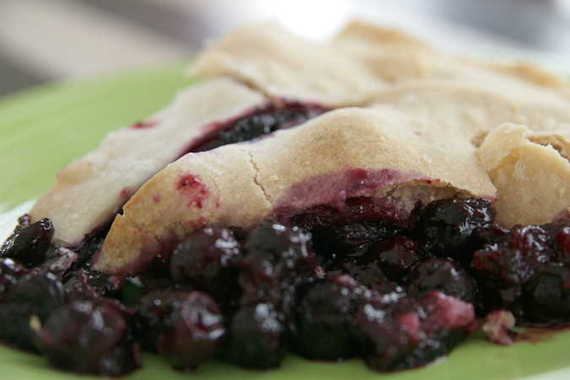
This was sooooo good! We especially loved it with a big scoop of vanilla ice cream on top! I think I’ll probably be making this every summer from now on – it just doesn’t seem like summer without a blueberry pie!
No, I’m not speaking some strange, made-up language…Bum Goolie is a type of food! It’s light, it’s tart, it’s refreshing…it’s totally delicious! But what is it, you’re probably wondering…
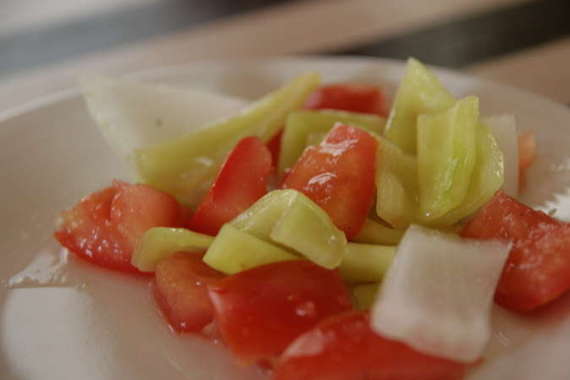
I guess you could say it’s a type of salad. It’s been in my family for years ever since my Aunt Bunny gave my Nana the recipe. We have no idea what the heck “bum goolie” means, but hey, it tastes good and that’s all that matters. It’s sort of a salad of pickled tomatoes, banana peppers and onions – that’s the best way I can describe it. It’s absolutely delicious in the summer when tomatoes and banana peppers are in season and the weather is hot- it’s very refreshing. I love to stock up on tomatoes and peppers at the Farmer’s Market and make a big batch – it goes great with pretty much every meal.
Here’s how I make it:
Bum Goolie
6-8 long, fresh banana peppers, seeded and chopped into bite-size chunks
3-4 tomatoes, seeded, cut into chunks
1/2 a yellow onion, cut into chunks
1/2 – 3/4 cup white vinegar (depending on how tart you like it – add as much or as little as you like. I like mine pretty tart, so I’d probably use a little more than this)
1/2 water
1 teaspoon sugar (or more if you like it a little sweeter)
salt and pepper to taste
Mix all ingredients in a large bowl (it will be very liquidy – you’ll need a slotted spoon when you go to serve it); cover and refrigerate for at least 2-3 hours. Overnight is best.
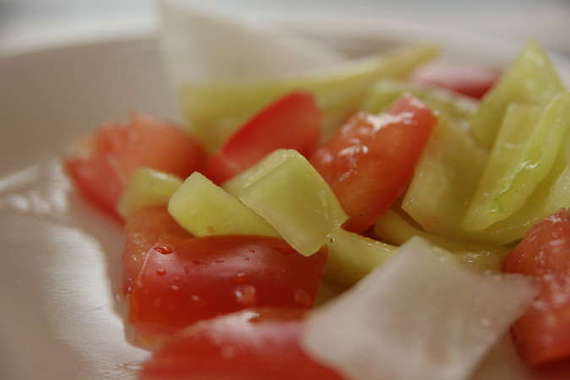
I know it looks and sounds weird, but trust me, it’s delicious. I just love it in the hot summertime! Enjoy!
I don’t know what it is that makes shooting decent pictures of brownies darned near impossible for me. You’d think I’d gradually get better at it, but no, these are just as bad, if not worse, as some of my other brownie shots from the past. Alas, I am too lazy to try again, so these ugly-looking brownie pictures are getting posted, like it or not!
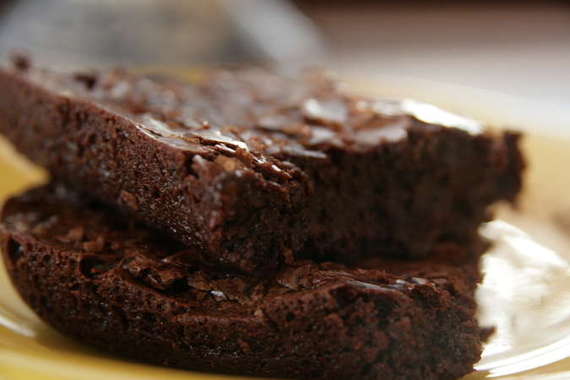
I realize it’s been two weeks since I posted a TWD recipe…I know…I’m bad. BUT – here I am again, back on the TWD wagon! This week’s recipe is Tribute to Katherine Hepburn Brownies (love her!), chosen by Lisa of Surviving Oz, who was the winner of a little logo contest we held over at TWD. Yay Lisa! I’ve been waiting on someone to pick these brownies for a couple of reasons, A.) I love me some brownies! and B.) I LOVE Katherine Hepburn! My favorite of her movies is The Philadelphia Story with Cary Grant and Jimmy Stewart – have you watched this? If you haven’t, you SHOULD!! It’s one of the great classics, in my opinion! Some others of hers that I just love are Bringing Up Baby, Adam’s Rib, and Woman of the Year. This woman didn’t make a bad movie! I was happy to make her special brownies and as I ate them, I imagined good old Kate baking these in her kitchen…”these brownies are just delicious, rally they are…rally..”.
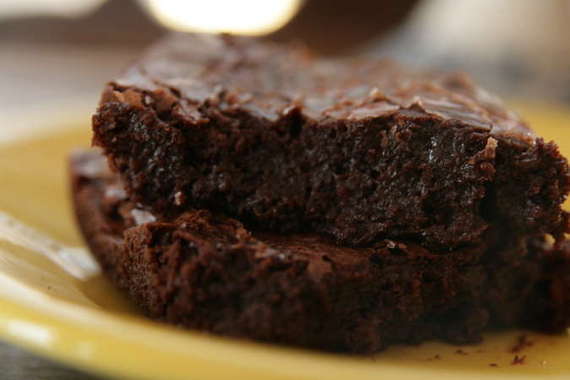
I know the pictures are the epitome of suck, but really, they were some of the best brownies I’ve ever eaten! If you like fudgy brownies, these are for you, my friend!! Visit Lisa’s blog and get the recipe – make Katherine’s brownies and watch her movies…a great night, in my opinion!! Enjoy!!
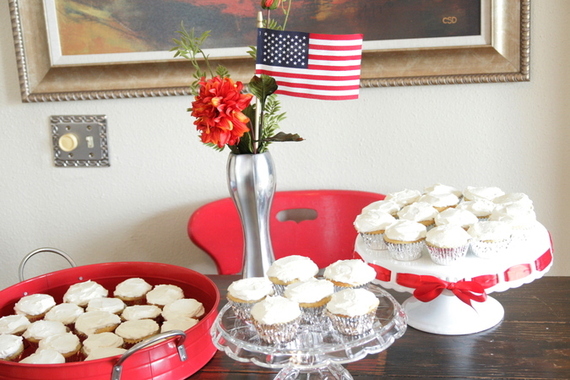
Yesterday we had a big family post-4th of July get-together at our house. My grandmother (Granna), my Aunt Josie and her family, my Uncle Alan and his family, my mom, dad, sister and nephew were all there. 16 people total. This was the first time for most of them to see our new house, so we were excited for them to come! I was especially excited for everyone to meet Izzy! Of course, she was (as always) the life of the party! Here’s Granna outside in our backyard getting acquainted little miss Izzy Bell…

(And yes, that is a dead hibiscus plant over there….I killed it a few weeks ago and now I’m trying to bring it back to life. We’ll see…)
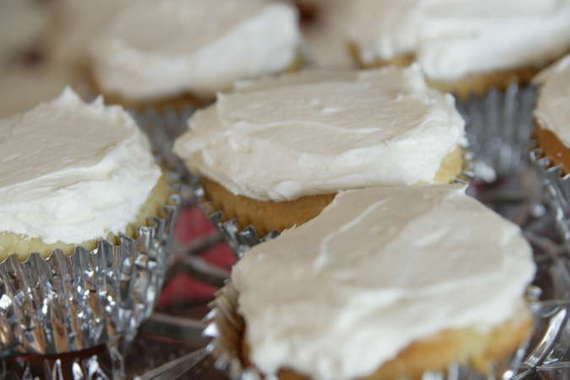
I thought this would be a perfect chance for me to try out my new Martha Stewart Cupcakes book – I picked the Yellow Buttermilk Cupcakes with Fluffy Vanilla Frosting and they were SO good! I think this might just be my new favorite cupcake. The cupcakes are light and moist and the frosting is to die for! Everyone really enjoyed them.
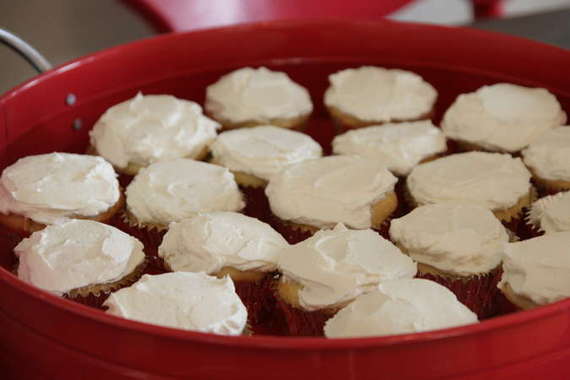
They were supposed to have cute little stars and stripes piped onto them, but we had a minor catastrophe just before everyone arrived (my pot wrack fell off of the wall, shattering my brand new ceramic measuring cups and making a HUGE mess that took forever to clean up!), so I didn’t exactly get a chance to do it. Oh well. They still tasted great. And who doesn’t love a plain ‘ol vanilla cupcake anyway, eh? Ok, so maybe it would’ve been cuter with the decorations….OH WELL!!
Yellow Buttermilk Cupcakes
-Martha Stewart Cupcakes
3 cups cake flour (not self-rising)
1 1/2 cups all-purpose flour
3/4 teaspoon baking soda
2 1/4 teaspoons baking powder
1 1/2 teaspoons coarse salt
1 cup plus 2 tablespoons (2 1/4 sticks) unsalted butter, room temperature
2 1/4 cups sugar
5 large whole eggs plus 3 egg yolks, room temperature
2 cups buttermilk, room temperature
2 teaspoons pure vanilla extract
Preheat oven to 350 degrees. Line standard muffin tins with paper liners. Sift together both flours, baking soda, baking powder, and salt.
With an electric mixer on medium-high speed, cream butter and sugar until pale and fluffy. Reduce speed to medium. Add whole eggs, one at a time, beating until each is incorporated, scraping down sides of bowl as needed. Add yolks, and beat until thoroughly combined. Reduce speed to low. Add flour mixture in three batches, alternating with two additions of buttermilk, and beating until combined after each. Beat in vanilla.
Divide batter evenly among lined cups, filling each three-quarters full. Bake, rotating tins halfway through, until cupcakes spring back when lightly touched and a cake tester inserted in centers comes out clean, about 20 minutes. Transfer tins to wire racks to cool 10 minutes; turn out cupcakes onto racks and let cool completely. Cupcakes can be stored overnight at room temperature, or frozen up to 2 months, in airtight containers.
Fluffy Vanilla Frosting
-Martha Stewart Cupcakes
1 1/2 cups (3 sticks) unsalted butter, room temperature
1 pound (4 cups) confectioners’ sugar, sifted
1/2 teaspoon pure vanilla extract
With an electric mixer, beat butter on medium-high speed until pale and creamy, about 2 minutes.
Reduce speed to medium. Add the confectioners’ sugar, 1/2 cup at a time, beating well after each addition and scraping down sides of bowl as needed; after every two additions, raise speed to high and beat 10 seconds to aerate frosting, then return to medium-high. This process should take about 5 minutes. Frosting will be very pale and fluffy.
Add vanilla, and beat until frosting is smooth. If not using immediately, frosting can be refrigerated up to 10 days in an airtight container. Before using, bring to room temperature, and beat on low speed until smooth again, about 5 minutes.
I think everyone had a great time (especially the kids who spent almost the entire time out in the pool!), and I loved making these great cupcakes and having everyone over for a great 4th of July get-together! I hope everybody had a great holiday weekend with friends and family!
If you’ve happened to look over to the right on my side bar, you’ll have noticed there’s a new badge – a cute little “You Want Pies With That?” badge! I’m so excited to be a part of a new online baking group! Very similar to Tuesdays with Dorie, except this is once a month, and it’s all about pie! I love pie. I mean really love pie. Did you ever see that movie Waitress, with Kerri Russell? Well, that’s what this group is based off of – Kerri Russell’s character makes up all kinds of amazing pies all the time, and so that’s what we do, too! Once a month, somebody picks a theme – like, this month’s theme is “Taste of Summer” – and then we all create our own ingenious pie based on that! How fun!! Here’s the site where you can go and look at all the amazing pies everyone has created.
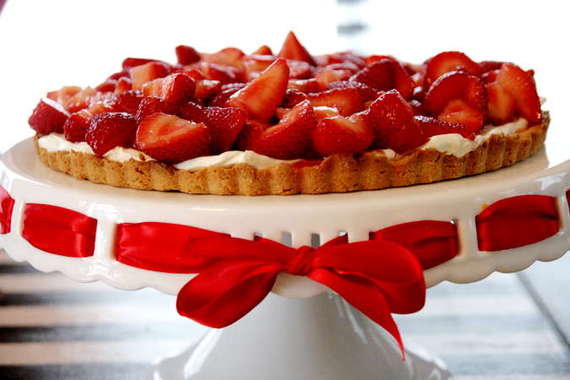
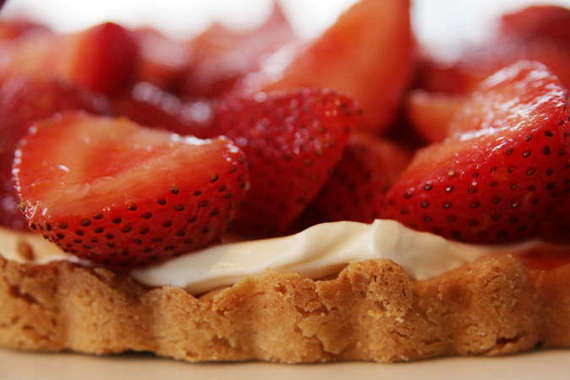
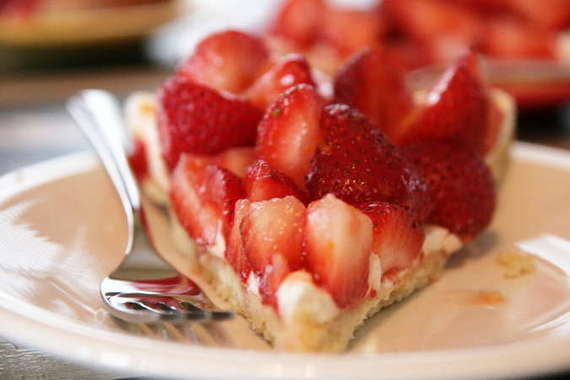
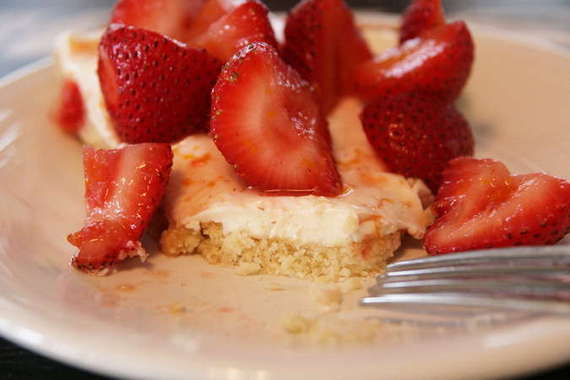
And here’s my “pie”. “Boozy Summer Strawberry Tart”. This was actually inspired by my hubby’s Aunt Judy – she suggested I toss strawberries with a little Amaretto Liqueur (YUM!); but I took it a little further and used a little splash of Grand Marnier, some orange zest and a squeeze of fresh orange juice; spread a cream cheese mixture over Dorie Greenspan’s Sweet Tart Crust, and topped it all off with the strawberries. I was a little worried since I was completely flying by the seat of my pants, but this ended up being one fantastic tart!
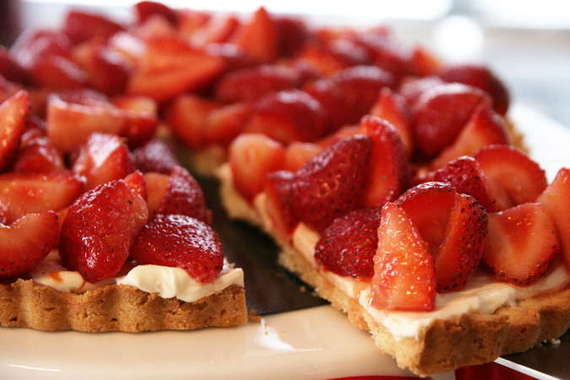
My good friend and fellow opera singer Amanda was visiting that day, so I decided to use her as my guinea pig. She absolutely loved the tart – she said it reminded her of something she ate once in Europe in a professional pastry shop (Yippee!). She thought it was the perfect summer dessert. Hubby and I both loved it too – so light and creamy and fresh. The Grand Marnier really gave the strawberries a fantastic flavor. This is definitely going to be a go-to dessert from now on! I’m so proud – my first ever, entirely made up dessert was a success! I am SO excited to be a part of this fun little group and can’t WAIT to see what fun kinds of pies lie ahead!
Boozy Summer Strawberry Tart
For the berries and cream cheese mixture:
2 regular sized containers fresh strawberries
1-2 tablespoons Grand Marnier Liqueur
1 8-oz package cream cheese, at room temperature
1 heaping tablespoon sour cream
1 teaspoon vanilla extract
1 tablespoon plus 1/2 tablespoon sugar (one tablespoon for the berries, and 1/2 tablespoon for the cream cheese mixture)
zest of half an orange
squeeze of fresh orange juice
Hull and cut the strawberries in half, length-wise and place in a large bowl with Grand Marnier, orange zest, juice and 1 tablespoon of the sugar. Toss to coat all the berries, then cover and place in the refrigerator for at least 1 hour (I left mine in for about 3 hours).
To make the cream cheese mixture, place the softened cream cheese in the bowl of a stand mixer (you can do all this with a hand mixer) and beat at medium speed until the cream cheese is smooth. Add in the sour cream, vanilla and sugar and continue to beat on medium-low speed until everything is mixed in and smooth. Refrigerate until needed.
For the tart crust:
1 1/2 cups all-purpose flour
1/2 cup confectioner’s sugar (powdered sugar)
1/4 tsp. salt
1 stick plus 1 tablespoon (9 tablespoons) very cold (or frozen) unsalted butter, cut into small pieces
1 large egg yolk
Put the flour, confectioners’ sugar and salt in a food processor and pulse a couple of times to combine. Scatter the pieces of butter over the dry ingredients and pulse until the butter is coarsely cut in–you should have some pieces the size of oatmeal flakes and some the size of peas. Stir the yolk, just to break it up, and add it a little at a time, pulsing after each addition. When the egg is in, process in long pulses–about 10 seconds each–until the dough, whisk will look granular soon after the egg is added, forms clumps and curds.
Turn the dough out onto a work surface and , very lightly and sparingly, knead the dough just to incorporate any dry ingredients that might have escaped mixing. Butter a 9-inch fluted tart pan with a removable bottom. Press the dough evenly over the bottom and up the sides of the pan, using all but one little piece of dough, which you should save in the refrigerator to patch any cracks after the crust is baked. Don’t be too heavy-handed–press the crust in so that the edges of the pieces cling to one another, but not so hard that the crust loses its crumbly texture. Freeze the crust for at least 30 minutes, preferably longer, before baking. Center a rack in the oven and preheat the oven to 375 degrees F.
Butter the shiny side of a piece of aluminum foil and fit the foil, buttered side down, tightly against the crust. (Since you froze the crust, you can bake it without weights.) Put the tart pan on a baking sheet to bake the crust for 25 minutes. Carefully remove the foil. If the crust has puffed, press it down gently with the back of a spoon. For a partially baked crust, patch the crust if necessary, then transfer the crust to a coking rack (keep it in is pan). To fully bake the crust: Bake for another 8 minutes or so, or until it is firm and golden brown. (Keep a close eye on the crust’s progress–it can go from golden to way too dark in a flash). Transfer the tart pan to a rack and cool the crust to room temperature before filling.
To Assemble:
Spread the cream cheese mixture evenly on the tart crust. Add the strawberries on top. Serve immediately and enjoy!
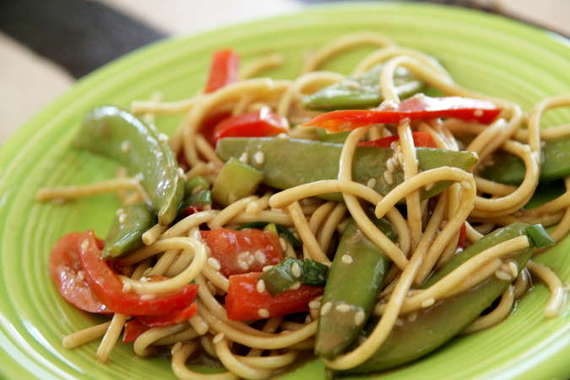
Who wants to turn their oven on when it’s this hot outside? I don’t know about you, but I certainly don’t want to be cooking a pot roast when it’s 100 degrees outside! After a long, hot day of running errands, yard work and cleaning house, all I want for dinner is something cool and refreshing – not warm and gooey. Don’t get me wrong- I love a nice, warm tuna casserole as much as the next guy, but definitely not in the summer. That’s why this salad is particularly nice. Cold, crisp, light – everything a summer salad should be!
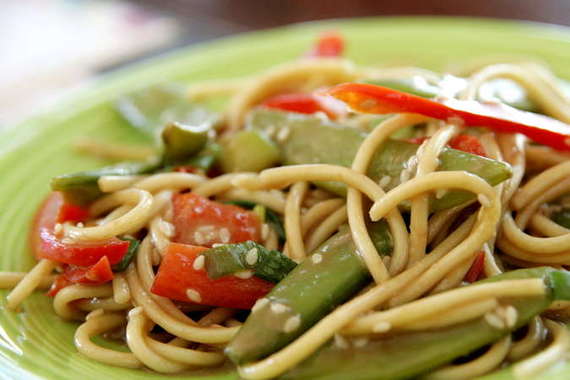
I made this for a Father’s Day picnic with my parents. We went to an outside concert where you could take a blanket and a picnic and just spread out and listen to good music. So much fun! My mother brought cucumber sandwiches, cantaloupe, watermelon, cheese and crackers and summer sausage, and I brought this salad along with some chocolate cupcakes and pink lemonade – what a great meal! We all really enjoyed the salad – it was absolutely perfect for a picnic! I really loved the crunch of the vegetables – so refreshing! This is a dish I will most definitely be making again and again – it’s great because it gets better the longer it sits. I made it the night before and it was perfect the next day. This is an ideal summer salad – a definite keeper!
Crunchy Noodle Salad
-Barefoot Contessa
Kosher salt
1/2 pound thin spaghetti
1 pound sugar snap peas
1 cup vegetable oil
1/4 cup rice wine vinegar
1/3 cup soy sauce
3 tablespoons dark sesame oil
1 tablespoon honey
2 garlic cloves, minced
1 teaspoon grated fresh ginger
3 tablespoons toasted white sesame seeds, divided
1/2 cup smooth peanut butter
2 red bell peppers, cored and seeded, and thinly sliced
4 scallions (white and green parts), sliced diagonally
Bring a large pot of salted water to a boil. Add the spaghetti and cook according to package directions. Drain and set aside.
Meanwhile, bring another large pot of salted water to a boil, add the sugar snap peas, return to a boil, and cook for 3 to 5 minutes, until crisp tender. Lift the sugar snap peas from the water with a slotted spoon and immerse them in a bowl of ice water. Drain.
For the dressing, whisk together the vegetable oil, rice wine vinegar, soy sauce, sesame oil, honey, garlic, ginger, 2 tablespoons sesame seeds and peanut butter in a medium bowl.
Combine the spaghetti, sugar snap peas, peppers and scallions in a large bowl. Pour the dressing over the spaghetti mixture. Add the remaining 1 tablespoon of sesame seeds and the parsley and toss together.


