Happy November!!! I hope everybody had a fun, safe Halloween and lots of yummy snacks and candy were eaten! I’d be lying if I said I didn’t have a leftover bag of Reese’s minis sitting on my nightstand just waiting for me. 😉
But now the fun of Halloween is over and it’s time to start thinking about Thanksgiving! Yippee! In fact, it was a Thanksgiving side dish that inspired me for this soup- mashed sweet potatoes with brown sugar, butter, a splash of orange juice and a sprinkling of pecans. I had four very large sweet potatoes I wanted to use and the idea of soup just popped into my head. I made it just like I make my mashed sweet potatoes at Thanksgiving, except I pureed the whole thing until I had a silky smooth, creamy soup, just perfect for a chilly fall evening. This came together so quickly and easily, and it made a pretty big pot of soup, so we had delicious leftovers to look forward to! I’d even recommend this for a Thanksgiving soup course; it really is a breeze to throw together and it’s easily customizable – you can add any number of seasonings or toppings to suit your tastes!

Sweet Potato Soup
4 large sweet potatoes, peeled and roughly chopped into chunks
2 cups chicken broth
2 cups water
salt
pepper
2 tablespoons butter
1/3-1/2 cup brown sugar (depending on how sweet you want it)
splash orange juice
1/8 teaspoon cayenne pepper
In a large pot, bring the sweet potatoes, chicken broth and water to a boil; cook for approximately 20-30 minutes, until the sweet potatoes are very soft. Using an immersion blender (or a regular blender in 2 or 3 batches), puree the soup until very smooth and no lumps remain. Add the salt, pepper, butter, brown sugar, orange juice and cayenne pepper. Check for seasoning. Garnish with chopped toasted pecans, if desired. Serves 4-6.
Recipe source: Sing For Your Supper original

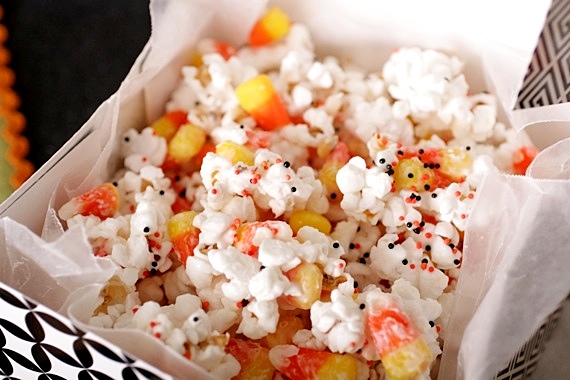
During the Halloween season, there’s nothing better than being snuggled up on the couch, watching Halloween movies and eating fun snacks (well, unless you’re a kid, in which case trick-or-treating is pretty hard to beat!). We make it a tradition every year to watch our favorite Halloween movies- Disney’s Icabod Crane (the cute animated version with Bing Crosby narrating), Hocus Pocus, Young Frankenstein, It’s the Great Pumpkin, Charlie Brown and of course, my all-time favorite- The Nightmare Before Christmas (ok, so I watch that one pretty much year ’round…). And watching those great movies just wouldn’t be the same without some kind of yummy snack; like this popcorn. It’s just a simple mixture of popcorn and candy corn coated in white chocolate bark and Halloween sprinkles. Nothing hard or complicated, just fun and downright yummy! Perfect for parties, trick-or-treaters or movie-watching! Whatever you make to snack on this Halloween, I hope you have a wonderful, FUN, safe time with your friends and family! Happy Halloween!!!

Halloween Popcorn
2 bags microwave popcorn, popped
1 bag candy corn
1 16-ounce package white chocolate bark*
Halloween sprinkles
wax paper
Place the popped popcorn and candy corn in a very large bowl (you need plenty of room to stir the popcorn). Melt the white chocolate bark in the microwave in 30 second increments, stirring after each time, until melted. Drizzle over the popcorn and candy corn and stir to coat each piece of popcorn. Pour the mixture over wax paper and spread into an even layer. Sprinkle with Halloween sprinkles and allow to cool for at least 15-30 minutes. Break into pieces. Serves 6-8.
*I know I’ll get questions about this: white chocolate bark (or white chocolate candy coating) can be found in your regular grocery store on the baking aisle with the chocolate chips and nuts.
Recipe source: Sing For Your Supper original (however, this isn’t exactly a new concept- I’m sure it’s been done many times before me)

I realized I haven’t really been keeping you in the loop lately. There has been so much going on in our lives lately and I haven’t really mentioned any of it on my blog. Nothing important, really, just lots of random things that we’ve been super busy and preoccupied with. So, I thought it might be fun to give you a peek into our lives as of now…just a few pictures taken with my phone camera to capture fun moments in our lives right now. Enjoy!

First up, our new front door and steps. This is just a small chunk of our mega-renovations; we’re having new carpet and floors installed and new paint on the walls throughout the whole house! What an ordeal! Our old brick steps were a death trap and quite frankly- pretty unattractive to look at, so we had some brand new concrete steps put in (and I actually have room for a welcome mat now!). We’re so happy with the way it turned out! Now if we could just get the rest of the house done….

We bought these initials for the baby’s room this past weekend and I loooove them! I wonder what they could stand for….. 😉

This past Monday, Joel’s parents took us to game 5 of the World Series! Go Rangers! (*Notice the giant pile of nachos and a jumbo dog sitting in my lap…ballpark food is a pregnant lady’s best friend!)

We’ve been slowly gathering cute little outfits and knick-knacks for the baby; I’ve found SO many cute things already! I just couldn’t resist this one… 😉

Last night Joel and I carved pumpkins- I love this tradition! Mine is Jack Skellington and Joel’s is a USB symbol (yeah, I married a nerd…)

And of course Izzy was there in her snazzy Halloween PJs. This girl loves to show off in a cute outfit! 🙂

27 weeks pregnant! Can you believe how the time is flying?! I’m just finishing up my second trimester and still feeling great (if not just a teensy bit hormonal…)! This baby girl is a KICKER and we love feeling (and sometimes seeing!) her sweet little kicks every evening. It’s something I never seem to get tired of (I’m sure by the time she starts playing kickball with my internal organs I might feel a little differently…). Things are slowly coming together- the furniture for the nursery arrived today and this weekend will be our first baby shower! I’m so excited I can’t stand it! This is such an exciting time in our lives and I’m so happy I could share some of it with you all! 🙂
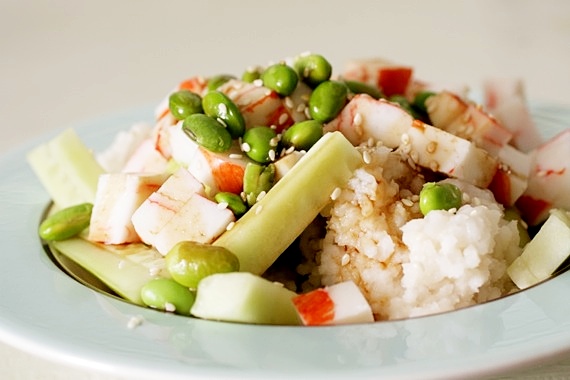
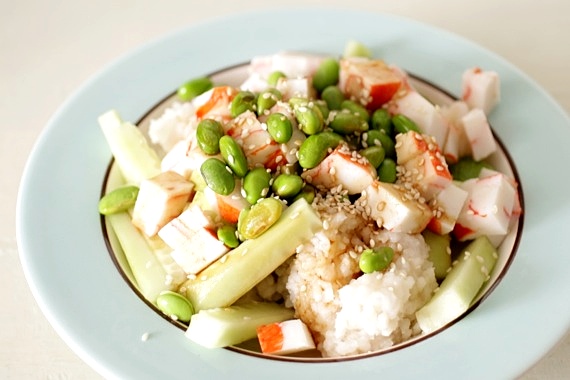
You all know how much we enjoy sushi, and even though Joel and I found making sushi at home to be extremely easy, we opt for a slightly easier version every now and then. Like these sushi bowls. It’s the most ingenious idea ever and SO easy! Gather up all your favorite sushi fixin’s, pile it in a bowl and voilà– sushi bowl awesomeness! We used cucumbers, imitation crab meat, avocado, shelled edamame and our favorite spicy sauce- the mayo/sriracha sauce; and BOY did we love this! If you’re searching for a quick, delicious weeknight dinner, I highly suggest making these; for one thing, it’s a heck of a lot cheaper than going out for sushi and it’s ready in no time! Perfect!
Sushi Bowls
1⅓ cups rice, rinsed well
1⅓ cups water
3 teaspoons rice vinegar
2 teaspoons sugar
1 cucumber, peeled and cut into sticks
imitation crab meat (as much as you like), cut into sticks
1 avocado, sliced and cut into chunks
shelled, steamed edamame (as much as you like; you can find pre-shelled edamame in the freezer section of most grocery stores)
1/4 cup sesame seeds, toasted
1/4 cup mayonnaise
1/2-1 teaspoon sriracha hot sauce, depending on how spicy you like it
soy sauce and wasabi for serving
Rinse the rice. Place the rice and water in a medium saucepan and bring to a boil over high heat, uncovered. Once it begins to boil, reduce the heat to the lowest setting and cover. Cook for 15 minutes. Remove from the heat and let stand, covered, for 10 minutes.
Combine the rice vinegar and sugar in a separate small bowl and heat in the microwave on high for 30 to 45 seconds, until the sugar dissolves. Transfer the rice into a large bowl and add the vinegar mixture. Fold and cut thoroughly to combine and coat each grain of rice with the mixture. Allow to cool. Do not refrigerate.
In a small bowl, combine the mayonnaise and sriracha; set aside.
Pile the rice, cucumber, crab meat, avocado and edamame in individual bowls and top with sesame seeds, soy sauce/wasabi (if desired) and sriracha mixture. Serves 4.
Recipe source: adapted from The Way the Cookie Crumbles

I guess this pregnancy has me really digging caramel, because I feel like I’ve been making lots of caramel-y treats lately even though I’m normally not a huge fan. Hey, there are worse things to crave! Last week I had a whole afternoon to myself and thought I’d try my hand at homemade caramel corn. I’ve made it once before, but with my mom’s help (in fact, I believe it was during the Halloween season and we munched on our homemade caramel corn while watching Halloween movies!) and lucky for me, she wrote the recipe down for me! Yay! So I got in the kitchen and whipped up this delicious caramel corn- man, oh MAN! What a TREAT! This was rich, buttery and most importantly, good ‘n crunchy! I took a big bag to work and none of us could stop munching on it! I will most definitely be making this again; probably on Halloween, in fact. A perfect snack to munch on while watching Hocus Pocus! 🙂

Caramel Corn
6 quarts popped corn (3 bags microwave popcorn- I used Tender White)
2 cups brown sugar
1 cup (2 sticks) butter
1/2 cup light corn syrup
1 teaspoon salt
1 teaspoon vanilla
1 teaspoon baking soda
Preheat oven to 250 degrees. Cook brown sugar, butter, corn syrup and salt in a large saucepan over medium-high heat. Bring to a boil and cook for 5 minutes, stirring constantly. Remove from heat and stir in baking soda and vanilla. Pour over popcorn and stir to coat. Place popcorn in a large roasting pan or spread out over two baking sheets lined with greased foil. Bake, stirring every 15 minutes for about 45 minutes. Caramel corn will be crunchy (with no sogginess) when done. Let cool and break into pieces. Makes enough to serve a large crowd- approximately 10-12 people.
Recipe source: my mom

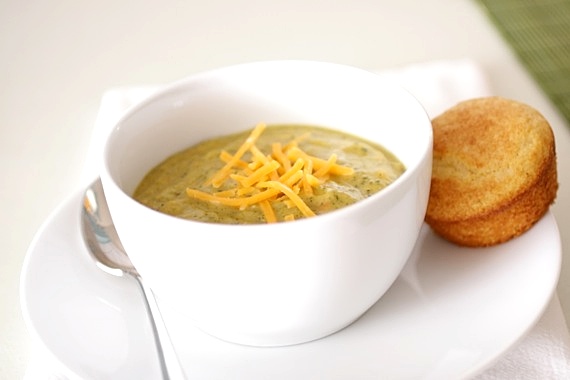
Guess what time it is??? It’s SOUP season!! YAY! This morning we woke up to a crisp, chilly morning, and for the first time all season, I don’t need my air conditioner running! That’s definitely something to celebrate (especially considering it was 90 degrees yesterday! Ugh!); so I’ll start today by posting my first soup recipe of the season (yippee!), then busting out my long sleeved shirts and sweaters, and baking some delicious pumpkin bread. Sounds like a heavenly day to me!
Now about this soup. I’m a HUGE fan of broccoli cheese soup. Love it. However, for some reason, I’ve never made my own. A few nights ago, I decided I had waited long enough and set out to make a big pot. This soup is not only cheesy, but rich, creamy and full of hearty broccoli flavor. We loved it! I think you will too! Now, some of you will remember that I am, indeed, lactose-intolerant, so I paid dearly for eating two bowls of this delicious soup (even with my magic enzyme pills), but honestly, it was worth it. However, I won’t be making that mistake again in the near future… 😉

Broccoli Cheese Soup
2 tablespoons butter
2 pounds broccoli, cut into small pieces; stalks peeled and cut into small chunks
3 carrots, shredded
1 medium onion, chopped
1 teaspoon dry mustard
salt and pepper
1 cup water
1/4 teaspoon baking soda
2 cups chicken broth
3/4 cup Velveeta cheese, cut into cubes
3/4 cup shredded cheddar cheese
1 cup milk
In a large pot or dutch oven, heat butter over medium high heat. Add broccoli, onion, carrots, mustard and salt and pepper. Stir frequently and cook until fragrant, about 6 minutes. Add water, chicken broth and baking soda and bring to a simmer. Cook until broccoli is very soft, about 20 minutes.
Add milk and cheeses and stir until all the cheese is melted. Using an immersion blender (or transfer the soup to a regular blender and blend in two batches), blend the soup until smooth. Check for seasoning and add salt and pepper as needed. Serves 6-8.
Recipe source: heavily adapted from Cook’s Illustrated, March/April 2011
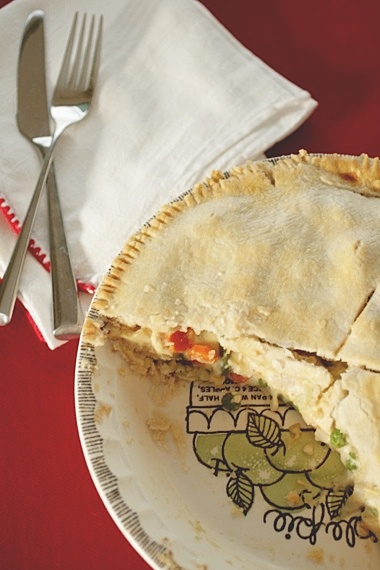
This picture doesn’t really do this chicken pot pie justice, but I was losing daylight fast and had to snap a quick picture before the whole thing disappeared! We LOVE chicken pot pie. It’s one of those great comfort foods that seem to make a hard day just melt away. I love the creamy white sauce with the juicy chicken and tender vegetables- an absolute winner! I’ve been making this exact recipe for 5 years now and it never, ever disappoints. I normally use store-bought pie crusts because it saves time, but you could absolutely make your own and be totally authentic. 🙂
So, the next time you’re tempted to throw one of those frozen numbers in the microwave- consider making yourself a gorgeous homemade chicken pot pie instead. You’ll be SO glad you did!
Chicken Pot Pie
2 large bone-in, skin-on chicken breasts
1 cup sliced carrots
1 cup frozen green peas
1/2 cup frozen green beans
2 medium Yukon Gold potatoes, cut into chunks
1/3 cup butter
1/3 cup chopped onion
1/3 cup all-purpose flour
1/2 teaspoon salt
1/4 teaspoon black pepper
1 3/4 cups chicken broth
2/3 cup milk
2 (9 inch) unbaked pie crusts
Preheat oven to 400 degrees. In a medium pot, cover chicken with water and boil for 30-45 minutes, until tender. Remove bones and skin and shred chicken with two forks and set aside. In a saucepan, combine chicken, carrots, peas, green beans and potatoes. Add water to cover and boil for 15 minutes. Remove from heat, drain and add to shredded chicken.
In a saucepan over medium heat, cook onions in butter until soft and translucent. Stir in flour, salt and pepper. SLOWLY whisk in chicken broth and milk. Simmer over medium-low heat until thick. Remove from heat and set aside.
Press bottom crust into a pie dish and place the chicken mixture in the crust (depending on how deep your pie dish is, you may have a little extra filling- just be sure not to overfill). Pour white sauce over. Cover with top crust, seal edges, and cut away excess dough. Make several small slits in the top to allow steam to escape.
Bake in the preheated oven for 30 to 35 minutes, or until pastry is golden brown and filling is bubbly. Cool for 10 minutes before serving.
Recipe source: adapted from allrecipes.com
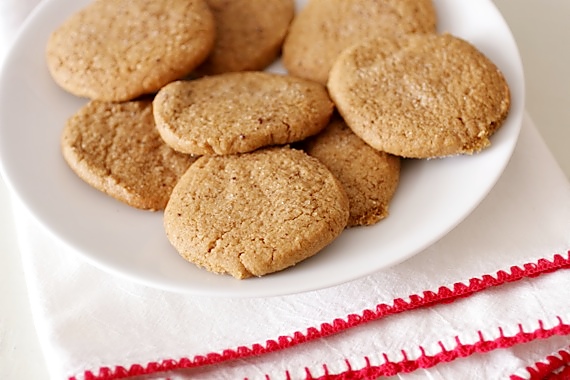
While visiting my Nana a couple of weeks ago, I was flipping through a Better Homes and Gardens cookbook that had come with one of her latest magazines. It was nothing but cookies, so of course I was finding recipes left and right I wanted to try. The first one to catch my eye was one for sugar and spice espresso cookies. Sounds great, right? Well, they really are! I came home and immediately baked up a batch of these cookies! The verdict: we loved them (even Joel, who isn’t crazy about coffee!)! Just a teensy bit chewy with a good amount of crunch and the coffee flavor is nicely complimented by the cinnamon. They tasted like cinnamon coffee, which happens to be one of my favorite fall treats. I loved the way my house smelled while these were baking, too! I marked the recipe with a little star and put it in my recipe box, which means I’ll definitely be making these over and over again!
Sugar and Spice Espresso Cookies
2 tablespoons, plus 1 teaspoon instant espresso powder
1 tablespoon hot water
1/2 cup (1 stick) butter, softened
1/4 cup shortening
1 1/4 cups sugar
1/2 cup packed brown sugar
1 teaspoon baking powder
1 teaspoon ground cinnamon
1/2 teaspoon salt
1 egg
1 teaspoon vanilla
2 cups flour
In a small bowl, combine the 2 tablespoons espresso powder and water, stirring until coffee powder is dissolved. Set aside.
In the bowl of a mixer fitted with the paddle attachment (or using a hand mixer), combine the butter and shortening; beat for 30 seconds. Add 1 cup of the granulated sugar, the brown sugar, baking powder, cinnamon, and salt. Beat until combined, scraping down the sides of the bowl occasionally. Beat in the egg, vanilla and coffee mixture. Slowly add the flour a little at a time until fully incorporated.
Divide the dough into thirds. Shape each portion into a 7-inch log. Wrap each log in plastic wrap and chill about 2 hours or until dough is firm enough to slice.
Preheat oven to 375 degrees. Cut logs into 3/8-inch slices. Place slices 2 inches apart on a cookie sheet lined with parchment paper. In a small bowl, stir together the remaining 1/4 cup sugar and 1 teaspoon espresso powder; sprinkle over slices. Bake for 9-10 minutes or until edges are golden brown. Makes approximately 48 cookies.
Recipe source: Better Homes and Gardens Best Ever Cookies recipe book


Fightin’ Texas Aggie Football is in full swing, so naturally we’re watching every single game on tv (the ones we don’t go to in person). I don’t know about you, but I need something yummy to snack on while I watch a football game, otherwise I get….bored. In fact, usually once the food is gone I pretty much lose interest in any sporting event. I know…I guess that makes me what Joel calls a “2 percent-er”. Oh well. A few weeks ago when we were enjoying one of the (few) particularly good Aggie games on tv, I whipped up this cheesy pepperoni bread and BOY did we gobble it down! It’s perfect football food! I used a store-bought can of bread dough, so it really saved a ton of time and came together lightening quick. We loved it dipped in marinara sauce- overall, a totally yummy snack that I’m sure I’ll be making over and over again every football season!

Cheesy Pepperoni Bread
1 can store-bought Pillsbury Italian or French bread (you could absolutely make your own dough- I was just short on time)
1 cup shredded mozzarella cheese
sliced pepperoni
marinara sauce for dipping
Preheat oven to 350 degrees. Unroll the bread dough so that it makes a large rectangle. Sprinkle generously with the mozzarella cheese, then top with desired amount of pepperoni. Carefully roll the dough jellyroll style into a loaf and place seam side down on a baking sheet lined with parchment paper or foil. Bake 18-20 minutes, or until the top is golden brown.
Recipe source: adapted from Brown Eyed Baker

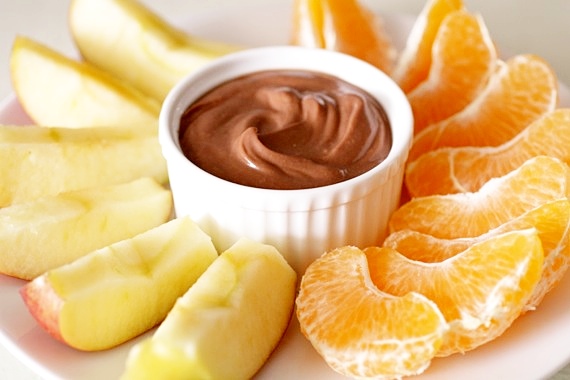
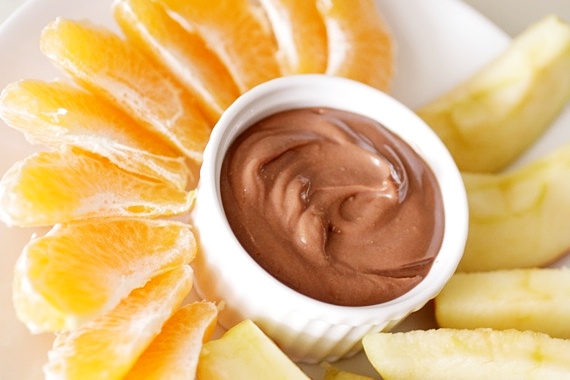
I’m sure by now, you’ve all heard about the awesomeness of Pinterest. If you haven’t, get over there right now and discover for yourself how addicting and fun it is! I’ve discovered more fantastic ideas for recipes, decorating, baby stuff, and so much more from there! Among them, this nutella yogurt fruit dip. 2 ingredients. How awesome is that?! I try to eat as much fruit as possible and after discovering this dip, it’s a breeze! If you’re looking for a healthier way to get your kids eating more fruit, definitely try this- it comes together in 5 seconds and it’s really delicious! Your family will love it!
Nutella Yogurt Fruit Dip
1 cup plain, nonfat Greek yogurt
1/2 cup nutella
Mix the two ingredients in a bowl and chill until ready to serve. Serve with any fruit you like- my favorites are apples and oranges. Serves 4-6.
Recipe source: The Family Kitchen
